Description
This Vegan Royal Icing recipe provides a delightful, plant-based alternative to traditional royal icing using aquafaba for a perfectly smooth and glossy texture. Ideal for decorating cookies, this versatile icing can be adjusted from thick outlining consistency to a thinner flooding consistency by modifying the liquid-to-sugar ratio. Naturally vegan and easy to whip up in minutes, it allows for custom coloring and flavoring, making your cookie decorations vibrant and tasty while avoiding animal products.
Ingredients
Scale
Main Ingredients
- 60 g aquafaba (chickpea water, see notes)
- 400 g powdered sugar (confectioner’s/icing sugar), organic if available
- 1 tablespoon lemon juice (or orange juice)
Optional Additions
- Natural food colors (powdered or liquid)
- Natural flavor extracts or oils (e.g., vanilla, almond)
Instructions
- Prepare Aquafaba: In a clean mixing bowl or stand mixer fitted with a whisk attachment, whisk the aquafaba for about 2 minutes until it becomes foamy. This aeration is essential to achieve the right texture for the icing.
- Add Sugar Gradually: Sift the powdered sugar in four increments into the foamy aquafaba, whisking thoroughly between each addition. Continue whisking until the mixture turns glossy and smooth.
- Incorporate Lemon Juice: Add 1 tablespoon of lemon juice to the mixture and whisk again to combine, which will help stabilize the icing and add a slight tang.
- Adjust Consistency: For outlining cookies, keep the icing thick enough to hold its shape without collapsing. For flooding (covering the whole cookie), thin the icing by adding small amounts of extra aquafaba or liquid colors until it reaches a runnier consistency. Note that runnier icing takes longer to dry.
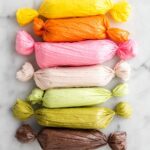
- Color and Flavor (Optional): Divide the icing into separate bowls if you want different colors or flavors. Add natural color powders or liquid food colors carefully, and incorporate any flavor extracts, mixing until evenly combined.
- Decorate Cookies: Fill a piping bag and snip the tip to create an opening sized according to how fine or thick your decorating lines need to be. Pipe outlines on the cookies and allow to dry for about an hour before flooding the centers with a thinner icing if desired. Let the decorated cookies dry for a couple of hours until the icing is dry to the touch.
- Storage: Seal any remaining icing in an airtight piping bag and store it in the refrigerator for up to 2 weeks. Keep it protected from air exposure to prevent it from drying out and hardening prematurely.
Notes
- The aquafaba used in this recipe is the liquid from canned chickpeas; it serves as an excellent egg white substitute for vegan baking and icing.
- You can thin the icing by adding more aquafaba or liquid colors, but thinner consistencies will require longer drying times.
- When using powdered colors, you may need to adjust the liquid added to achieve the perfect consistency.
- This icing is suitable for outlining and flooding cookies for detailed decorative effects.
- Store icing in a sealed bag to maintain moisture and usability.