Description
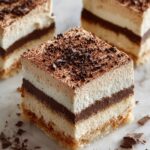
This No-Bake Earl Grey Infused Slice is a delightful and elegant dessert featuring a crunchy digestive biscuit base topped with a creamy Earl Grey tea-infused mousse and a smooth dark chocolate layer. Perfect for tea lovers, this slice combines aromatic bergamot-flavored tea with rich cream cheese and chocolate for a sophisticated treat that requires no baking and is easy to prepare.
Ingredients
Scale
Base
- 1 1/2 cups digestive biscuits (or any plain biscuits), crushed
- 1/4 cup unsalted butter, melted
- 2 tbsp sugar (optional)
Filling
- 1 cup heavy cream
- 2 Earl Grey tea bags (or 2 tbsp loose leaf Earl Grey tea)
- 8 oz cream cheese, softened
- 1/4 cup powdered sugar
- 1/2 tsp vanilla extract
- 1/4 tsp sea salt
Chocolate Topping
- 3/4 cup dark chocolate chips (or chopped dark chocolate)
- 2 tbsp coconut oil or butter
Instructions
- Prepare the Base: In a bowl, combine the crushed digestive biscuits and sugar if using. Pour in the melted butter and mix thoroughly until the biscuit crumbs are evenly coated and the mixture holds together well.
- Press the Base into the Pan: Line an 8×8-inch square or rectangular pan with parchment paper. Firmly press the biscuit mixture into the base to form a compact, even layer. Chill in the refrigerator while you prepare the filling.
- Infuse the Tea into the Cream: Heat the heavy cream gently over low heat in a small saucepan. Add the Earl Grey tea bags or loose tea to the cream and let steep for 5-7 minutes, stirring occasionally to extract flavors. Remove the tea bags or strain out loose tea leaves. Allow the cream to cool slightly.
- Make the Mousse Filling: In a large mixing bowl, beat the softened cream cheese with powdered sugar, vanilla extract, and sea salt until smooth, creamy, and free of lumps.
- Combine the Tea-Infused Cream with the Cream Cheese: Gradually add the slightly cooled tea-infused cream to the cream cheese mixture, beating continuously until fully combined and the mixture has a smooth, mousse-like consistency.
- Assemble the Slice: Pour and spread the Earl Grey-infused cream cheese mixture evenly over the chilled biscuit base, smoothing the surface with a spatula for a neat finish.
- Make the Chocolate Topping: Melt the dark chocolate chips and coconut oil or butter together in a small saucepan over low heat or carefully in the microwave, stirring until smooth and glossy.
- Top the Slice with Chocolate: Drizzle the melted chocolate over the Earl Grey filling and use a spatula to spread it evenly across the top layer.
- Chill: Place the assembled slice in the refrigerator and chill for at least 3-4 hours, or until the filling is firm and the chocolate layer has set completely.
- Serve: Once the slice is fully set, cut into 16 squares or bars and enjoy the creamy, aromatic Earl Grey-infused dessert with a crunchy base and rich chocolate topping.
Notes
- If you prefer a sweeter base, adding 2 tablespoons of sugar to the biscuit crumbs helps balance the flavors.
- Allow the tea-infused cream to cool before mixing with cream cheese to avoid curdling.
- You can substitute digestive biscuits with graham crackers or any plain cookie if preferred.
- Use high-quality dark chocolate for the topping for the best flavor and texture.
- This dessert is best kept refrigerated and consumed within 3-4 days for optimal freshness.
- For added texture, you can sprinkle finely chopped nuts over the biscuit base before adding the mousse layer.