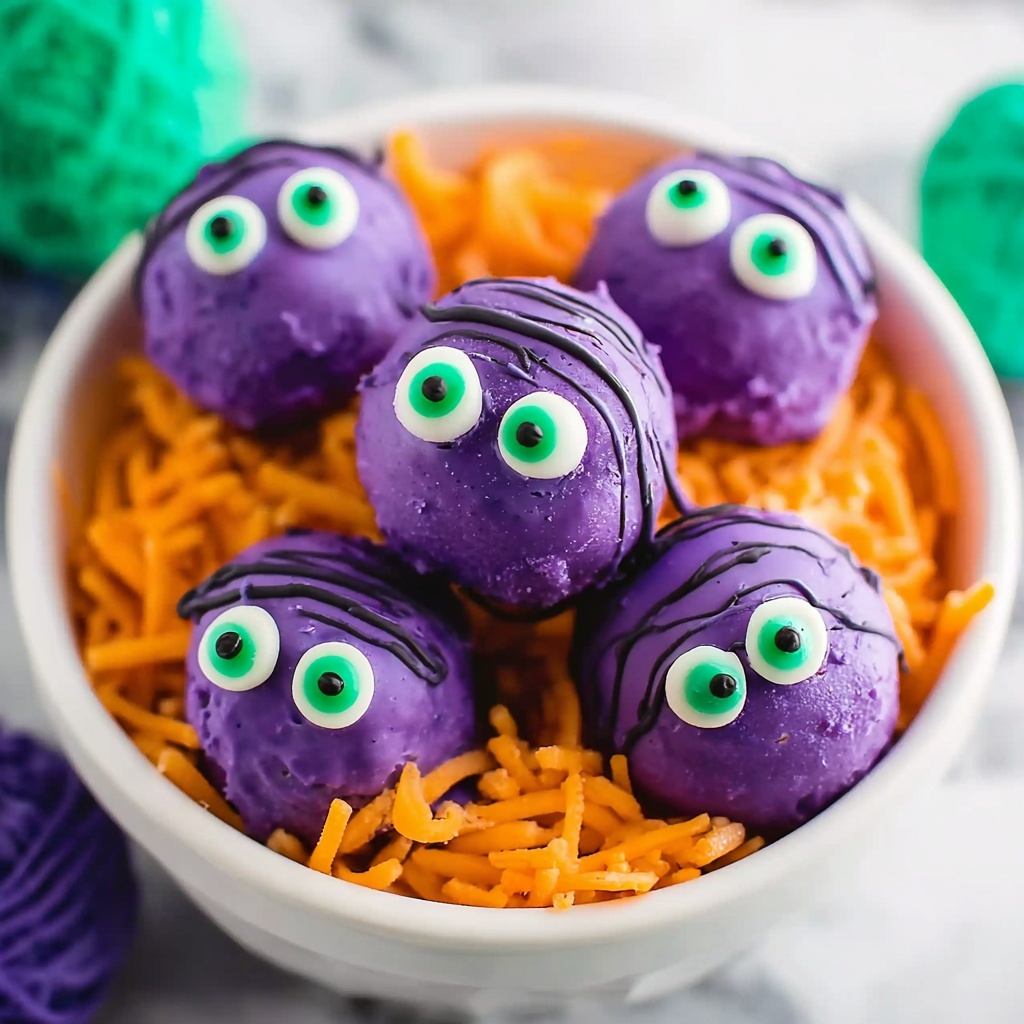
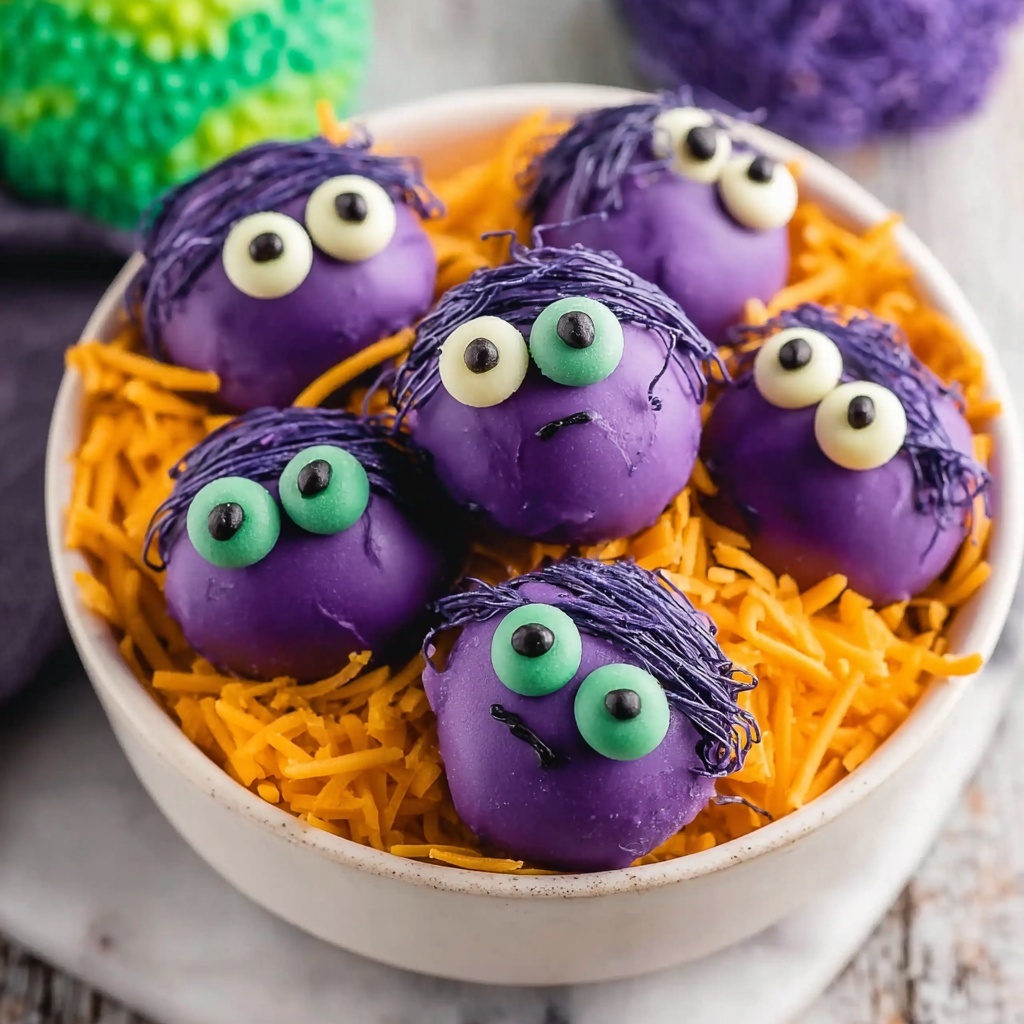
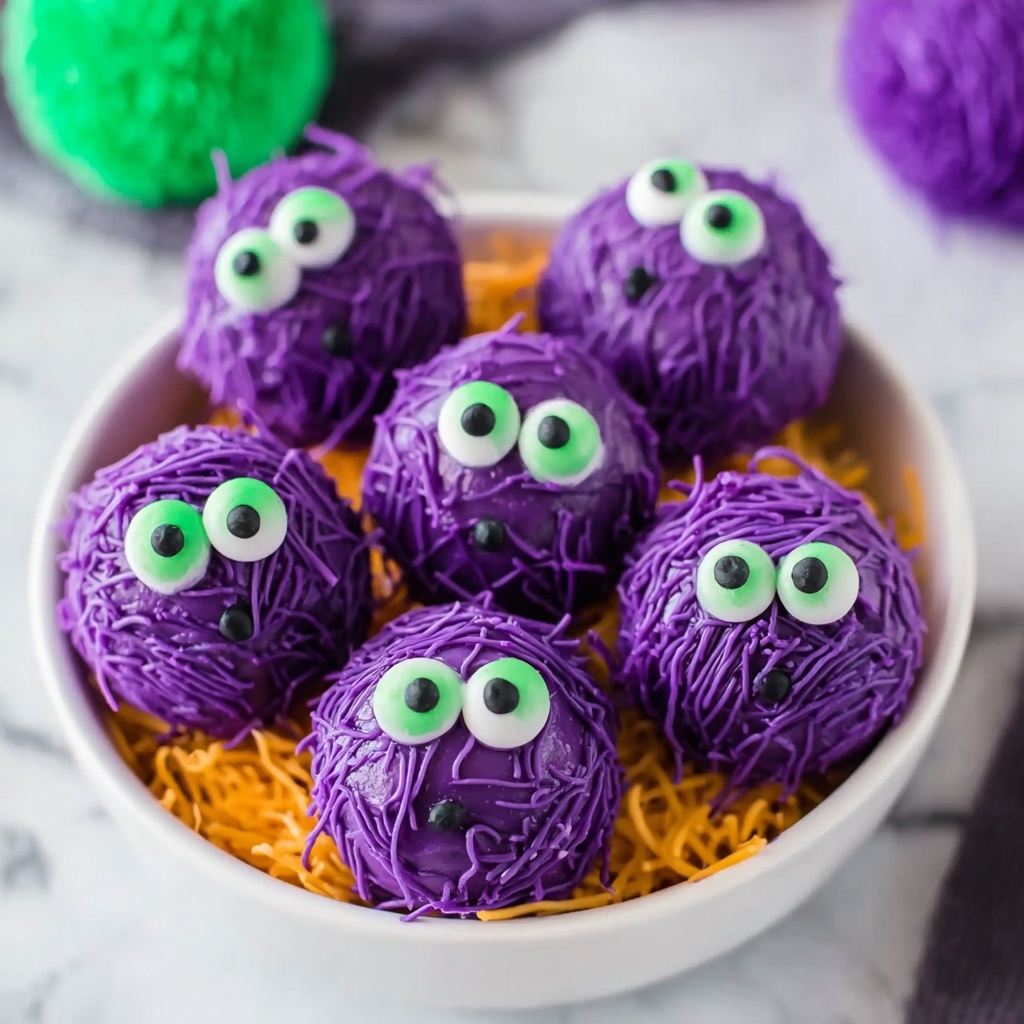
If you’re looking for a delightfully spooky treat that’s as fun to make as it is to eat, then this Monster Eyeballs: Fun No-Bake Halloween Oreos You’ll Love Recipe is exactly what you need! These adorable yet creepy little Oreo truffles are perfect for Halloween parties, family gatherings, or just a playful snack to get everyone in the festive spirit. Imagine creamy, tangy cream cheese mixed with crunchy, chocolatey Oreos, all coated in vibrant candy melts, and topped with googly candy eyes and sprinkles that make each monster eyeball uniquely fun. The best part? No oven required, so you’ll have these spooky goodies ready in no time.
Ingredients You’ll Need
Gathering your ingredients is super simple, but each item plays a crucial role in creating that perfect blend of textures and flavors. From the crunchy Oreos providing the base to the smooth cream cheese that holds everything together, right through to the colorful candy melts and spooky garnishes that bring these monster eyeballs to life.
- Golden Oreos – These provide a sweet, crisp foundation; you can also swap with any sandwich cookie you love.
- Cream Cheese – Adds richness and smoothness, use room temperature for easy mixing.
- Colored Candy Melts – Choose your favorite Halloween colors or mix them up for a wild look and that irresistible candy shell.
- Color-Matching Sprinkles – Sprinkles add a festive and colorful finishing touch for extra flair.
- Large Candy Eyes – These are the star decoration, giving each eyeball monster personality and that spooky charm.
How to Make Monster Eyeballs: Fun No-Bake Halloween Oreos You’ll Love Recipe
Step 1: Crush the Cookies
Start by crushing those Golden Oreos into fine crumbs using a food processor. This fine texture is key—it mixes better with the cream cheese to make smooth, bite-sized truffles that hold their shape perfectly.
Step 2: Mix with Cream Cheese
Add the room temperature cream cheese into the crushed Oreos and pulse several times until fully combined into a smooth, dough-like mixture. The cream cheese adds a luscious creaminess that balances out the cookie crumbs beautifully.
Step 3: Shape the Truffles
Roll the mixture into 1½ tablespoon-sized balls and place them on a parchment-lined baking sheet. Getting them uniform in size helps them look neat and ensures they’ll coat evenly with the candy melts later on.
Step 4: Chill for Setting
Pop the tray of Oreo balls into the refrigerator for 15-30 minutes. This step firms them up so they’re sturdy enough to dip without falling apart—plus, it makes handling easier and less messy.
Step 5: Melt the Candy
While your truffles chill, melt the candy melts in a microwave-safe bowl. Remember to heat in short bursts of 20-30 seconds and stir in between to achieve a perfectly smooth, glossy coating without burning the candy.
Step 6: Coat the Truffles
Now comes the fun part. Dip each chilled truffle into the melted candy melt, gently tapping off any excess coating back into the bowl. This gives the monster eyeballs their signature colorful shell that snaps delightfully when you bite.
Step 7: Decorate with Eyes and Sprinkles
Before the candy hardens, press a large candy eye onto each truffle and sprinkle color-matching sprinkles over them. This instantly transforms your treats into playful, eerie monster eyeballs that are as charming as they are delicious.
Step 8: Final Chill
Refrigerate the decorated truffles for another 30 minutes so the coating sets completely. Once firm, they’re ready to serve, hold, and impress every Halloween guest.
Step 9: Serve and Enjoy
Whether you serve these monster eyeballs cold from the fridge or let them sit for a few minutes at room temperature to soften slightly, they’re guaranteed to be a hit. Watch them disappear fast at any party or gathering!
How to Serve Monster Eyeballs: Fun No-Bake Halloween Oreos You’ll Love Recipe
Garnishes
While the candy eyes and sprinkles do a fantastic job decorating each ball, don’t hesitate to add a little extra spooky touch. Think edible glitter, tiny fondant fangs, or even a drizzle of dark chocolate “veins” for that authentic monster effect that will wow your guests.
Side Dishes
Pair these monster eyeballs with other Halloween treats like caramel apples, pumpkin-flavored popcorn, or a tangy blood-red fruit punch to create a full festive spread. Their creamy texture and sweetness balance wonderfully with crunchy or tart sides.
Creative Ways to Present
Presentation is half the fun! Arrange your monster eyeballs in cupcake liners or on a decorative tiered platter. For an extra scare factor, try placing them inside hollowed-out mini pumpkins or alongside faux spider webs and Halloween confetti on your dessert table.
Make Ahead and Storage
Storing Leftovers
Store your leftover monster eyeballs in an airtight container in the refrigerator. They’ll stay fresh and delicious for up to a week, making them perfect for prepping in advance or keeping everyone happy after the party.
Freezing
If you want to make these in bulk for multiple events, monster eyeballs freeze wonderfully. Place them in a single layer on a tray until firm, then transfer to a freezer-safe container or bag. When ready to enjoy, thaw in the fridge overnight to preserve their creamy texture.
Reheating
Since these are no-bake treats best served cold or at room temperature, reheating isn’t necessary and may ruin the candy coating. Instead, simply let them sit at room temperature for 15-20 minutes before serving if they’ve been refrigerated or frozen.
FAQs
Can I use regular Oreos instead of Golden Oreos?
Absolutely! Regular Oreos will give you a deeper chocolate flavor and a darker truffle. Both versions taste fantastic; choose whichever you and your monsters prefer.
What if I don’t have candy melts?
You can substitute with white chocolate chips or colored chocolate melts available at craft stores. Just be careful when melting to avoid burning, and you can even add a bit of shortening to get a smoother coating.
Are these monster eyeballs gluten-free?
Traditional Oreos are not gluten-free, but you can find gluten-free sandwich cookies that work just as well. Just double-check all your ingredients to ensure they follow your dietary needs.
Can kids help make this recipe?
Definitely! This Monster Eyeballs: Fun No-Bake Halloween Oreos You’ll Love Recipe is perfect for little helpers, especially when it comes to rolling balls and decorating with eyes and sprinkles. Just supervise around the melted candy melts for safety.
How long will the candy melt coating stay shiny and intact?
If stored properly in a cool, dry place, the candy melt shell stays shiny and crisp for several days. Avoid warm, humid environments to prevent melting or stickiness.
Final Thoughts
Now that you have the step-by-step know-how to whip up these irresistible Monster Eyeballs: Fun No-Bake Halloween Oreos You’ll Love Recipe, it’s time to gather your ingredients and get creative. This recipe is not only a guaranteed crowd-pleaser but also a joyful activity that brings everyone into the Halloween spirit. Enjoy the laughs, the decorating, and the sweet, spooky treats that follow—these monster eyeballs will definitely become a seasonal favorite you look forward to year after year!
Print
Monster Eyeballs: Fun No-Bake Halloween Oreos You’ll Love Recipe
- Prep Time: 20 minutes
- Cook Time: 0 minutes
- Total Time: 1 hour 15 minutes
- Yield: 24 servings
- Category: Dessert
- Method: No-Cook
- Cuisine: American
Description
Monster Eyeballs are fun and spooky no-bake treats perfect for Halloween parties. Made with crushed Golden Oreos mixed with creamy softened cream cheese, these truffles are coated in colorful candy melts and decorated with large candy eyes and sprinkles to create a playful monster look. Easy to prepare and chill, these delightful eyeballs are a hit with kids and adults alike.
Ingredients
Oreos and Cream Cheese
- 19.1 ounces Golden Oreos (or any sandwich cookies)
- 8 ounces cream cheese, room temperature
Coating and Decoration
- 12 ounces colored candy melts (any color or mix)
- Color-matching sprinkles
- Large candy eyes
Instructions
- Crush the Cookies: Start by placing 19.1 ounces of Golden Oreos in a food processor and pulse until they become fine crumbs.
- Mix with Cream Cheese: Add 8 ounces of room temperature cream cheese to the crushed Oreos and pulse until the mixture is well combined and smooth.
- Shape the Truffles: Roll the mixture into balls about 1½ tablespoons in size and place them on parchment-lined baking sheets.
- Chill for Setting: Refrigerate the truffle balls for 15 to 30 minutes until they are firm and hold their shape.
- Melt the Candy: In a microwave-safe bowl, melt 12 ounces of colored candy melts in short intervals, stirring until completely smooth.
- Coat the Truffles: Dip each chilled truffle into the melted candy, allowing any excess coating to drip off back into the bowl.
- Decorate with Eyes: Press one large candy eye onto each coated truffle and sprinkle with matching colored sprinkles to create the monster’s look.
- Final Chill: Place the decorated truffles back in the refrigerator for 30 minutes to let the candy coating harden completely.
- Serve and Enjoy: Once set, serve these fun monster eyeballs chilled or at room temperature for a festive Halloween treat.
Notes
- Use room temperature cream cheese for easier mixing and smoother texture.
- You can substitute Golden Oreos with any other sandwich cookies if desired.
- Try different candy melt colors to customize your monster eyeballs.
- Store leftovers in an airtight container in the refrigerator for up to 5 days.
- Allow the candy coating to harden fully to avoid sticky fingers.


