
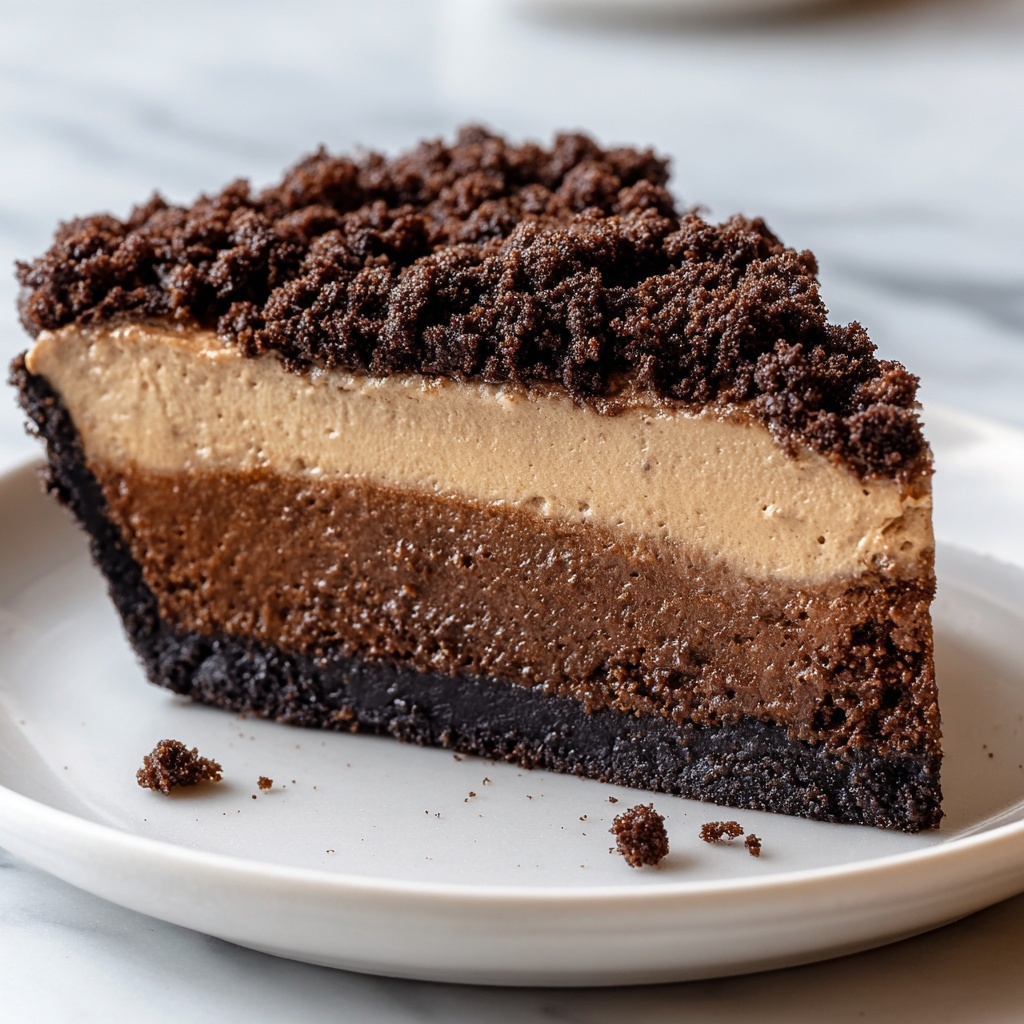
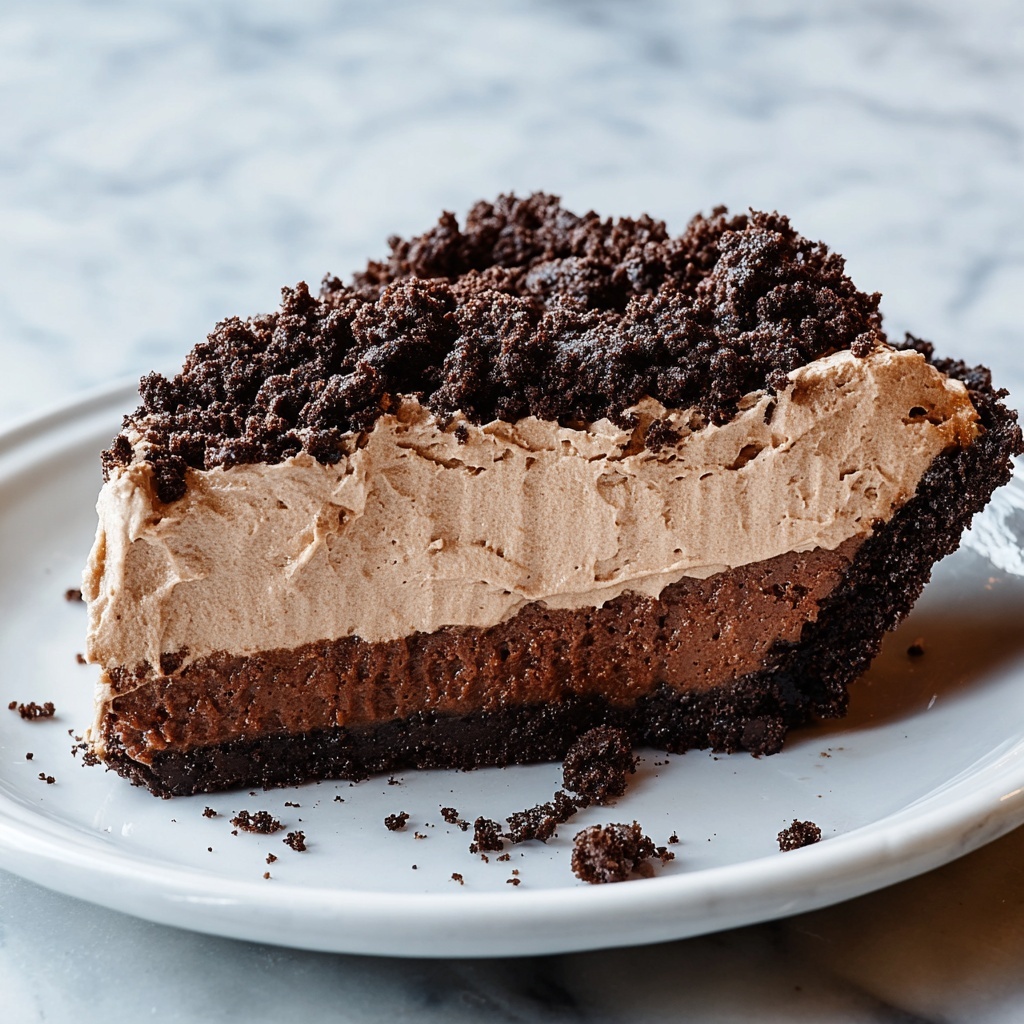
If you are seeking a dessert that delights with layers of rich chocolate and crunchy texture, this Mississippi Mud Pie Recipe is a must-try. From its buttery Oreo cookie crust to the fudgy brownie center, indulgent chocolate mousse, and crumbly topping, every bite delivers comfort and decadence in perfect harmony. Whether you’re a seasoned baker or just want to impress guests with an unforgettable treat, this pie offers a beautiful blend of flavors and textures that is truly irresistible.
Ingredients You’ll Need
Gathering the ingredients for this Mississippi Mud Pie Recipe is straightforward but essential for nailing the luscious taste and distinct layers. Each component, from the Oreos to the chocolates and creams, plays a crucial role in creating that signature balance of dense, creamy, and crunchy elements.
- 16 Oreo cookies: For the crust, providing a rich, chocolatey base with a fun crunch.
- 1 tablespoon granulated sugar: Enhances the sweetness of the crust just right.
- 4 tablespoons unsalted butter, melted and cooled: Binds the crust crumbs together perfectly.
- 4 ounces bittersweet chocolate, finely chopped: Gives a deep, intense chocolate flavor to the brownie layer.
- 3 tablespoons unsalted butter: Adds richness and moisture to the brownie batter.
- 3 tablespoons vegetable oil: Keeps the brownie fudge-like and tender.
- 1 ½ tablespoons unsweetened cocoa powder: Boosts the chocolaty depth in the brownie and topping.
- ⅔ cup dark brown sugar, firmly packed: Provides a warm, caramel undertone to the brownie.
- 2 large eggs, room temperature: Essential for structure and moisture in the brownie layer.
- 2 teaspoons vanilla extract: Brightens flavors throughout the pie.
- ¼ teaspoon salt: Balances sweetness and enhances chocolate notes.
- 3 tablespoons all-purpose flour: Just enough to give the brownie layer body without heaviness.
- 6 Oreo cookies: Coarsely crushed for the crumbly topping that adds texture contrast.
- 2 tablespoons powdered sugar: Sweetens the crumb topping delicately.
- 1 tablespoon unsweetened cocoa powder: Gives the topping a chocolate punch.
- ⅛ teaspoon salt: Rounds out the flavor in the topping.
- 2 tablespoons unsalted butter, melted: Helps create a sandy, crisp crumb topping.
- 6 ounces milk chocolate, chopped fine: The star in the silky chocolate mousse.
- 1 cup heavy cream, very cold, divided: Whipped into airy softness for mousse layers and creaminess.
- 2 tablespoons unsweetened cocoa powder: Mixed into the mousse for extra chocolate richness.
- 2 tablespoons powdered sugar: Sweetens the mousse gently.
- Pinch of salt: Elevates the chocolate flavor without adding saltiness.
How to Make Mississippi Mud Pie Recipe
Step 1: Prepare the Crust
Start by preheating your oven to 325°F (163°C). Take 16 Oreo cookies and pulse them into fine crumbs using a food processor; this creates the delicious chocolate base that will hold your pie together. Mix in the granulated sugar and melted butter until everything binds nicely. Press this mixture firmly into the bottom and sides of a 9-inch pie plate — this step ensures a sturdy crust that’s packed with flavor. Bake for 15 minutes until fragrant, then set aside to cool completely on a wire rack.
Step 2: Make the Brownie Layer
Now, for the fudgy brownie layer, melt the bittersweet chocolate, butter, vegetable oil, and cocoa powder together gently in the microwave at half power. Stir frequently to get a smooth mixture that’s glossy and rich. In another bowl, whisk the dark brown sugar, eggs, vanilla extract, and salt until smooth and shining. Combine the melted chocolate with this mixture, then gently fold in the flour just until incorporated. Pour this brownie batter over your cooled Oreo crust and bake again at 325°F (163°C) for about 15 minutes. The edges should be set while the center is slightly wobbly. Cool the pie on a wire rack for an hour, then refrigerate it so it firms up beautifully.
Step 3: Create the Topping
Take 6 Oreo cookies and pulse them into coarse crumbs — you want a sandy texture here for nice crunch. To these crumbs, add powdered sugar, cocoa powder, and salt, pulsing to combine. Drizzle in the melted butter and pulse just until the crumbs resemble wet sand. Spread this topping on a baking sheet and bake for about 10 minutes until the aroma fills your kitchen. Let the topping cool completely before adding it to your pie.
Step 4: Prepare the Chocolate Mousse
Melt milk chocolate gently again using the microwave at 50% power, stirring often until smooth. Let it cool to around 85°F (29°C) so it’s still liquid but not hot. Whip half of your cold heavy cream until soft peaks form and refrigerate it to keep it firm. In a separate bowl, whip the remaining cream with cocoa powder, powdered sugar, and a pinch of salt until thickened. Fold the cocoa mixture into the cooled chocolate, then carefully fold in the whipped cream until perfectly smooth and no streaks remain. Spread this luscious mousse over the chilled brownie layer and sprinkle your cooled cookie crumble on top. Refrigerate the entire pie for at least 4 hours to set beautifully.
How to Serve Mississippi Mud Pie Recipe
Garnishes
Elevate your Mississippi Mud Pie Recipe by adding some extra flair with garnishes like a dusting of cocoa powder or powdered sugar to enhance its visual and flavor appeal. Fresh raspberries or mint leaves provide a refreshing contrast to the intense chocolate, making each slice a little work of art.
Side Dishes
This pie stands strong on its own but pairs brilliantly with simple vanilla ice cream or a scoop of whipped cream to soften the richness. A cup of dark roast coffee or freshly brewed espresso complements the deep chocolate notes perfectly, rounding out your dessert experience.
Creative Ways to Present
Presenting your Mississippi Mud Pie with a drizzle of caramel or chocolate sauce creates an indulgent look that’s sure to impress guests. For a festive touch, serve it in individual glass dishes layered with extra mousse and crumbs, turning your favorite pie into a personalized dessert delight.
Make Ahead and Storage
Storing Leftovers
After enjoying your Mississippi Mud Pie Recipe, cover any leftover pie tightly with plastic wrap or store in an airtight container in the refrigerator. It will stay fresh and delicious for up to 3 days, allowing those decadent flavors to mellow and deepen even further.
Freezing
If you want to save your Mississippi Mud Pie for longer, freezing is a great option. Wrap the pie securely in plastic wrap and then foil to prevent freezer burn. When stored properly, it can last for up to a month. Thaw overnight in the refrigerator before serving to preserve its creamy, fudgy texture.
Reheating
This pie is best enjoyed chilled, so reheating isn’t recommended as it may affect the mousse and brownie layers. Just let it sit at room temperature for 10-15 minutes to soften slightly before slicing for the perfect texture.
FAQs
Can I use a different type of cookie for the crust?
Yes! While Oreo cookies give a distinct chocolate flavor and texture, you can experiment with other chocolate sandwich cookies or even graham crackers for a different twist. Just keep in mind the flavor impact on the overall pie.
What if I don’t have a microwave to melt the chocolate?
You can melt chocolate gently using a double boiler method. Place a heatproof bowl over simmering water and stir frequently until melted and smooth, then cool as directed for the mousse.
How long does the Mississippi Mud Pie need to chill before serving?
To ensure the mousse sets properly and the flavors meld, the pie should chill at least 4 hours, though overnight chilling is ideal for best results.
Can I make this pie gluten-free?
To make it gluten-free, substitute the Oreo cookies and all-purpose flour with gluten-free alternatives. There are many gluten-free chocolate cookies available that work well for the crust and topping.
Is it possible to make this pie ahead for a party?
Absolutely! This Mississippi Mud Pie Recipe is perfect for making a day or two in advance. Just keep it refrigerated until ready to serve, and add the topping fresh for optimal crunch if you prefer.
Final Thoughts
This Mississippi Mud Pie Recipe is truly one of those crowd-pleasers that feels like a warm chocolate hug in dessert form. Rich, textured, and layered with love, it’s a perfect centerpiece for any celebration or a special treat just because. I hope you enjoy making and sharing this pie as much as I do — happy baking!
Print
Mississippi Mud Pie Recipe
- Prep Time: 30 minutes
- Cook Time: 40 minutes
- Total Time: 5 hours
- Yield: 12 servings
- Category: Dessert
- Method: Baking
- Cuisine: American
Description
Mississippi Mud Pie is a decadent layered dessert featuring a crunchy Oreo crust, rich chocolate brownie layer, silky milk chocolate mousse, and a crumbly chocolate topping. Perfectly balanced with bittersweet and milk chocolate, this pie is baked and chilled to create a luscious texture and deep chocolate flavor, ideal for special occasions or chocolate lovers.
Ingredients
Crust
- 16 Oreo cookies
- 1 tablespoon granulated sugar
- 4 tablespoons unsalted butter, melted and cooled
Brownie Layer
- 4 ounces bittersweet chocolate, finely chopped
- 3 tablespoons unsalted butter
- 3 tablespoons vegetable oil
- 1 ½ tablespoons unsweetened cocoa powder
- ⅔ cup dark brown sugar, firmly packed
- 2 large eggs, room temperature
- 2 teaspoons vanilla extract
- ¼ teaspoon salt
- 3 tablespoons all-purpose flour
Topping
- 6 Oreo cookies
- 2 tablespoons powdered sugar
- 1 tablespoon unsweetened cocoa powder
- ⅛ teaspoon salt
- 2 tablespoons unsalted butter, melted
Mousse
- 6 ounces milk chocolate, chopped fine
- 1 cup heavy cream, very cold, divided
- 2 tablespoons unsweetened cocoa powder
- 2 tablespoons powdered sugar
- Pinch of salt
Instructions
- Prepare the Crust: Preheat the oven to 325°F (163°C). In a food processor, pulse 16 Oreo cookies into fine crumbs. Add 1 tablespoon granulated sugar and 4 tablespoons melted butter; pulse until combined. Press the mixture firmly into the bottom and up the sides of a 9-inch pie plate. Bake for 15 minutes until fragrant. Cool on a wire rack.
- Prepare the Brownie Layer: In a microwave-safe bowl, combine 4 ounces chopped bittersweet chocolate, 3 tablespoons unsalted butter, 3 tablespoons vegetable oil, and 1 ½ tablespoons cocoa powder. Microwave at 50% power, stirring frequently, until melted and smooth (about 1 minute 30 seconds). In another bowl, whisk together ⅔ cup dark brown sugar, 2 large eggs, 2 teaspoons vanilla extract, and ¼ teaspoon salt until smooth. Add the melted chocolate mixture and whisk until combined. Stir in 3 tablespoons all-purpose flour until just incorporated. Pour the brownie batter into the cooled Oreo crust. Bake at 325°F (163°C) for about 15 minutes, until the edges are set and a toothpick inserted into the center comes out with a thin coating of batter. Cool on a wire rack for 1 hour, then refrigerate for at least 1 hour until completely chilled.
- Prepare the Topping: In a food processor, pulse 6 Oreo cookies into coarse crumbs. Add 2 tablespoons powdered sugar, 1 tablespoon cocoa powder, and ⅛ teaspoon salt; pulse to combine. Drizzle in 2 tablespoons melted butter and pulse until the mixture resembles wet sand. Spread the crumb mixture evenly on a baking sheet. Bake at 325°F (163°C) for about 10 minutes until fragrant. Cool completely.
- Prepare the Mousse: Melt 6 ounces milk chocolate in a microwave-safe bowl at 50% power, stirring frequently, until smooth. Let cool until the chocolate reaches 85°F (29°C). In a chilled mixing bowl, whisk ½ cup heavy cream until soft peaks form; refrigerate. In another bowl, whisk the remaining ½ cup heavy cream, 2 tablespoons cocoa powder, 2 tablespoons powdered sugar, and a pinch of salt until thickened. Fold the cocoa mixture into the melted chocolate until combined. Gently fold in the whipped cream until no streaks remain. Spread the chocolate mousse evenly over the chilled brownie layer. Sprinkle the cooled cookie crumble topping over the mousse layer. Refrigerate the pie for at least 4 hours until set.
Notes
- Use room temperature eggs for the brownie layer to ensure even mixing and proper texture.
- Make sure the heavy cream is very cold before whipping for best results.
- The mousse should be spread gently to maintain its light and airy texture.
- Allow adequate chilling time for proper set and flavor development.
- Store the pie refrigerated and consume within 3 days for optimal freshness.


