Mini Cherry Pies Recipe
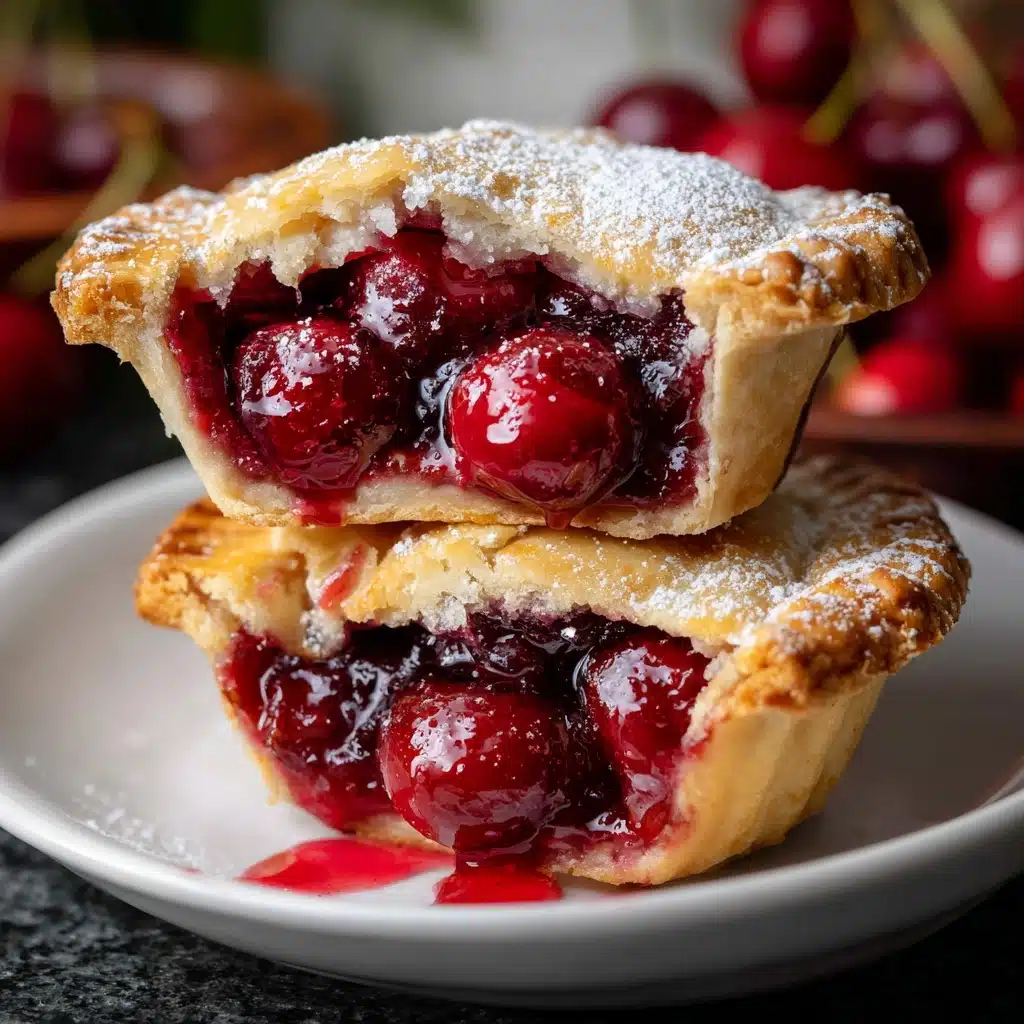
If you’re dreaming of a bite-sized dessert that packs all the nostalgia and flavor of a classic pie, these Mini Cherry Pies are about to become your new obsession. Imagine buttery golden pastry and a jewel-red cherry filling, all in the palm of your hand! Whether you’re sharing them at a party or sneaking one with your afternoon coffee, these adorable pies deliver the perfect balance of tart fruit and sweet crunch. No complicated steps and no fancy equipment needed—just pure cherry delight in every bite.
Ingredients You’ll Need
-
Pie Filling:
- 1 (21-ounce) can cherry pie filling
Pie Crust:
- 1 box refrigerated pie crusts (2 crusts, thawed)
Additional Ingredients:
- 1 egg, beaten (for egg wash)
- 1 tablespoon granulated sugar (for sprinkling)
- Flour for dusting
How to Make Mini Cherry Pies
Step 1: Prep Your Oven and Ingredients
Start by preheating your oven to 375°F (190°C). This ensures that the oven’s nice and hot when your pies are ready to bake, resulting in a perfectly crisp crust. Grease a standard-size muffin tin so nothing sticks; these little details make for easy pie removal later.
Step 2: Roll Out and Cut the Dough
Lightly dust your countertop with flour, then unroll the thawed pie crusts. Using a round cutter (3.5 to 4 inches, a glass works in a pinch), cut out as many circles as you can—aim for about 12. Gently press half the rounds into your muffin tin cups, forming cute little pie shells ready for their cherry filling.
Step 3: Fill with Cherry Goodness
Now comes the best part! Spoon 1 to 2 tablespoons of cherry pie filling into each crust-lined cup. Don’t worry about being too precise—just try not to overfill, as the luscious juices will bubble up as they bake.
Step 4: Add Tops and Seal
For the tops, you can get creative. Place another dough circle on top for a classic look, or slice them into strips for a rustic lattice design that lets the cherry filling peek through. Press gently around the edges to seal everything in—no cherry explosions, please!
Step 5: Egg Wash and Sugar Sprinkle
Brush the tops with beaten egg to help them turn golden and shiny. Sprinkle on a little granulated sugar for crunch and a bakery-style sparkle. These small touches make a big difference in the final pie.
Step 6: Bake to Perfection
Slide the pan into your preheated oven and bake for 18 to 22 minutes. Watch for a golden, crisp crust and bubbly cherry filling peeking out—it’s truly a beautiful sight. Let the Mini Cherry Pies cool in the pan for about 10 minutes, then carefully transfer to a wire rack to finish cooling.
How to Serve Mini Cherry Pies

Garnishes
A little flourish goes a long way! Dust your Mini Cherry Pies with powdered sugar, add a dollop of whipped cream, or even top with a sprinkle of sliced almonds for an elegant presentation that highlights their homemade charm.
Side Dishes
Pair these beauties with a scoop of vanilla ice cream (highly recommended), a hot mug of coffee, or a fresh fruit salad to round out your dessert table. The pies’ sweet-tart flavor also plays well with a little lemon zest or a drizzle of melted chocolate.
Creative Ways to Present
Serve Mini Cherry Pies on a tiered dessert stand for a playful, party-friendly vibe. Wrap each in parchment and tie with string as a memorable edible gift, or arrange them picnic-style in a basket for a delightful handheld treat at your next gathering.
Make Ahead and Storage
Storing Leftovers
These pies stay fresh for up to three days when stored in an airtight container at room temperature. They hold their shape and flavor beautifully, making them a great make-ahead option for busy weeks or special events.
Freezing
Mini Cherry Pies freeze surprisingly well! Let them cool completely, wrap individually in plastic wrap, and store in a freezer-safe bag. When you’re ready for a sweet snack, just thaw at room temperature or warm gently in the oven.
Reheating
Bring them back to warm, golden perfection by popping them in a 300°F (150°C) oven for about 8 minutes. The crust regains its crisp texture, and the filling turns wonderfully gooey again—just like fresh-baked!
FAQs
Can I use homemade cherry pie filling instead of canned?
Absolutely! Homemade cherry pie filling adds a personal touch and lets you control the sweetness and flavor. Just be sure your filling isn’t too runny to prevent soggy crusts.
Can I make Mini Cherry Pies gluten-free?
Yes, simply substitute your favorite gluten-free pie crust for the standard version. There are great ready-made gluten-free options in most grocery stores, so you can keep this treat accessible for everyone.
How do I prevent the bottoms from getting soggy?
Make sure not to overfill your pies, and always let them cool in the pan for a few minutes before removing them. Baking until the crust is golden brown also helps ensure a crisp bottom every time.
Can I use other fruit fillings for variety?
Absolutely! This recipe is wonderfully adaptable. Try blueberry, apple, or even peach pie filling for a different twist, or mix and match to create a colorful array for your dessert spread.
Can I prepare parts of this recipe ahead?
Definitely. You can cut the dough rounds and refrigerate them (separated by parchment) a day ahead. Assembling and baking is quick, so you’ll be ready to serve fresh pies in no time.
Final Thoughts
There’s just something wholly joyful about making (and eating!) Mini Cherry Pies. These little beauties are easy enough for bakers of any level and guaranteed to be a hit at any table. Invite some friends over or tuck a few in your lunchbox—you’ll be glad you did. Give these charming pies a try and let the smiles (and cherry-stained fingers) begin!
Print
Mini Cherry Pies Recipe
- Total Time: 35 minutes
- Yield: 12 mini pies 1x
- Diet: Vegetarian
Description
Indulge in these delightful Mini Cherry Pies that are perfect for any occasion. These handheld treats are bursting with sweet cherry filling encased in flaky pie crusts, making them a favorite among both kids and adults alike.
Ingredients
Pie Filling:
- 1 (21-ounce) can cherry pie filling
Pie Crust:
- 1 box refrigerated pie crusts (2 crusts, thawed)
Additional Ingredients:
- 1 egg, beaten (for egg wash)
- 1 tablespoon granulated sugar (for sprinkling)
- Flour for dusting
Instructions
- Preheat the oven: Preheat the oven to 375°F (190°C).
- Prepare the crusts: Lightly flour a surface and unroll the pie crusts. Cut out circles using a 3.5–4 inch round cutter.
- Form mini pie shells: Gently press half the dough rounds into greased muffin tin cups.
- Fill pies: Add 1–2 tablespoons of cherry pie filling to each shell.
- Top and bake: Cover with remaining dough circles or create a lattice design. Brush with egg wash, sprinkle with sugar, and bake for 18–22 minutes until golden.
- Cool and serve: Let the mini pies cool in the pan for 10 minutes before transferring to a wire rack to cool completely.
Notes
- You can store the mini cherry pies in an airtight container for up to 3 days.
- For added flavor, consider incorporating a dash of almond extract to the filling or topping the pies with whipped cream.
- Prep Time: 15 minutes
- Cook Time: 20 minutes
- Category: Dessert
- Method: Baking
- Cuisine: American
Nutrition
- Serving Size: 1 mini pie
- Calories: 200
- Sugar: 12g
- Sodium: 170mg
- Fat: 10g
- Saturated Fat: 3g
- Unsaturated Fat: 6g
- Trans Fat: 0g
- Carbohydrates: 27g
- Fiber: 1g
- Protein: 2g
- Cholesterol: 15mg

