Easter Poke Cake Recipe
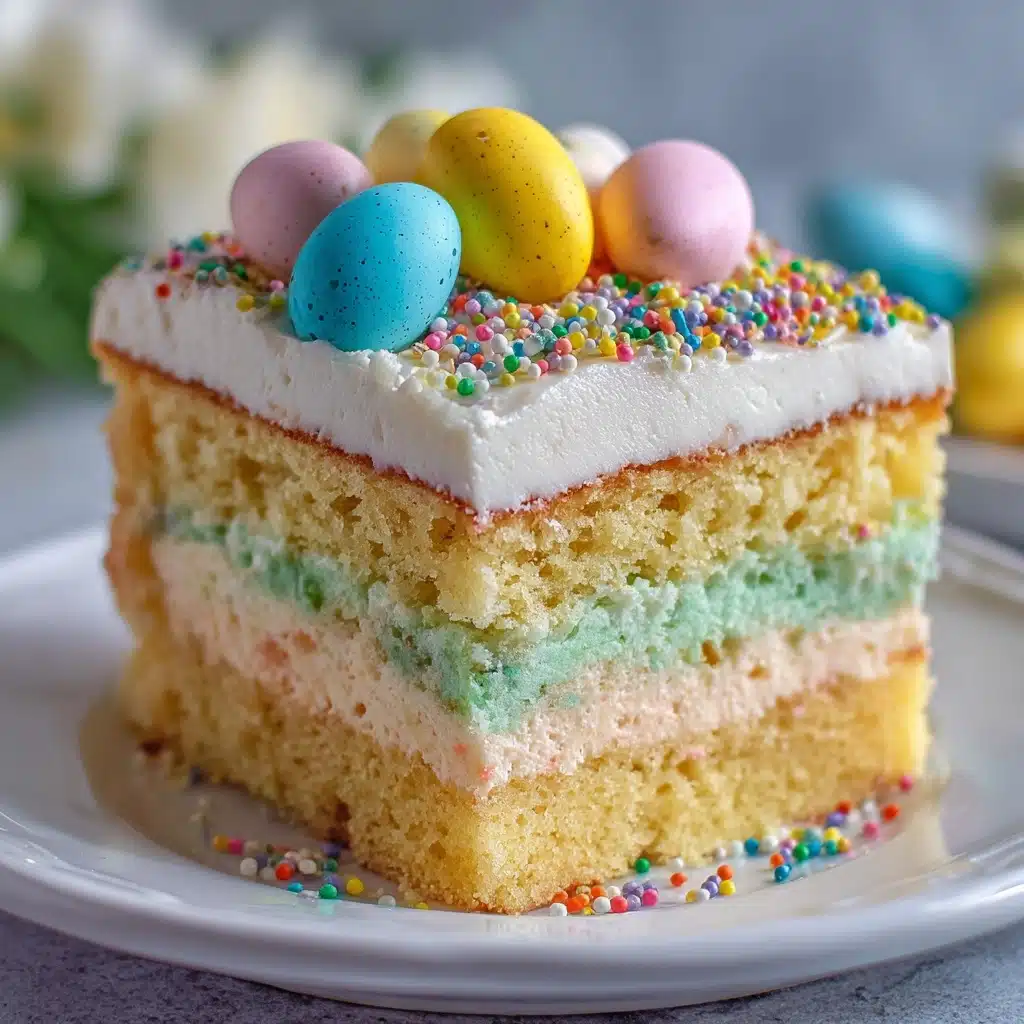
If you’re looking for a cheerful, foolproof dessert that guarantees smiles, this Easter Poke Cake will become your new holiday tradition. Imagine a soft white cake, infused with sweet bursts of berry blue and tart lemon gelatin, all crowned with a cloud of whipped topping and a glitter of pastel sprinkles. Every forkful is a bite of springtime! The irresistible colors and flavors of this Easter Poke Cake make it a crowd-pleaser for both little ones and grown-ups, perfect for brightening any Easter table.
Ingredients You’ll Need
You’ll be amazed at how a handful of pantry staples come together to create a dessert that’s as show-stopping as it is delicious. Each ingredient plays a starring role, contributing either tenderness, vibrant color, or that crave-worthy creamy finish you’ll remember long after the last slice disappears.
- White Cake Mix: A simple box mix is the shortcut to an ultra-moist, fluffy cake base with minimal effort.
- Berry Blue Gelatin: Brings electric blue swirls and a sweet, fruity punch that kids especially adore.
- Lemon Gelatin: Adds a sunny yellow hue and bright, citrusy tang to balance the sweetness.
- Boiling Water (2 cups): Essential for dissolving the gelatin completely for those striking, glassy colors.
- Cold Water (1 cup): Cools down the gelatin so it soaks into the cake just right without cooking it further.
- Whipped Topping (8 ounces, thawed): The creamy blanket that finishes the cake with a cool, light mouthfeel.
- Pastel Sprinkles or Easter Candy: For that festive touch – feel free to get creative with candies, chocolate eggs, or even more jellybeans!
How to Make Easter Poke Cake
Step 1: Bake the Cake
Start by preheating your oven and preparing the white cake mix as directed on the box, using a 9×13-inch baking dish. This trusty sheet cake is going to be the canvas for all your brilliant color and flavor, so bake it up until it’s golden and springy to the touch. Once done, let it cool for about 15 minutes—just enough so it’s warm and ready for poking.
Step 2: Poke the Cake
Here’s the fun part! Grab the handle of a wooden spoon and gently poke holes all over the cake, spacing them about an inch apart. This is where the magic happens; those little tunnels are going to suck up the vibrant gelatin, creating that signature “stained glass” effect every Easter Poke Cake is known for.
Step 3: Prepare and Pour the Gelatin
In two separate bowls, dissolve each gelatin flavor in 1 cup of boiling water. Give them a good stir until completely dissolved, then add 1/2 cup of cold water to each to cool things down. Carefully pour the berry blue gelatin over one half of the poked cake, letting it ooze into every opening. Repeat with the sunny lemon gelatin on the other half. You’ll see the colors start to soak in—so satisfying!
Step 4: Chill the Cake
Cover your cake and pop it in the fridge for at least 4 hours. This setting time is crucial: it lets the gelatin firm up beautifully inside, ensuring those colorful stripes stay crisp and bright. If you’re making the cake ahead, you can let it chill overnight for even more convenience.
Step 5: Frost and Decorate
Once the cake is fully chilled, spread the whipped topping evenly over the entire surface, like a fluffy snowdrift. The finishing touch? Scatter your favorite pastel sprinkles or Easter candies over the top. This step is where you can let your creativity run wild—get the kids involved or pattern your sprinkles for extra fun!
How to Serve Easter Poke Cake

Garnishes
When it comes to dressing up your Easter Poke Cake, a hefty shower of pastel sprinkles is just the beginning. Try small chocolate eggs, bunny-shaped candies, or a dusting of edible glitter for an extra sprinkle of holiday cheer. If you’re feeling really playful, line the edges with jellybeans or nestle a few marshmallow chicks on every slice.
Side Dishes
Serve this cake chilled alongside a basket of fresh berries, a scoop of lemon or raspberry sorbet, or even a fruit salad to echo the cake’s fruity flavors. A pot of bright herbal tea or a glass of sparkling lemonade is all you need to round out a light, spring-inspired dessert course.
Creative Ways to Present
Slice your Easter Poke Cake into neat squares and arrange them on a tiered cake stand for a pastel “patchwork” effect. You can also cut out shapes using cookie cutters—think bunnies or eggs—for a playful Easter brunch presentation. If you’re serving a crowd, individual slices can be dished into colorful paper liners or cupcake wrappers, topped with an extra dollop of whipped topping and a single candy egg.
Make Ahead and Storage
Storing Leftovers
Leftover Easter Poke Cake keeps wonderfully in the fridge. Simply cover the pan tightly with plastic wrap or transfer slices to an airtight container. The gelatin helps lock in moisture, so the cake stays surprisingly fresh and flavorful for up to 3 days.
Freezing
If you need to freeze your poke cake, do so before adding the whipped topping and garnishes. Wrap the cooled, gelatin-infused cake in a double layer of plastic wrap, then foil, and freeze for up to 2 months. Thaw overnight in the fridge, add your whipped topping and decorations just before serving for the best taste and presentation.
Reheating
No reheating required! This cake is all about being served chilled. If the cake was previously frozen, let it come to fridge temperature, then top and serve. If your cake is a little too cold straight from the fridge, let it sit out for 10–15 minutes for the flavors and softness to shine before slicing.
FAQs
Can I use different flavors or colors of gelatin for my poke cake?
Absolutely! While berry blue and lemon create a classic Easter palette, you can mix and match any fruity gelatin flavors you like. Strawberry, lime, or grape can make your Easter Poke Cake even more vibrant and unique.
Do I need to use boxed cake mix, or can I make the cake from scratch?
A boxed white cake mix is the quickest route, but if you have a favorite homemade white cake recipe, feel free to use it. Just be sure to bake it in a 9×13-inch pan for best results and poke it while it’s still warm.
How far ahead can I make Easter Poke Cake?
You can make this cake a day in advance. After chilling and decorating with whipped topping and candies, keep it covered in the fridge until ready to serve. The flavors actually get even better as the gelatin soaks in!
What’s the best way to cut the cake so the colors show?
Use a sharp, clean knife and wipe it between cuts for the neatest slices. When you cut straight down through the layers, you’ll reveal those gorgeous colored stripes running through your Easter Poke Cake.
How can I make this recipe more allergy-friendly?
You can easily adapt this cake by using a gluten-free cake mix, dairy-free whipped topping, and checking that your gelatin and decorations are free from any allergens. It’s a remarkably flexible and inclusive dessert for any gathering!
Final Thoughts
Baking this Easter Poke Cake is not just easy, it’s pure joy from start to finish. Bursting with color, flavor, and fun, it’s a wonderful way to celebrate spring and create sweet memories with your loved ones. Give it a try this holiday and watch it become an instant family classic!
Print
Easter Poke Cake Recipe
- Total Time: 45 minutes plus chilling time
- Yield: 12 servings 1x
- Diet: Non-Vegetarian
Description
Celebrate Easter with this colorful and delicious Easter Poke Cake. A moist white cake is infused with fruity gelatin, topped with whipped cream, and adorned with festive sprinkles. It’s a perfect dessert to brighten up your holiday table.
Ingredients
White Cake:
- 1 box white cake mix (plus ingredients listed on box)
Berry Blue Layer:
- 1 package (3 ounces) berry blue gelatin
- 1 cup boiling water (divided)
- 1/2 cup cold water
Lemon Layer:
- 1 package (3 ounces) lemon gelatin
- 1 cup boiling water (divided)
- 1/2 cup cold water
- 8 ounces whipped topping, thawed
- Pastel sprinkles or Easter candy for garnish
Instructions
- Prepare the White Cake: Follow the package directions to prepare and bake the white cake in a 9×13-inch baking dish. Let it cool for 15 minutes.
- Make the Berry Blue Layer: Dissolve the berry blue gelatin in 1 cup boiling water, then stir in 1/2 cup cold water. Pour over half of the cake.
- Make the Lemon Layer: Repeat the process with the lemon gelatin for the other half of the cake.
- Chill the Cake: Refrigerate the cake for at least 4 hours until set.
- Add Topping: Spread whipped topping over the cake, then decorate with sprinkles or candy.
- Serve: Slice and serve chilled.
Notes
- For a more vibrant look, create additional gelatin flavors and layer them in smaller sections.
- This cake can be made a day in advance and refrigerated until ready to serve.
- Prep Time: 20 minutes
- Cook Time: 25 minutes
- Category: Dessert
- Method: Baking, No-Bake Assembly
- Cuisine: American
Nutrition
- Serving Size: 1 slice
- Calories: 250
- Sugar: 30g
- Sodium: 300mg
- Fat: 8g
- Saturated Fat: 3g
- Unsaturated Fat: 3g
- Trans Fat: 0g
- Carbohydrates: 43g
- Fiber: 0g
- Protein: 3g
- Cholesterol: 35mg


