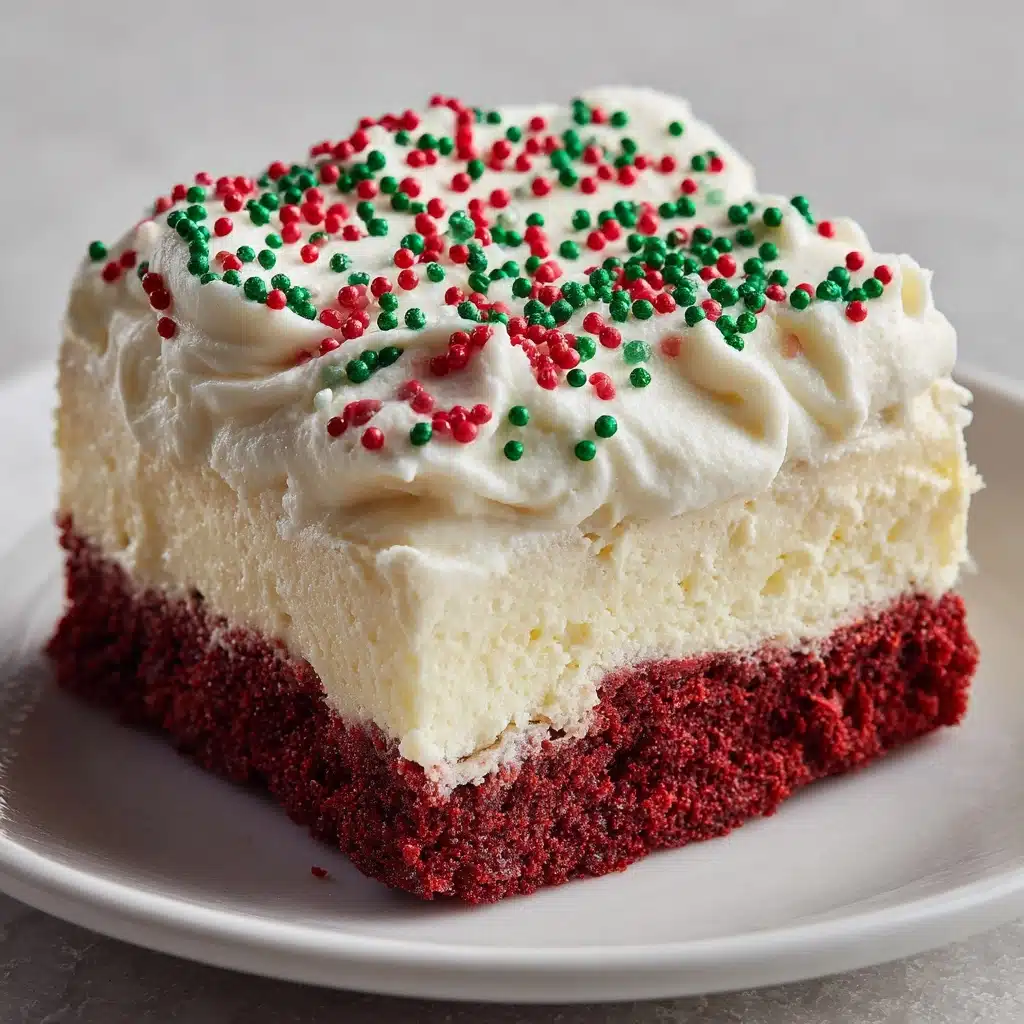
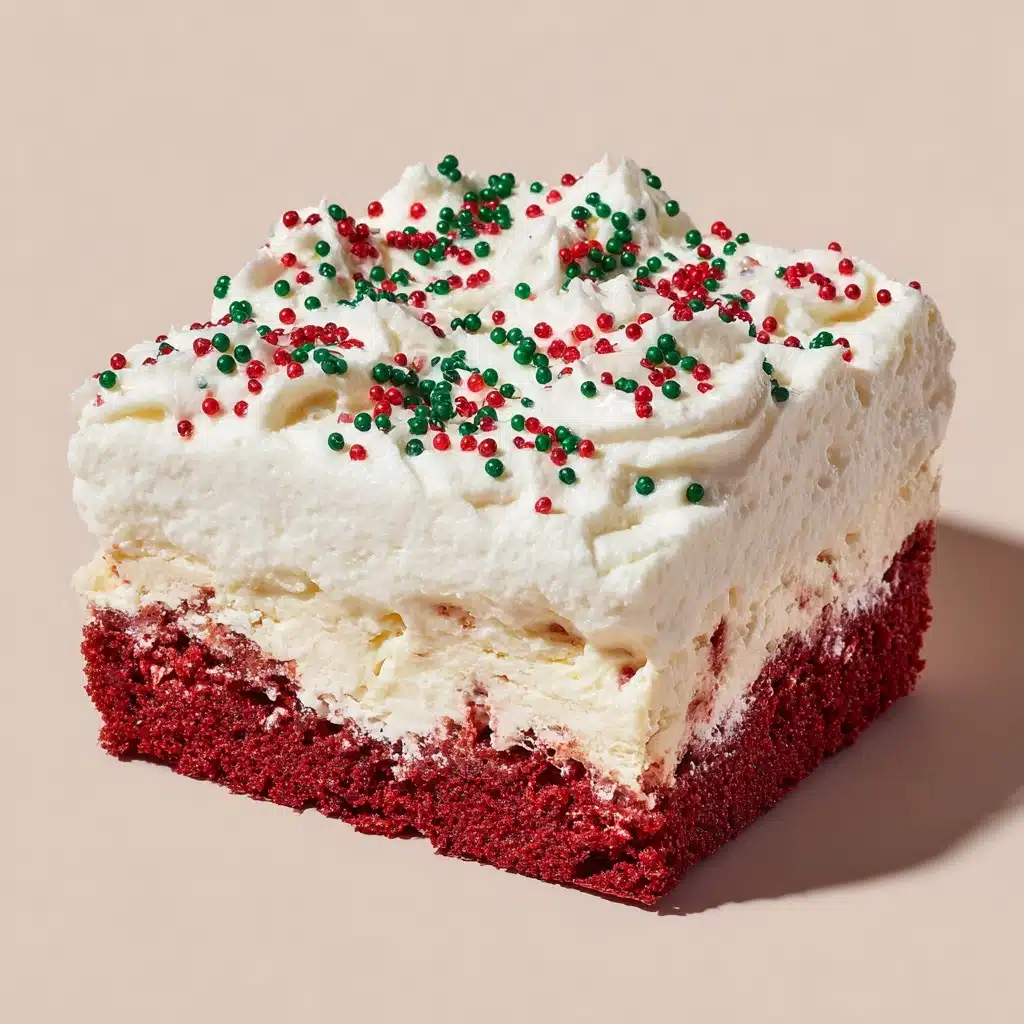
Christmas Red Velvet Poke Cake Recipe
There’s something truly magical about the holidays, and this Christmas Red Velvet Poke Cake brings the festivities right onto your dessert table! Lush, vibrant red velvet cake soaked with creamy pudding and topped with clouds of whipped topping and gleaming, festive sprinkles—this treat isn’t just a feast for the eyes but a showstopper that’s deliciously moist and impossible to resist. From its tender crumb to its irresistible sweet filling, every slice feels like an edible celebration. If you’re searching for a new Christmas tradition that’s as easy as it is unforgettable, this Christmas Red Velvet Poke Cake is about to become your go-to holiday dessert!
Ingredients You’ll Need
With only a handful of accessible ingredients, you’ll be amazed at how much personality and pizzazz this cake brings to your holiday spread. Each item below has a starring role, contributing to the cake’s classic flavor, mesmerizing color, and indulgent, creamy finish.
- Red velvet cake mix: Your shortcut to deep, velvety flavor and vibrant holiday color—with all the appeal and none of the fuss.
- Eggs, oil, and water: Essential for bringing your cake mix to life, so your base is rich, fluffy, and perfectly moist.
- Instant cheesecake or vanilla pudding mix: Adds a luscious texture and a layer of sweet, creamy flavor that seeps into every bite.
- Cold milk: Helps set the pudding just right so it fills the cake’s poked holes with decadent creaminess.
- Whipped topping (thawed): A light, billowy layer to top it off, adding the perfect snowy contrast to the red velvet base.
- Red and green sprinkles: Bring sparkle and a burst of holiday color to your finished masterpiece.
- White chocolate curls or crushed peppermint (optional): Elevate the holiday excitement with gourmet touches that make each slice extra festive.
How to Make Christmas Red Velvet Poke Cake
Step 1: Prepare the Cake Mix
Let’s kick things off! Preheat your oven to 350°F (175°C), grab your trusty 9×13-inch baking dish, and give it a generous coating of nonstick spray. Mix up the red velvet cake batter just as the box directs, using those eggs, oil, and water for a cake that’s truly soft and springy. Pour the batter into your pan, evening it out, and get ready for magic!
Step 2: Bake the Red Velvet Cake
Pop your pan into the oven and bake according to the package instructions (usually about 28–32 minutes, but always rely on the toothpick test for doneness!). Once the cake is baked and the kitchen smells like pure holiday bliss, remove the cake and let it cool for 5–10 minutes—just enough so it’s warm but won’t melt those next layers.
Step 3: Poke Holes
Now for the fun part! Take the handle of a wooden spoon and poke holes all over the cake, about 1 inch apart. These little wells are going to catch all the pudding goodness, making every forkful tender and packed with creamy flavor.
Step 4: Mix and Pour the Pudding
In a medium bowl, whisk together your instant pudding mix and cold milk for about 2 minutes, just until it’s starting to thicken. Pour this golden mixture evenly over the entire cake, aiming to fill those poke holes. Use a spatula to gently coax the pudding around and smooth the surface so every inch is gloriously creamy.
Step 5: Chill and Set
Patience pays off! Pop the cake into the refrigerator and let it chill for at least 2 hours. This gives the pudding time to mingle and settle into all the nooks and crannies, turning every bite into pure holiday comfort.
Step 6: Top and Decorate
Once chilled, spread a generous, even layer of whipped topping across the cake. Scatter on your red and green sprinkles, and if you’re feeling fancy, scatter with white chocolate curls or crushed peppermint for that festive final touch. Voilà—Christmas Red Velvet Poke Cake ready to steal the spotlight!
How to Serve Christmas Red Velvet Poke Cake
Garnishes
For a truly dazzling presentation, don’t skimp on the garnishes! Red and green sprinkles deliver instant cheer, while a scattering of white chocolate curls or a sprinkle of crushed peppermint will transform each slice into a mini winter wonderland. Want an extra swoon-worthy finish? Try a light dust of powdered sugar for a snowy effect that’s picture-perfect.
Side Dishes
Nothing pairs better with a slice of Christmas Red Velvet Poke Cake than a hot mug of cocoa or a festive latte. If you’re planning a dessert buffet, consider teaming your showstopper with a fresh fruit salad or a tray of assorted Christmas cookies for a merry medley of flavors and textures. For grownups, a small scoop of vanilla bean ice cream on the side is a real crowd-pleaser!
Creative Ways to Present
Serve slices on bright holiday plates, or cut the cake into small squares and display on a tiered dessert stand for a party. You can even layer cubes in clear dessert cups for individual servings—perfect for gatherings where everyone wants their own festive treat. If celebrating with kids, let them add their own sprinkles or toppings at the table for a fun, interactive experience.
Make Ahead and Storage
Storing Leftovers
Leftover Christmas Red Velvet Poke Cake keeps beautifully in the refrigerator. Simply cover the pan tightly with plastic wrap or transfer slices to an airtight container. It’ll stay moist, creamy, and fresh for up to 3–4 days, making it an excellent choice for prepping ahead—if you can resist eating it all at once!
Freezing
If you’re planning to freeze, hold off on adding the whipped topping and decorations; wrap the fully cooled, pudding-filled cake tightly with plastic wrap and then foil. Freeze for up to one month. Thaw overnight in the fridge and finish with fresh whipped topping and garnishes just before serving for the best flavor and texture.
Reheating
This cake is truly meant to be served chilled or at cool room temperature, highlighting the creamy pudding and light topping. If you prefer it less chilly, just let it rest at room temperature for 15–20 minutes before serving—no need to heat it up!
FAQs
Can I use homemade red velvet cake instead of a mix?
Absolutely! If you have a favorite red velvet recipe, go right ahead and use it for your base—just be sure to make enough for a 9×13-inch pan so your Christmas Red Velvet Poke Cake turns out perfectly sized.
Can I swap the pudding flavor?
Of course! Cheesecake or vanilla pudding are classics, but white chocolate or even chocolate pudding add a luscious twist. Avoid flavors with strong colors (like pistachio) to keep that iconic red-and-white look.
How far in advance can I assemble this cake?
You can make the cake (with pudding layer) up to 24 hours in advance. Hold off on adding the whipped topping and final garnishes until just before serving for the freshest, prettiest finish.
What’s the best way to poke holes in the cake?
A wooden spoon handle works wonders, but a large straw, chopstick, or even a skewer can do the trick—just make sure the holes aren’t too small, so the pudding can really soak in.
Can I make this cake gluten-free?
Definitely! Use your favorite gluten-free red velvet cake mix and double-check that your pudding and whipped topping are gluten-free as well. Follow all the same steps and enjoy every bite!
Final Thoughts
There’s no better way to bring big smiles to your holiday celebrations than with a homemade Christmas Red Velvet Poke Cake. It’s easy, outrageously festive, and scrumptiously good—so go ahead and share the cheer. Trust me, it’s a tradition everyone will ask for year after year!
Print
Christmas Red Velvet Poke Cake Recipe
- Total Time: 2 hours 45 minutes (includes chilling)
- Yield: 12 servings 1x
- Diet: Vegetarian
Description
Indulge in the festive flavors of Christmas with this delightful Red Velvet Poke Cake. A moist red velvet cake is soaked in creamy pudding, topped with a fluffy whipped topping, and garnished with holiday sprinkles for a dessert that’s perfect for the holiday season.
Ingredients
For the Cake:
- 1 box red velvet cake mix (plus ingredients listed on box: usually eggs, oil, and water)
For the Pudding Layer:
- 1 package (3.4 oz) instant cheesecake or vanilla pudding mix
- 2 cups cold milk
For Topping:
- 1 container (8 oz) whipped topping, thawed
- Red and green sprinkles for garnish
- Optional: white chocolate curls or crushed peppermint for topping
Instructions
- Prepare the Cake: Preheat oven to 350°F (175°C) and prepare a 9×13-inch baking dish with nonstick spray. Prepare the red velvet cake mix according to the package instructions and pour into the prepared dish. Bake as directed, then remove from oven and let cool for 5–10 minutes.
- Add Pudding Layer: Using the handle of a wooden spoon, poke holes all over the cake about 1 inch apart. In a medium bowl, whisk together the pudding mix and cold milk until slightly thickened, about 2 minutes. Pour the pudding evenly over the cake, making sure it seeps into the holes. Use a spatula to smooth the surface.
- Chill and Top: Refrigerate the cake for at least 2 hours to chill and set. Once chilled, spread the whipped topping over the cake and garnish with red and green sprinkles, white chocolate curls, or crushed peppermint just before serving.
Notes
- For extra richness, drizzle sweetened condensed milk over the cake before adding the pudding.
- This dessert can be made a day ahead and kept refrigerated.
- Prep Time: 15 minutes
- Cook Time: 30 minutes
- Category: Dessert
- Method: Baking
- Cuisine: American
Nutrition
- Serving Size: 1 slice
- Calories: 350
- Sugar: 28g
- Sodium: 400mg
- Fat: 15g
- Saturated Fat: 6g
- Unsaturated Fat: 7g
- Trans Fat: 0g
- Carbohydrates: 50g
- Fiber: 1g
- Protein: 4g
- Cholesterol: 45mg

