
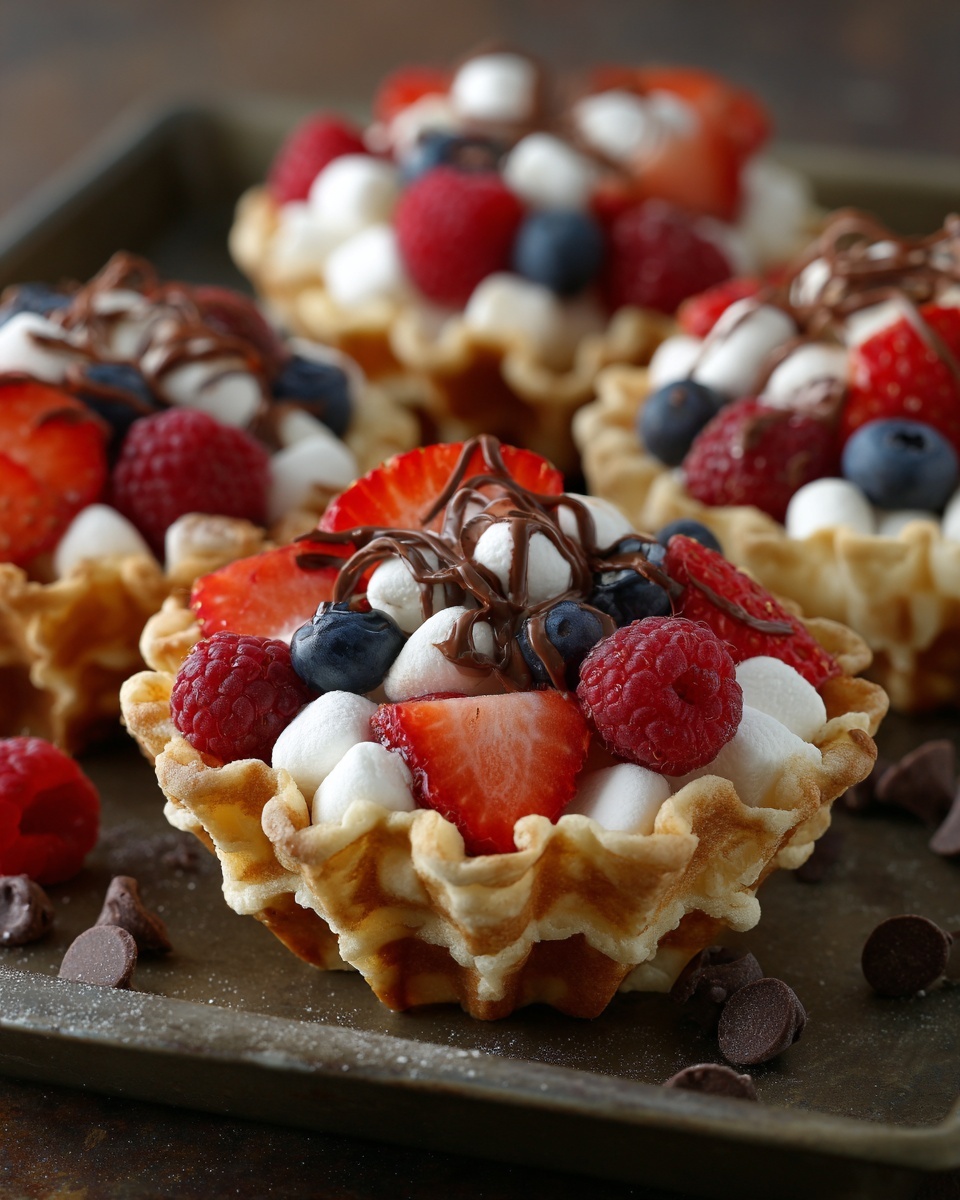
If you are looking for a fun and delicious treat to enjoy outdoors or at home, the Campfire Cones Recipe is an absolute game-changer. Imagine crispy waffle cones filled with layers of melty chocolate, gooey marshmallows, and a mix of your favorite sweet and nutty goodies, all warmed up by the campfire or grill. It’s that perfect combination of crunchy, gooey, and slightly toasted flavors that brings everyone together. Whether you’re camping, having a backyard barbecue, or just craving a nostalgic dessert, this recipe will quickly become a beloved favorite in your dessert rotation.

Ingredients You’ll Need
To make this delightful Campfire Cones Recipe, you only need a handful of simple ingredients that each play a crucial role in delivering that incredible mix of textures and flavors. The combination of crisp waffle cones, soft marshmallows, and rich chocolate chips creates the foundation, while optional additions can add crunch and extra bursts of sweetness.
- Waffle cones: The perfect crunchy vessel to hold all the gooey goodness inside.
- Mini marshmallows: They melt beautifully and provide that classic, sticky sweetness.
- Chocolate chips (or chopped chocolate): Melts into luscious pockets of chocolatey bliss.
- Peanut butter chips (optional): Adds a nutty richness that pairs wonderfully with chocolate.
- M&Ms or other small candy pieces (optional): Brings colorful pops of fun and extra sweetness with a slight crunch.
- Chopped nuts (optional): Peanuts, almonds, or walnuts add satisfying texture and depth of flavor.
- Aluminum foil: Essential for wrapping the cones securely to prevent spills while heating.
- Sprinkles (optional): For a vibrant finishing touch that kids and adults alike will enjoy.
How to Make Campfire Cones Recipe
Step 1: Prepare Your Fire or Grill
Start by preheating your campfire, fire pit, or grill to a medium heat. This ensures you’ll have a nice steady warmth perfect for melting the marshmallows and chocolate without burning the cones. If you’re using a campfire, gather some glowing coals or stable embers for the best heat control.
Step 2: Fill the Waffle Cones
Stand your waffle cones upright and begin layering inside. Start with a layer of mini marshmallows, then sprinkle a handful of chocolate chips, followed by any optional peanut butter chips, candy pieces, or nuts you’d like to include. Keep layering until the cone is almost full to the top. This layering builds a delightful combination of flavors and textures in every bite.
Step 3: Add a Fun Finishing Touch
If you want to add a bit of festive color, sprinkle some colorful sprinkles on top of the filled cones. This is especially fun if you are making these with kids or for a party. It’s like adding a little magic before the cones get wrapped and heated.
Step 4: Wrap the Cones in Foil
Wrap each filled cone tightly in aluminum foil, making sure to seal the edges completely. This step is key because it traps the heat and melts the ingredients inside while preventing any drips or spills that can cause flare-ups on the fire or mess on the grill grate.
Step 5: Cook the Cones
Place the foil-wrapped cones on the grill or directly onto the campfire grate. Allow them to heat for 5 to 7 minutes, checking occasionally to ensure they aren’t scorching. Alternatively, hold the cones over the fire with tongs, turning gently so all sides get even heat. You’ll know they’re ready when the marshmallows and chocolate have melted into delicious gooeyness inside.
Step 6: Cool and Serve
Carefully remove the cones from the heat and let them cool just enough so they are safe to handle. Unwrap the foil slowly to avoid steam burns. Serve your gooey, warm campfire treat immediately and watch everyone’s eyes light up with each bite, thanks to the incredible melting magic inside.
How to Serve Campfire Cones Recipe
Garnishes
Add a little charm to your Campfire Cones Recipe by tossing on extra sprinkles, a drizzle of chocolate or caramel sauce, or a dusting of powdered sugar right before serving. These garnishes elevate the presentation and add an extra layer of flavor that makes the experience even more special.
Side Dishes
This sweet treat pairs wonderfully with simple sides like fresh fruit—think juicy strawberries or tangy orange slices—to balance the richness. For a more indulgent option, serve alongside creamy vanilla ice cream or a scoop of your favorite frozen yogurt for a cool contrast to the warm cones.
Creative Ways to Present
Rather than just passing out cones, try presenting them in a rustic wooden crate lined with parchment or colorful napkins for a festive vibe. You can also arrange them standing upright in a tall cup or mason jar to make serving easy and mess-free. For a fun twist, invite guests to customize their own with various mix-ins on the side, turning the dessert into an interactive experience.
Make Ahead and Storage
Storing Leftovers
If you happen to have any leftover Campfire Cones Recipe, store them tightly wrapped in foil or airtight containers at room temperature for up to a day. Because the cones can get soft as the marshmallows and chocolate cool, it’s best to enjoy them fresh, but proper storage will help keep them edible and tasty for a short time.
Freezing
Freezing isn’t ideal for this recipe because the texture of melted marshmallows and chocolate changes when frozen and thawed. However, if you want to prepare cones ahead of time without the heat, you can fill cones and freeze them wrapped in foil. When you’re ready, thaw them briefly and warm them on the grill or campfire as usual.
Reheating
To warm up leftover cones, place them back on the grill or wrap in foil and heat them gently in an oven at 300°F (150°C) for about 5 minutes, just until the marshmallows and chocolate get soft again. Avoid microwaving, as it can make cones soggy and unevenly heated.
FAQs
Can I use regular ice cream cones instead of waffle cones?
Regular sugar or cake cones are usually more fragile and not as sturdy for this recipe. Waffle cones have a thicker, more durable texture that holds up better during heating and prevents burning or falling apart.
What if I don’t have a campfire or grill? Can I make Campfire Cones Recipe indoors?
Absolutely! You can use an oven or even a toaster oven by wrapping the cones in foil and baking at 350°F (175°C) for around 5-7 minutes. Keep a close eye on them to avoid burning and melting messes.
Are there any allergy-friendly variations?
Definitely! Skip the peanut butter chips and nuts if you have allergies, and try safe alternatives like sunflower seed butter chips or dried fruit pieces. You can customize the fillings to suit any dietary needs while keeping the fun melted treat concept intact.
How can I prevent the cones from getting soggy?
Wrapping the cones tightly in foil and cooking them at moderate heat helps prevent sogginess by trapping heat evenly and keeping moisture controlled. Serving immediately after cooking also preserves the crispness of the cone.
Can I make the Campfire Cones Recipe vegan or dairy-free?
Yes! Use vegan-friendly waffle cones, vegan marshmallows, and dairy-free chocolate or chips. There are plenty of delicious plant-based options available that melt just as well and taste amazing.
Final Thoughts
There is truly something magical about gathering around the fire to share a warm, gooey sweet treat, and this Campfire Cones Recipe captures that magic perfectly. It’s easy, customizable, and endlessly fun for all ages. Give it a try next time you’re craving a cozy dessert with a twist — I promise it will be loved by everyone lucky enough to take a bite!
Print
Campfire Cones Recipe
- Prep Time: 5 minutes
- Cook Time: 7 minutes
- Total Time: 12 minutes
- Yield: 8 servings
- Category: Dessert
- Method: Grilling
- Cuisine: American
Description
Campfire Cones are a fun and easy-to-make dessert perfect for outdoor gatherings. These waffle cones are stuffed with mini marshmallows, chocolate chips, and optional add-ins like peanut butter chips, M&Ms, and chopped nuts, then wrapped in foil and heated over a campfire or grill until gooey and melted.
Ingredients
Base Ingredients
- 8 waffle cones
- 1 cup mini marshmallows
- 1 cup chocolate chips (or chopped chocolate)
Optional Ingredients
- 1/2 cup peanut butter chips
- 1/2 cup M&Ms or other small candy pieces
- 1/4 cup chopped nuts (peanuts, almonds, or walnuts)
- Sprinkles (for added fun)
Other
- Aluminum foil (for wrapping cones)
Instructions
- Preheat the heat source. Preheat the campfire or grill to medium heat to create an even and safe cooking environment for melting the cone fillings.
- Fill the waffle cones. Stand each waffle cone upright and layer mini marshmallows, chocolate chips, peanut butter chips, candy pieces, and chopped nuts inside, filling each cone nearly to the top.
- Add sprinkles. If desired, sprinkle colorful candies on top of the cone fillings for an extra festive touch.
- Wrap cones in foil. Wrap each filled cone tightly in aluminum foil, ensuring all edges are sealed to prevent any melted ingredients from leaking out during cooking.
- Cook over heat. Place the foil-wrapped cones on the grill or campfire grate and cook for 5-7 minutes until the marshmallows and chocolate melt and become gooey. Alternatively, hold the cones over the fire with tongs, turning them gently to melt evenly.
- Cool and serve. Carefully remove the cones from the heat and allow them to cool for a few minutes before unwrapping. Serve immediately and enjoy the warm, gooey treat.
Notes
- You can customize these cones with your favorite candies and nuts for different flavors and textures.
- Use caution when handling hot cones and foil; they can become very hot during cooking.
- If you don’t have a campfire or grill, you can also warm the cones in an oven at 350°F wrapped in foil for about 5-7 minutes.
- For a nut-free version, omit nuts and peanut butter chips.

