
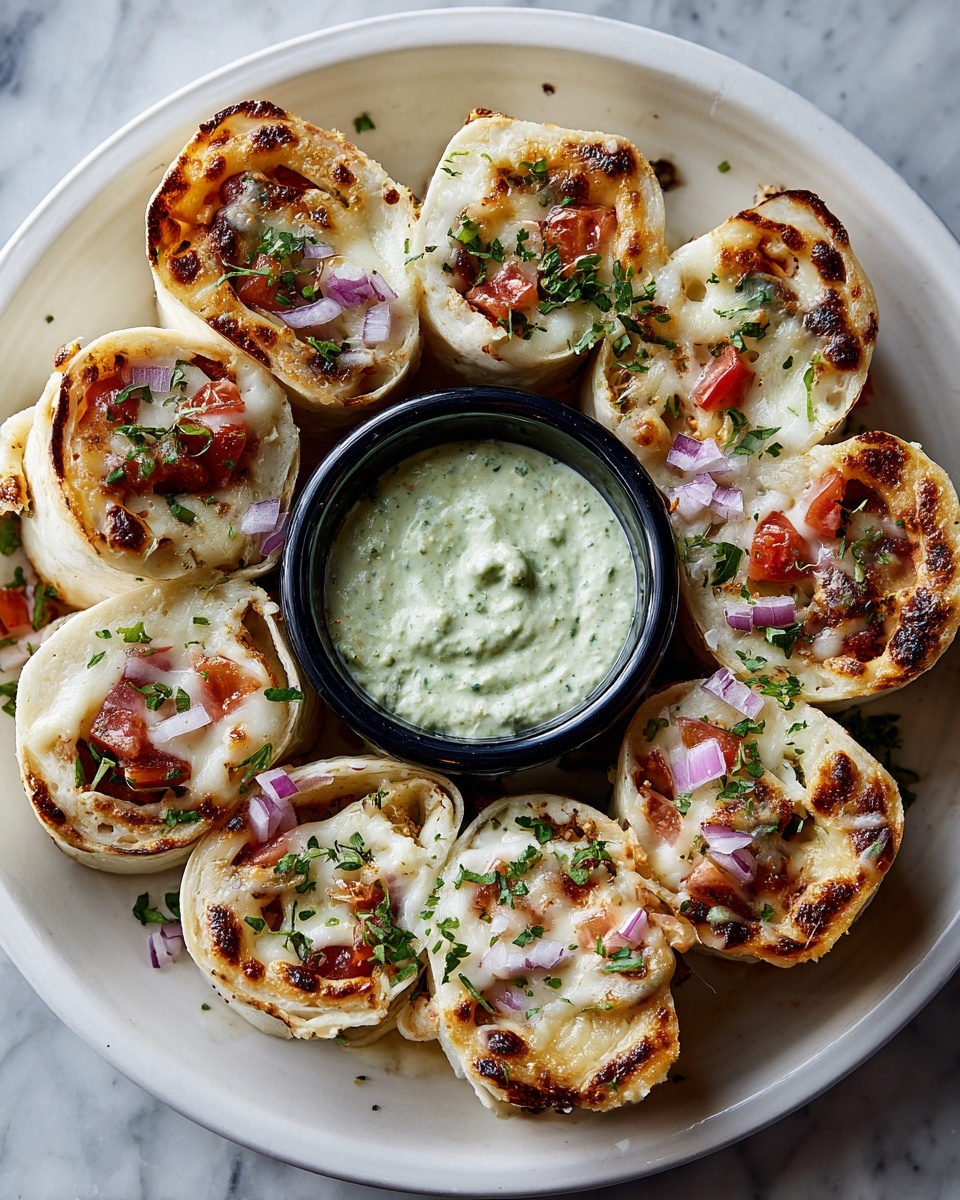
If you’re looking for a fun and irresistible party appetizer that brings everyone together, look no further than the Blooming Quesadilla Ring Recipe. This delightful dish combines crispy baked tortillas with a savory, cheesy chicken filling that bursts with flavor in every bite. Perfect for game days, casual get-togethers, or simply because you deserve a delicious treat, this blooming quesadilla ring looks impressive but comes together with surprisingly simple steps. Once you try it, you’ll understand why it’s quickly become a favorite crowd-pleaser.
Ingredients You’ll Need
Don’t let the short list of ingredients fool you – each one plays a special role in creating the perfect balance of taste, texture, and vibrant color.
- 6 large flour tortillas: The soft yet sturdy base that crisps up beautifully in the oven for that irresistible crunch.
- 2 cups cooked shredded chicken: Adding hearty protein and savory depth, rotisserie chicken works wonderfully here.
- 1 1/2 cups shredded Mexican blend cheese: A melty, flavorful mix that ties all the filling ingredients together.
- 1/2 cup canned black beans, drained and rinsed: For added fiber and a subtle earthiness to complement the chicken.
- 1/2 cup corn (frozen and thawed or canned and drained): Adds a pop of sweetness and color that brighten the filling.
- 1/4 cup diced red bell pepper: Provides crunch and a touch of sweetness that balances the spices.
- 1/4 cup chopped green onions: Brings mild oniony freshness that lifts the savory flavors.
- 1 tablespoon taco seasoning: Infuses the filling with classic Tex-Mex spices for a bold, zesty punch.
- 1 tablespoon olive oil or melted butter: For brushing the tops of the quesadilla ring to achieve that glossy, golden crispiness.
- Sour cream, salsa, or guacamole for dipping: Essential accompaniments that add creaminess, tang, or freshness with every dip.
How to Make Blooming Quesadilla Ring Recipe
Step 1: Prep and Mix the Filling
Start by preheating your oven to 375°F (190°C) and line a large baking sheet with parchment paper to prevent sticking. Next, grab a large bowl and combine your shredded chicken, shredded cheese, black beans, corn, diced red bell pepper, chopped green onions, and taco seasoning. Stir everything well to ensure that every bit of filling has that perfect burst of Tex-Mex flavor in every bite.
Step 2: Cut and Fill Your Tortillas
Take each flour tortilla and slice it in half to create manageable sizes that will easily form the cone shape needed for the ring. Place a generous spoonful of the filling onto the straight edge of each tortilla half. Then, fold that straight edge over the filling and pinch it so it forms a cute little cone that will hold all the deliciousness inside as it bakes.
Step 3: Arrange the Cones Into a Beautiful Ring
On your prepared baking sheet, position the filled cones in a circular shape, pointing the narrow ends inward and overlapping the open, stuffed edges slightly. This arrangement will create the signature blooming flower shape that makes this dish both stunning and practical for sharing.
Step 4: Brush and Bake
Lightly brush olive oil or melted butter over the tops of the cones. This extra step translates into a richly browned, crispy finish that’s almost impossible to resist. Bake the entire ring at 375°F for 18 to 22 minutes until the tortillas become golden brown and the cheese bubbles through in places, signaling it’s time to take your creation out of the oven.
Step 5: Cool Slightly and Serve
Letting the blooming quesadilla ring cool for a few minutes helps make it easier to handle and maximizes flavor as the filling settles. Place your favorite dipping sauces in the center of the ring — sour cream, salsa, or guacamole work beautifully — and watch everyone dive in eagerly!
How to Serve Blooming Quesadilla Ring Recipe

Garnishes
Adding fresh garnishes like chopped cilantro, extra green onions, or a sprinkle of paprika elevates the look and taste of your blooming quesadilla ring. These little touches bring fresh notes and vibrant color, making the dish even more appetizing and crowd-friendly.
Side Dishes
Pair your quesadilla ring with light, refreshing sides such as a crisp garden salad, Mexican street corn salad, or a zesty avocado tomato salad. These options add a healthy balance to the cheesy, baked goodness and bring complementary textures to your meal.
Creative Ways to Present
Why not get creative with the presentation? Serve the blooming quesadilla ring on a large wooden platter or colorful ceramic dish to make it pop visually. You can also nestle small bowls of various salsas inside the ring for flavor variety and a festive party feel. Everyone loves to customize each bite!
Make Ahead and Storage
Storing Leftovers
If you have any quesadilla ring leftovers, wrap them tightly in plastic wrap or place them in an airtight container and refrigerate. They will stay fresh for up to three days, making for a delicious next-day snack or quick meal.
Freezing
This recipe freezes surprisingly well! Assemble your filled cones on a baking sheet just like usual, then freeze them uncovered until solid. Transfer the frozen cones into a labeled freezer-safe bag or container, and freeze for up to two months. When ready to enjoy, bake them straight from frozen, adding a few extra minutes to the baking time.
Reheating
To reheat, place leftovers onto a baking sheet and warm in a 350°F oven until heated through and crispy again, about 10 to 12 minutes. Avoid microwaving if possible, as that can lead to sogginess and a less satisfying texture.
FAQs
Can I make the filling vegetarian?
Absolutely! Swap out the shredded chicken for extra beans, sautéed mushrooms, or spiced tofu to keep the filling hearty and delicious without meat.
What type of cheese is best for this recipe?
A Mexican blend cheese works beautifully because it melts well and combines mild cheddar, Monterey Jack, and other cheeses for great flavor. You can also use just cheddar or pepper jack if you prefer a spicier kick.
Can I use corn tortillas instead of flour?
Flour tortillas are preferred for this recipe since they fold easily and crisp up nicely. Corn tortillas may tear more easily and won’t hold the cone shape as well, but if you want to try, warm them first to make them pliable.
Is it okay to prepare this recipe entirely ahead of time?
Yes, you can assemble the filled cones and refrigerate them until you’re ready to bake. Just be sure to cover them tightly to keep them from drying out.
What dipping sauces complement the blooming quesadilla ring best?
Classic choices include sour cream, guacamole, and salsa. You could also try chipotle mayo, queso dip, or even a fresh pico de gallo for a refreshing twist.
Final Thoughts
I can’t recommend the Blooming Quesadilla Ring Recipe enough for your next gathering or cozy night in. It transforms simple ingredients into a festive, flavor-packed feast that everyone will be asking for again and again. So go ahead, gather your loved ones, get creative in the kitchen, and enjoy the delicious fun that this blooming quesadilla ring brings to your table!
Print
Blooming Quesadilla Ring Recipe
- Prep Time: 20 minutes
- Cook Time: 20 minutes
- Total Time: 40 minutes
- Yield: 8 servings
- Category: Appetizer
- Method: Baking
- Cuisine: Tex-Mex
Description
The Blooming Quesadilla Ring is a fun and flavorful Tex-Mex appetizer perfect for parties and game day spreads. This recipe features flour tortillas filled with a seasoned mixture of shredded chicken, cheese, black beans, corn, and veggies, baked to golden perfection and served with your favorite dipping sauces like sour cream, salsa, or guacamole.
Ingredients
Filling
- 2 cups cooked shredded chicken (rotisserie works well)
- 1 1/2 cups shredded Mexican blend cheese
- 1/2 cup canned black beans, drained and rinsed
- 1/2 cup corn (frozen and thawed or canned and drained)
- 1/4 cup diced red bell pepper
- 1/4 cup chopped green onions
- 1 tablespoon taco seasoning
Quesadilla Ring
- 6 large flour tortillas
- 1 tablespoon olive oil or melted butter (for brushing)
- Sour cream, salsa, or guacamole for dipping
Instructions
- Preheat Oven and Prepare Baking Sheet: Preheat your oven to 375°F (190°C) and line a large baking sheet with parchment paper to prevent sticking and ensure easy cleanup.
- Mix Filling Ingredients: In a large bowl, combine the shredded chicken, shredded Mexican blend cheese, drained black beans, corn, diced red bell pepper, chopped green onions, and taco seasoning. Mix thoroughly until the ingredients are well incorporated.
- Cut Tortillas and Fill: Cut each large flour tortilla in half. Spoon a generous amount of the filling onto the straight edge of each tortilla half. Fold the straight edge over the filling to create a cone-shaped pocket.
- Arrange Cones in a Ring: Place the filled tortilla cones on the prepared baking sheet in a circle, with the pointed ends facing inward and the open edges slightly overlapping to form a ring.
- Brush with Oil or Butter: Lightly brush the tops of the arranged quesadilla cones with olive oil or melted butter to promote browning and crispiness during baking.
- Bake Until Golden and Crisp: Bake in the preheated oven for 18 to 22 minutes, or until the tortillas are golden brown and crispy on top.
- Cool and Serve: Allow the quesadilla ring to cool slightly before serving. Place your choice of dipping sauces such as sour cream, salsa, or guacamole in the center of the ring for dipping.
Notes
- Customize the filling by adding sautéed onions, jalapeños, or chopped spinach for extra flavor and nutrition.
- This recipe is ideal for parties and game day spreads as a shareable appetizer.
- You can assemble the quesadilla ring ahead of time and refrigerate it until ready to bake, making it perfect for prepping in advance.


