
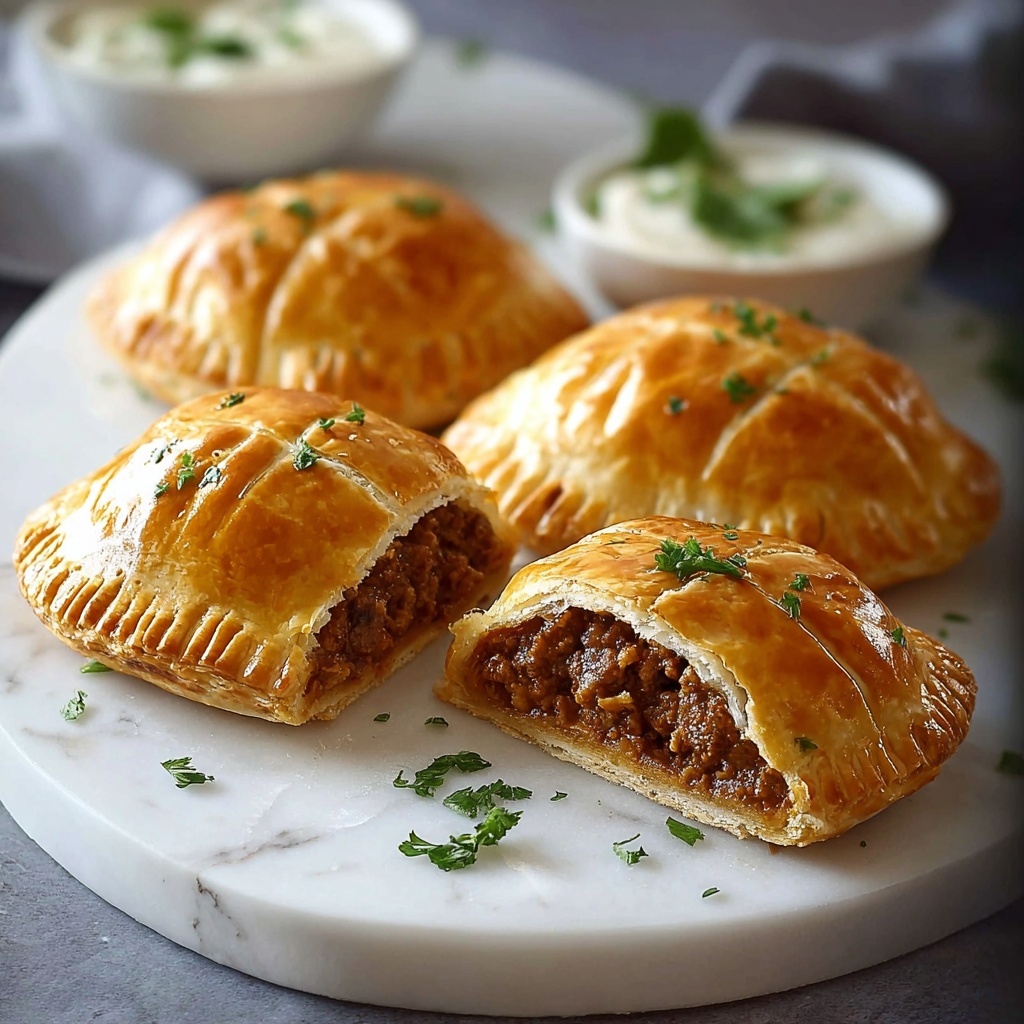
If you’re craving a warm, comforting snack that hits all the right notes of savory satisfaction, these Beef and Cheese Hand Pies: A Delicious Recipe for Savory Snacks Recipe are exactly what you need. Picture tender, seasoned ground beef mingling with gooey melted cheese, all wrapped in a golden, flaky crust that’s just begging to be eaten hot from the oven. These hand pies are not only simple to make but also incredibly versatile, perfect for when you want something easy yet outrageously tasty. Whether enjoyed as a quick snack or a hearty addition to your meal lineup, this recipe brings joy to any table with every delicious bite.

Ingredients You’ll Need
This recipe relies on a handful of straightforward yet essential ingredients that work in harmony to create unforgettable flavor, texture, and appearance. Each component plays a starring role in bringing these hand pies to life, ensuring that every mouthful is perfectly balanced.
- Ground Beef: Use lean or medium fat for rich flavor and juicy filling.
- Shredded Cheese: Cheddar or a blend melts beautifully for that irresistible gooey center.
- Pie Crust Dough: Store-bought or homemade, this creates the flaky, buttery exterior that holds everything together.
- Onion (optional): Adds sweetness and depth when sautéed and combined with beef.
- Garlic Powder: A subtle boost that enhances the savory profile.
- Salt and Pepper: Essential for seasoning the beef to perfection.
- Egg (for egg wash): Brushed on the crust to give a beautiful golden finish.
How to Make Beef and Cheese Hand Pies: A Delicious Recipe for Savory Snacks Recipe
Step 1: Prepare the Beef Filling
Start by heating a skillet over medium heat and adding the ground beef. Break it up with a spatula and cook until fully browned, about 6–8 minutes. If you choose to add onions, sauté them alongside the beef until they’re soft and translucent. Season the mixture with garlic powder, salt, and pepper to taste. Once cooked, drain any excess fat and let the filling cool slightly before mixing in your shredded cheese. This step ensures the cheese melts just right inside your hand pies without leaking.
Step 2: Roll Out and Cut the Dough
On a lightly floured surface, roll out your pie crust dough to about 1/8-inch thickness. Using a round cutter—roughly 5 inches in diameter—cut out circles that will become your hand pies. This size is perfect for a handheld snack that’s both filling and convenient. Don’t worry if your circles aren’t perfect; the rustic look adds charm!
Step 3: Assemble the Hand Pies
Place a generous spoonful of the beef and cheese filling in the center of each dough circle. Be careful not to overfill to prevent the pies from bursting during baking. Fold the dough over to form a half-moon shape, then crimp the edges with a fork to seal them tight. This technique not only secures the filling but also gives a lovely decorative touch.
Step 4: Apply Egg Wash and Bake
Beat an egg and brush the surface of each hand pie generously to achieve a gorgeous golden color when baked. Place the hand pies on a baking sheet lined with parchment paper and bake in a preheated oven at 375°F (190°C) for about 20 to 25 minutes, or until the crust is puffed and golden. The aroma wafting through your kitchen will have you reaching for napkins before these even cool down!
How to Serve Beef and Cheese Hand Pies: A Delicious Recipe for Savory Snacks Recipe
Garnishes
One fantastic way to elevate your hand pies is by pairing them with fresh, vibrant garnishes. A sprinkle of chopped fresh parsley or cilantro adds a burst of color and herbaceous brightness that cuts through the richness beautifully. You can also offer a dollop of sour cream or a drizzle of your favorite hot sauce on the side for dipping, which brings an inviting tang or heat that complements the filling perfectly.
Side Dishes
These hand pies are hearty but can easily be rounded out with some simple sides to make a complete meal. Consider serving them alongside a crisp green salad tossed with a light vinaigrette for freshness or a bowl of tomato soup for a cozy, comforting combo. Roasted vegetables or a simple coleslaw also work wonderfully, adding texture and nutrition without stealing the spotlight.
Creative Ways to Present
If you’re hosting a party or want to impress friends, consider presenting these hand pies on a rustic wooden board with small ramekins of assorted dips—think guacamole, ranch, or salsa. For a whimsical touch, serve them wrapped in parchment paper tied with twine, making them perfect grab-and-go snacks that look as delightful as they taste. Kids and adults alike will adore the personal, handmade vibe.
Make Ahead and Storage
Storing Leftovers
If you have leftover hand pies (though that rarely happens!), store them in an airtight container in the refrigerator. They will stay fresh for up to 3 days, making them a great option for quick lunches or snacks throughout the week.
Freezing
These hand pies freeze beautifully, which is excellent for meal prep. Arrange unbaked pies on a baking sheet in a single layer and freeze until solid. Then transfer them to a freezer-safe bag or container. When you’re ready, bake from frozen, just adding a few extra minutes to the baking time to ensure they heat through perfectly.
Reheating
To reheat, pop your hand pie into a preheated oven at 350°F (175°C) for about 10–15 minutes. This helps maintain the crispy crust and warm filling. Avoid microwaving if possible, as it tends to make the crust soggy and less enjoyable.
FAQs
Can I use different types of cheese in this recipe?
Absolutely! While cheddar is a classic choice, feel free to experiment with mozzarella for extra stretchiness, pepper jack for a little spice, or even a combo of cheeses to customize the flavor to your liking.
Are these hand pies suitable for freezing and baking later?
Yes, they freeze wonderfully. Freezing them before baking helps preserve the shape and texture. When ready, bake directly from frozen, adding a few extra minutes to the baking time.
Can I make these hand pies vegetarian?
Definitely! Substitute the ground beef with sautéed mushrooms, lentils, or your favorite plant-based protein and keep the cheese or try a vegan alternative for a meat-free version that is still delicious and satisfying.
What can I serve with these Beef and Cheese Hand Pies for a full meal?
A simple salad, roasted vegetables, or a warm bowl of soup pairs perfectly. These sides complement the savory pies without overwhelming their rich flavor.
How do I avoid soggy crusts?
To keep your crust flaky, make sure your filling is not too wet. Drain any excess liquid from cooked beef and allow the filling to cool before assembling. Brushing the crust with egg wash also helps create a protective barrier during baking.
Final Thoughts
I hope this Beef and Cheese Hand Pies: A Delicious Recipe for Savory Snacks Recipe inspires you to dive into your kitchen and whip up something truly comforting and fun. These hand pies are the perfect way to bring people together over mouthwatering food that’s as satisfying to make as it is to eat. Give them a try, make them your own, and enjoy every flaky, cheesy bite. Happy baking!
Print
Beef and Cheese Hand Pies: A Delicious Recipe for Savory Snacks Recipe
- Prep Time: 20 minutes
- Cook Time: 25 minutes
- Total Time: 45 minutes
- Yield: 3 servings (3-4 hand pies)
- Category: Snack
- Method: Baking
- Cuisine: American
Description
These Beef and Cheese Hand Pies are the perfect savory snack or meal option, featuring a flaky crust filled with seasoned ground beef and melty cheese. Ideal for appetizers, main dishes with a salad, or picnic treats, they offer a comforting and satisfying bite. Customize the filling with sautéed vegetables or different cheeses to suit your taste.
Ingredients
For the Filling
- 1/2 pound ground beef
- 1 cup shredded cheddar cheese
- 1/4 cup finely chopped onions (optional)
- 1/4 cup chopped bell peppers or jalapeños (optional)
- Salt and pepper, to taste
- 1/2 teaspoon garlic powder
- 1/2 teaspoon paprika
For the Dough
- 2 cups all-purpose flour
- 1/2 teaspoon salt
- 1/2 cup unsalted butter, cold and cubed
- 1/3 cup cold water
- 1 egg (for egg wash)
Instructions
- Prepare the Dough: In a large bowl, mix the flour and salt. Cut in the cold cubed butter using a pastry cutter or fingers until the mixture resembles coarse crumbs. Gradually add cold water, mixing until a dough forms. Wrap in plastic wrap and refrigerate for 30 minutes.
- Cook the Filling: In a skillet over medium heat, cook the ground beef until browned and cooked through. Drain excess fat. Add onions, bell peppers or jalapeños if using, garlic powder, paprika, salt, and pepper. Cook until vegetables are softened. Remove from heat and let the mixture cool slightly. Stir in shredded cheddar cheese.
- Assemble Hand Pies: Preheat oven to 375°F (190°C). Roll out the dough on a floured surface to about 1/8 inch thickness. Cut into circles approximately 4-5 inches in diameter. Place a spoonful of the beef and cheese mixture onto one half of each circle. Fold the other half over and seal edges by crimping with a fork.
- Apply Egg Wash: Beat the egg and brush it over the tops of each hand pie for a golden, glossy finish.
- Bake: Place the hand pies on a parchment-lined baking sheet. Bake for 20-25 minutes or until golden brown and flaky.
- Serve: Let the hand pies cool slightly before serving. Enjoy warm as a snack or with a side salad for a satisfying meal.
Notes
- You can substitute cheddar cheese with pepper jack or mozzarella for different flavor profiles.
- Add sautéed onions, garlic, or jalapeños to the filling for extra flavor and heat.
- These hand pies freeze well; freeze before baking and bake from frozen, adding extra baking time.
- Make sure to seal the edges properly to prevent filling leakage during baking.


