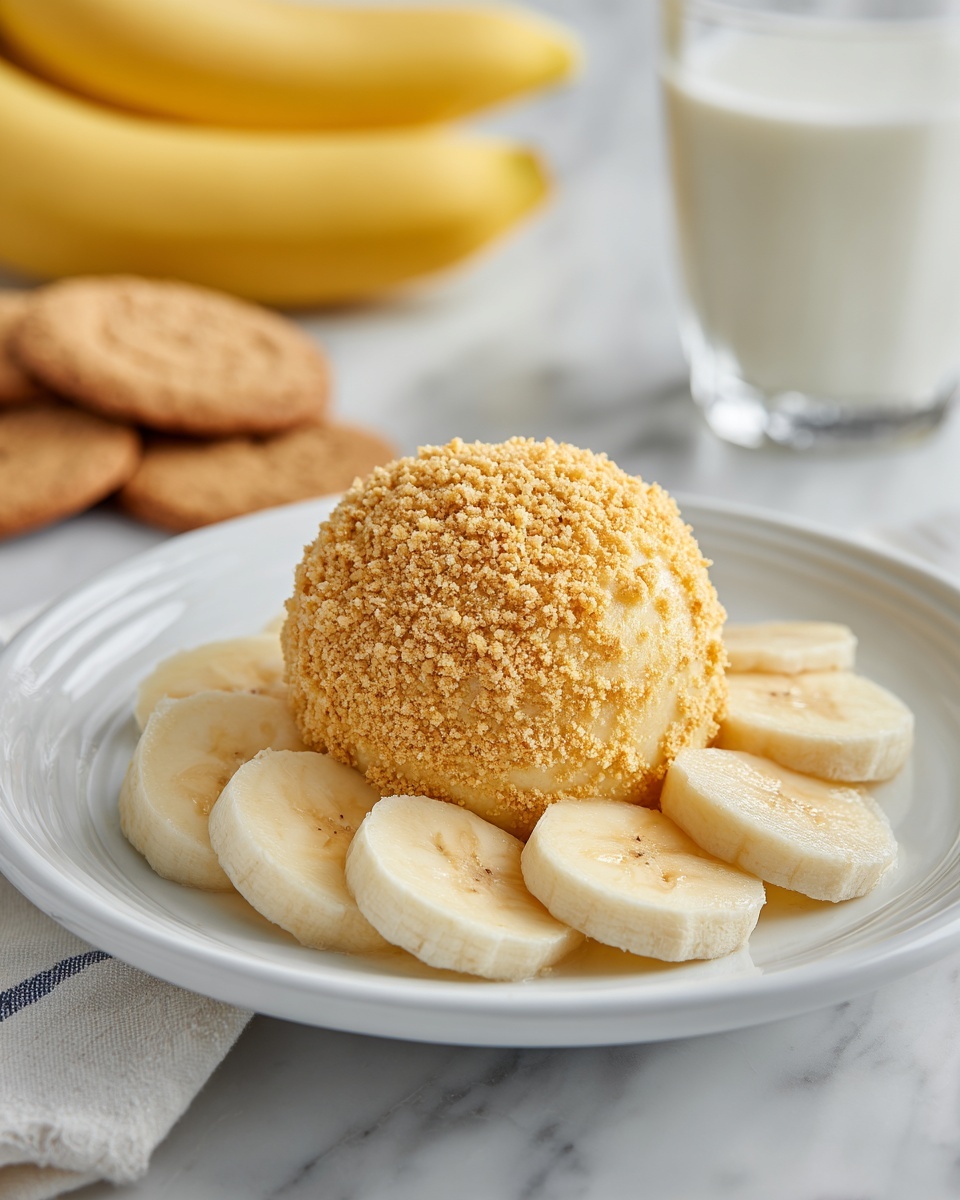
If you are looking for a show-stopping treat that’s equal parts fun, nostalgic, and downright delicious, you’ve got to try this Banana Pudding Dessert Cheese Ball Recipe. This unique twist on classic banana pudding takes all the creamy, dreamy flavors you love and cleverly transforms them into a perfect party-ready cheese ball. Imagine velvety cream cheese and buttery vanilla wafers combined with the unmistakable sweetness of banana pudding — rolled into a smooth, scoopable delight that’s just begging to be shared. Whether you’re serving it at a family gathering, a potluck, or just craving a special snack, this recipe brings a joyful burst of flavor that’s as charming as it is tasty.

Ingredients You’ll Need
Getting the ingredients right is super important here, but don’t worry — the list is simple, and each component plays a starring role in creating that luscious taste and perfect texture of this Banana Pudding Dessert Cheese Ball Recipe.
- Cream cheese (8 oz, softened): Provides the rich, tangy base that gives the cheese ball its creamy texture.
- Unsalted butter (1/2 cup, softened): Adds smoothness and a touch of buttery richness, balancing the sweetness.
- Instant banana cream pudding mix (3.4 oz, dry): Brings that signature banana flavor and a luscious, velvety sweetness.
- Powdered sugar (1/4 cup): Sweetens the mix gently without graininess, keeping it silky smooth.
- Vanilla extract (1/2 teaspoon): Enhances the overall flavor and adds a lovely aromatic depth.
- Crushed vanilla wafers (1 cup, plus extra for coating): Provides a delightful crunch and classic banana pudding vibe.
- Mini vanilla wafers and sliced bananas (for serving): Perfect dippers that add texture and fruity freshness.
How to Make Banana Pudding Dessert Cheese Ball Recipe
Step 1: Cream Together the Bases
Start by beating the softened cream cheese and butter together in a large mixing bowl until the mixture is smooth and creamy — this is the foundation of your cheese ball. The combination makes a luscious, velvety base that will carry all your banana pudding flavors perfectly.
Step 2: Add Banana Pudding Mix and Sweetness
Next, sprinkle in the instant banana cream pudding mix, powdered sugar, and vanilla extract. Beat everything together until fully combined and fluffy. This step infuses the mixture with that classic, nostalgic banana pudding taste everyone loves, making the cheese ball irresistibly yummy.
Step 3: Fold in Crushed Vanilla Wafers
Gently fold in the crushed vanilla wafers to add delightful texture and that unmistakable vanilla cookie crunch. The wafers bring more than flavor; they add a playful burst of texture that keeps this dish so enjoyable to eat.
Step 4: Shape and Chill
Using a large piece of plastic wrap, scoop the mixture onto the center and shape it into a tight ball. Wrap it securely and refrigerate for at least 2 hours, or until it firms up completely. The chilling time lets the flavors meld while giving the cheese ball a perfect, scoopable consistency.
Step 5: Coat and Serve
Right before serving, generously roll the chilled cheese ball in additional crushed vanilla wafers to create a beautiful, crunchy exterior. This lovely coat not only looks inviting but provides a wonderful complementary texture to the creamy center.
How to Serve Banana Pudding Dessert Cheese Ball Recipe

Garnishes
Keep it simple but tasty by serving with mini vanilla wafers and thin slices of fresh banana. These dippers complement the banana pudding flavors while adding delightful textures and perfect bite-sized convenience for your guests.
Side Dishes
For a well-rounded dessert spread, try pairing the cheese ball with light vanilla or cinnamon graham crackers, or even shortbread cookies. Their mild sweetness and crispness make great vehicles for scooping up every last bit of this creamy delight.
Creative Ways to Present
Think outside the bowl: serve this Banana Pudding Dessert Cheese Ball Recipe in a hollowed-out pineapple or a decorative ceramic bowl lined with banana leaves for a tropical flair. You could also shape the cheese ball into fun forms like a banana or cluster grapes for themed parties. Little details like this amp up the wow factor!
Make Ahead and Storage
Storing Leftovers
Once made, this dessert is easy to store in the fridge wrapped tightly in plastic wrap or in an airtight container. It’s best enjoyed within two days for peak freshness and flavor. If you plan to store slices overnight, avoid fresh banana garnish to prevent browning and maintain a fresh look.
Freezing
While not ideal due to the creamy texture, you can freeze the cheese ball if necessary. Wrap it tightly in plastic wrap and aluminum foil to prevent freezer burn. Thaw it overnight in the fridge before serving, but keep in mind the texture might be slightly different.
Reheating
This no-cook dessert is served cold, so reheating isn’t needed. Instead, allow it to sit at room temperature for about 10 to 15 minutes before serving to soften the cheese ball just enough and bring out the flavors beautifully.
FAQs
Can I make the Banana Pudding Dessert Cheese Ball Recipe ahead of time?
Absolutely! In fact, making it a day ahead allows the flavors to meld wonderfully. Just be sure to tightly cover it and refrigerate until you’re ready to serve.
What can I use if I don’t have vanilla wafers?
If you’re out of vanilla wafers, try crushed graham crackers or shortbread cookies as a tasty substitute. They bring a similar sweet crunch that pairs beautifully with this cheese ball.
Is this recipe suitable for vegetarians?
Yes, it’s perfect for vegetarian diets, given that you use vegetarian-friendly pudding mix and ensure no gelatin is in the ingredients.
Why is it important to soften the cream cheese and butter?
Softening them makes for easier mixing and results in a smooth, creamy texture without lumps, which is essential for the perfect consistency of the cheese ball.
Can I add fresh bananas inside the cheese ball?
Fresh bananas inside the mixture aren’t recommended because they can cause the cheese ball to become watery and brown quickly. Serve sliced bananas as a side instead for freshness.
Final Thoughts
This Banana Pudding Dessert Cheese Ball Recipe is truly one of those delightful surprises that brings smiles and satisfied taste buds all around. It’s straightforward to make, bursting with classic flavors, and offers a fun new way to enjoy banana pudding with friends and family. So go ahead, whip one up for your next gathering and watch it become an instant favorite!
Print
Banana Pudding Dessert Cheese Ball Recipe
- Prep Time: 15 minutes
- Cook Time: 0 minutes
- Total Time: 15 minutes (plus chilling time)
- Yield: 10 servings
- Category: Dessert
- Method: No-Cook
- Cuisine: American
- Diet: Vegetarian
Description
This Banana Pudding Dessert Cheese Ball is a creamy, no-bake treat combining the flavors of banana cream pudding and vanilla wafers. Perfect as a party dip or a fun, shareable dessert, it features a smooth cream cheese and butter base mixed with instant banana pudding and powdered sugar, then coated in crushed vanilla wafers and served with mini wafers or fresh banana slices. It’s easy to prepare and delightfully indulgent.
Ingredients
Cheese Ball Mixture
- 1 package (8 oz) cream cheese, softened
- 1/2 cup unsalted butter, softened
- 1 package (3.4 oz) instant banana cream pudding mix (dry)
- 1/4 cup powdered sugar
- 1/2 teaspoon vanilla extract
- 1 cup crushed vanilla wafers (plus extra for coating)
For Serving
- Mini vanilla wafers
- Sliced bananas
Instructions
- Beat cream cheese and butter: In a large mixing bowl, beat the softened cream cheese and unsalted butter together until the mixture is smooth and creamy. This creates a rich base for the cheese ball.
- Add pudding mix and flavorings: Mix in the dry instant banana cream pudding mix, powdered sugar, and vanilla extract. Continue beating until all ingredients are fully incorporated and the mixture is fluffy.
- Fold in crushed wafers: Gently fold the crushed vanilla wafers into the creamy mixture, ensuring an even distribution without crushing the wafers too much.
- Shape and chill: Scoop the batter onto a large piece of plastic wrap. Use the wrap to shape the mixture into a tight ball. Wrap it well and refrigerate for at least 2 hours to firm up the cheese ball.
- Coat and serve: Just before serving, roll the chilled cheese ball in additional crushed vanilla wafers to coat the exterior. Arrange on a serving plate alongside mini vanilla wafers and banana slices for dipping.
Notes
- For best flavor and texture, let the cheese ball sit at room temperature for 10–15 minutes before serving.
- You can prepare the cheese ball up to 2 days in advance and store it refrigerated.
- If storing overnight, avoid using fresh banana slices to prevent browning; serve them fresh instead.
