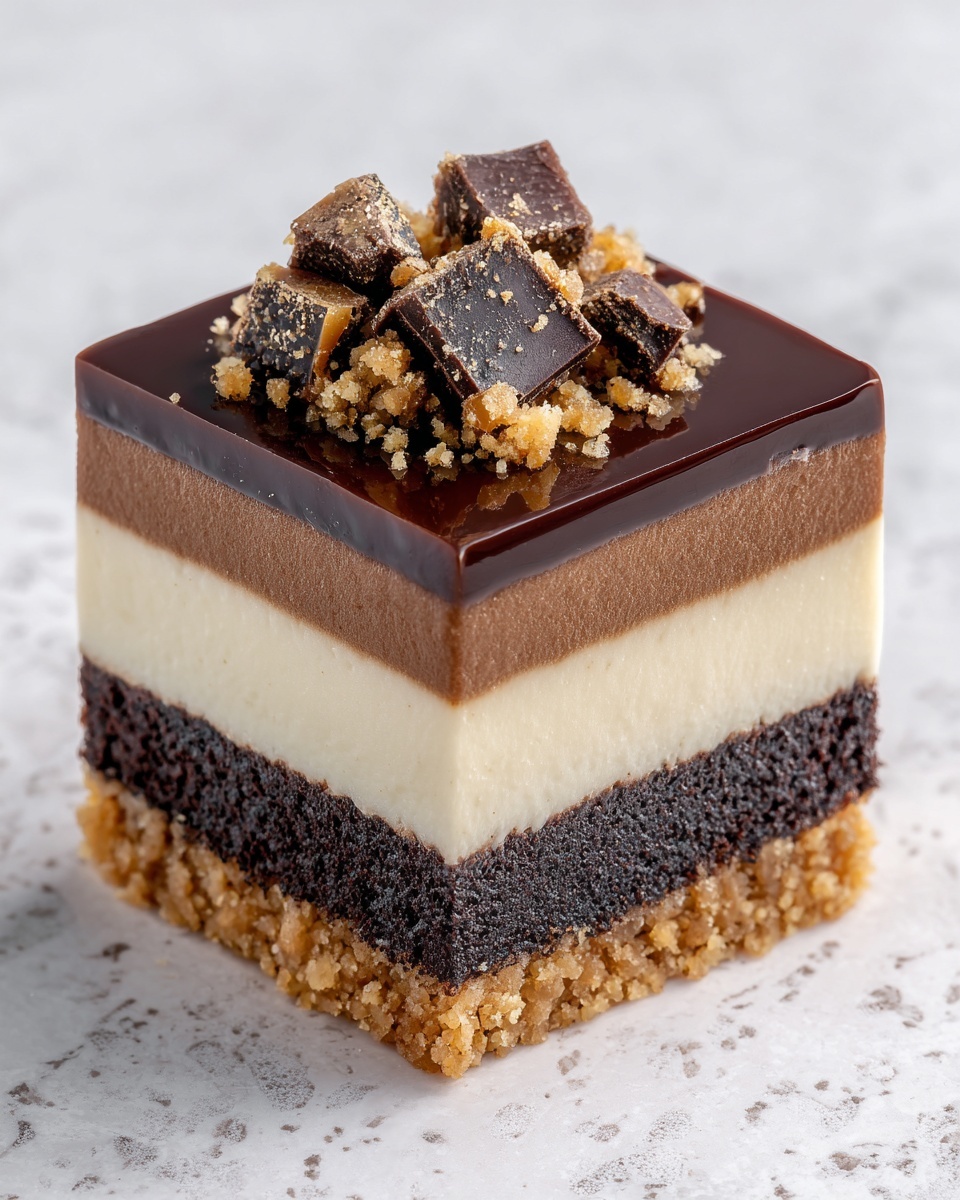
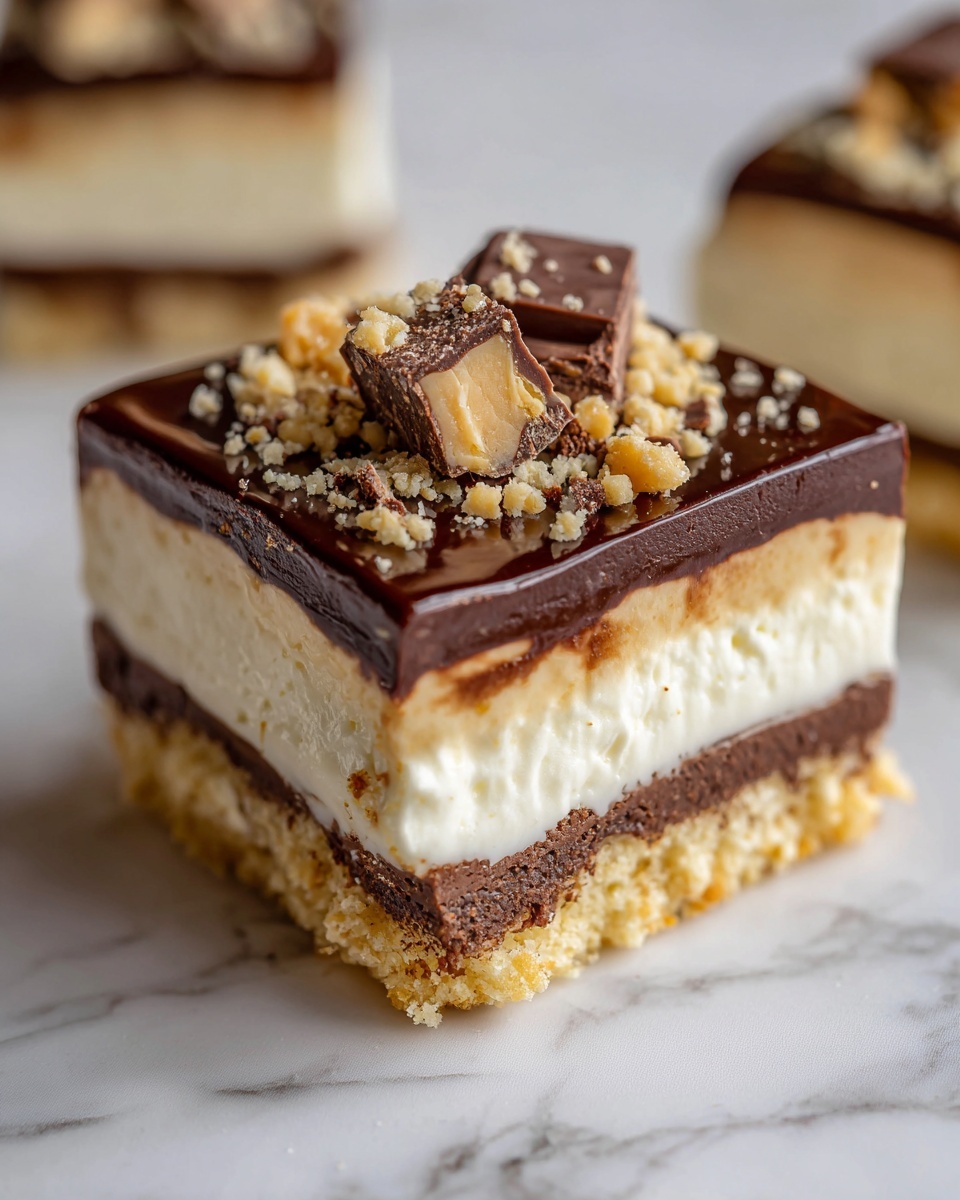
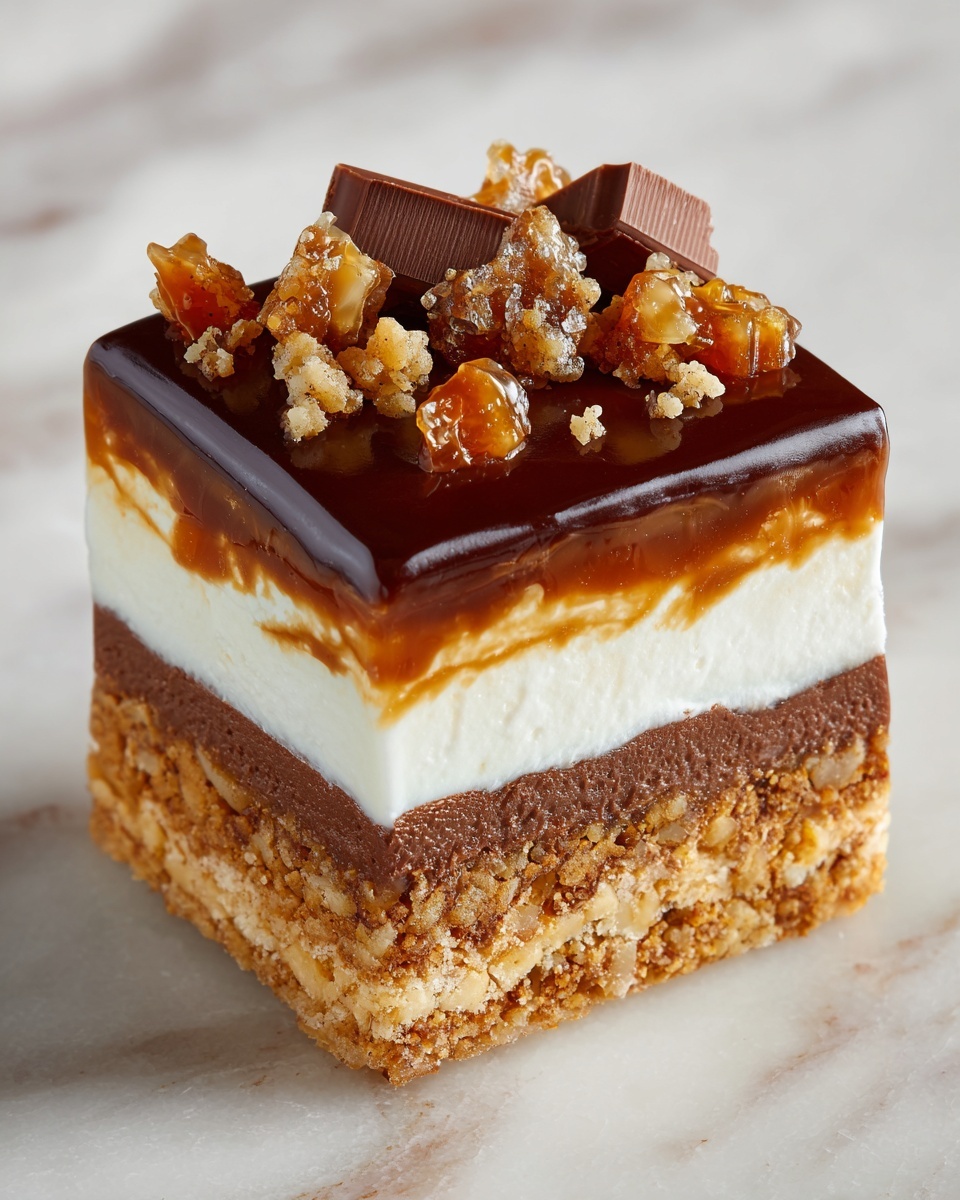
If you are craving a dessert that feels like a candy bar has met a creamy cheesecake, let me introduce you to the irresistibly luscious Homemade No-Bake Twix Cheesecake Recipe. This delightfully decadent treat brings together buttery graham cracker crust, gooey caramel, silky chocolate, and fluffy cheesecake filling — all without turning on the oven. It’s the perfect make-ahead indulgence that will wow guests or satisfy your sweet tooth anytime with minimal effort. Trust me, once you try this dessert, it will quickly become your go-to recipe when you want a show-stopping, no-fuss dessert.
Ingredients You’ll Need
These simple but essential ingredients combine to create the perfect balance of flavors and textures, from the crunchy crust and smooth cheesecake to the rich chocolate and luscious caramel that make this recipe a star. Each one plays a pivotal role in delivering a taste you will adore.
- 2 cups graham cracker crumbs: For that classic, crunchy crust that forms the delicious base.
- 1/2 cup melted butter: Binds the crust crumbs together for a buttery finish.
- 1 cup chocolate chips: Used twice for creating the chocolate layer and the final drizzle, adding silky richness.
- 1/2 cup heavy cream: Helps melt the chocolate smoothly and adds creaminess to the layers.
- 2 cups cream cheese, softened: The creamy core of the cheesecake filling, lending smooth texture and tang.
- 1/2 cup powdered sugar: Sweetens the filling just right, blending perfectly with the cream cheese.
- 1 tsp vanilla extract: Adds warmth and enhances all the dessert’s flavors.
- 1 cup caramel sauce: Pour on top for that signature gooey, buttery twix element.
- 1 cup whipped cream: Folded into the filling to keep it airy and light.
How to Make Homemade No-Bake Twix Cheesecake Recipe
Step 1: Make the Crust
Begin by combining the graham cracker crumbs with melted butter in a mixing bowl until the mixture is evenly coated and resembles wet sand. Press this mixture firmly into the bottom of a springform pan, forming a nice even layer. Pop it into the refrigerator for about 10 minutes so it sets up and becomes firm enough to hold all those luscious layers.
Step 2: Prepare the Chocolate Layer
In a microwave-safe bowl, combine the chocolate chips and heavy cream. Warm this in short 20-second intervals, stirring in between until the chocolate melts into a silky, smooth sauce. Pour this over your chilled crust and spread it evenly with a spatula. Return the pan to the fridge for about 15 to 20 minutes, allowing the chocolate to firm up nicely before moving on.
Step 3: Make the Cheesecake Filling
In a large bowl, beat the softened cream cheese, powdered sugar, and vanilla extract until the mixture becomes smooth and creamy with no lumps. Next, gently fold in the whipped cream to bring that lovely airy lightness to your filling. This will balance the cheesecake’s richness and make each bite heavenly fluffy.
Step 4: Assemble the Layers
Spoon the cheesecake filling carefully over the set chocolate layer, smoothing it out evenly to cover every inch. Then take your luscious caramel sauce and pour it on top, spreading gently with a spatula to create that signature gooey Twix look and flavor.
Step 5: Final Chocolate Drizzle
If you like, melt a bit more chocolate chips with a splash of heavy cream to create a drizzly topping. Pour this drizzle on top of the caramel layer, letting it cascade slightly over the edges for an elegant and mouthwatering finish.
Step 6: Chill and Serve
Refrigerate your masterpiece for at least 4 hours to let everything set perfectly. Once chilled, slice into generous pieces and enjoy the divine combination of crunchy crust, creamy cheesecake, rich chocolate, and gooey caramel in every bite.
How to Serve Homemade No-Bake Twix Cheesecake Recipe
Garnishes
A little extra flair makes enjoying this cheesecake even more special. Try sprinkling crushed graham crackers or chopped Twix bars on top for added crunch, or a light dusting of cocoa powder for subtle elegance. Fresh berries can provide a bright, tangy contrast that complements the sweetness wonderfully.
Side Dishes
While this cheesecake shines brilliantly on its own, serving it alongside a scoop of vanilla bean ice cream or a small dollop of lightly sweetened whipped cream can elevate the experience. A cup of rich coffee or warm espresso also pairs gorgeously with the layered flavors, making it a perfect dessert for after dinner.
Creative Ways to Present
If you want to impress, consider slicing the cheesecake into mini portions and serving them in individual glass jars with layers where you can see all the distinct textures. Or top each slice with a small Twix bar or a drizzle of extra caramel sauce before serving. This Homemade No-Bake Twix Cheesecake Recipe also makes an excellent party centerpiece, ready to wow your family and friends.
Make Ahead and Storage
Storing Leftovers
Leftover cheesecake can be kept in an airtight container in the refrigerator for up to 3 days. The flavors actually meld together beautifully when rested overnight, so it tastes even better the next day. Just be sure to cover it well to prevent the crust from softening too much.
Freezing
You can freeze slices of this cheesecake wrapped tightly in plastic wrap and then foil, placing them in a freezer-safe container or bag. Frozen cheesecake will keep well for up to 1 month. Thaw in the refrigerator overnight before serving for the best texture.
Reheating
This cheesecake is best enjoyed cold or at room temperature, so reheating is generally unnecessary. If you prefer it slightly softer, let it sit out for 15 to 20 minutes before slicing. Avoid microwaving as it can cause separation of the layers.
FAQs
Can I use different types of cookies for the crust?
Absolutely! While graham cracker crumbs give the classic texture and flavor, crushed digestive biscuits or shortbread cookies also work beautifully and add a unique twist.
Is it possible to make this cheesecake dairy-free?
Yes, you can substitute the cream cheese, heavy cream, and butter with plant-based alternatives like vegan cream cheese, coconut cream, and dairy-free margarine for a similar taste and consistency.
How long does it take to set properly?
The cheesecake needs at least 4 hours in the fridge to set well before serving. Overnight chilling is even better to ensure firm layers that slice neatly.
Can I use store-bought caramel sauce?
Definitely! A good quality store-bought caramel sauce saves time and works perfectly here, but homemade caramel can add an even richer, personal touch.
What if I don’t have a springform pan?
You can use a regular cake pan lined with parchment paper or plastic wrap for easy removal. Just be gentle when releasing the cheesecake to keep the layers intact.
Final Thoughts
This Homemade No-Bake Twix Cheesecake Recipe is pure dessert magic in an easy-to-make form. Whether you’re celebrating a special occasion or simply treating yourself on a lazy afternoon, it’s a sensational way to enjoy all the best flavors of a Twix bar with the luxurious creaminess of cheesecake. So go ahead, gather your ingredients, and make a delicious memory with every forkful of this crowd-pleasing delight!
Print
Homemade No-Bake Twix Cheesecake Recipe
- Prep Time: 15 minutes
- Cook Time: 5 minutes (melting chocolate and assembling)
- Total Time: 4 hours 20 minutes (including chilling time)
- Yield: 8 servings
- Category: Dessert
- Method: No-Cook
- Cuisine: American
Description
This Homemade No-Bake Twix Cheesecake combines the delightful layers of graham cracker crust, rich chocolate, creamy cheesecake filling, and luscious caramel sauce to recreate the flavors of a classic Twix bar. Perfect for those who want an impressive dessert without turning on the oven, this cheesecake sets in the fridge and is ideal for any occasion.
Ingredients
Crust Ingredients
- 2 cups graham cracker crumbs
- 1/2 cup melted butter
Chocolate Layer
- 1 cup chocolate chips
- 1/2 cup heavy cream
Cheesecake Filling
- 2 cups cream cheese, softened
- 1/2 cup powdered sugar
- 1 tsp vanilla extract
- 1 cup whipped cream
Toppings
- 1 cup caramel sauce
- Additional chocolate chips and heavy cream for drizzle (optional)
Instructions
- Make the Crust: In a mixing bowl, combine the graham cracker crumbs and melted butter thoroughly. Press this mixture firmly into the bottom of a springform pan to form an even crust layer. Place it in the refrigerator for 10 minutes to allow it to set properly.
- Prepare the Chocolate Layer: Combine the chocolate chips and heavy cream in a microwave-safe bowl. Heat in 20-second intervals, stirring after each interval until the mixture is smooth and fully melted. Pour this chocolate mixture evenly over the chilled crust. Return the pan to the refrigerator and chill for 15-20 minutes or until the chocolate is firm.
- Make the Cheesecake Filling: Using a large bowl, beat the softened cream cheese, powdered sugar, and vanilla extract until the mixture becomes smooth and creamy. Gently fold in the whipped cream to lighten the texture, making the filling fluffy and airy.
- Assemble the Layers: Spoon the prepared cheesecake filling carefully over the firm chocolate layer and spread it evenly. Pour the caramel sauce on top and smooth it gently using a spatula for an even layer.
- Final Chocolate Drizzle: Optionally, melt additional chocolate chips with a bit of heavy cream using the microwave or a double boiler. Drizzle this melted chocolate over the caramel layer, allowing some chocolate to drip down the sides of the cheesecake for an elegant finish.
- Chill and Serve: Refrigerate the fully assembled cheesecake for at least 4 hours, allowing all the layers to set completely. Once set, slice into portions and serve to enjoy the decadent combination of chocolate, caramel, and creamy cheesecake.
Notes
- Use a springform pan to make removal easy and keep the layers intact.
- Ensure the cream cheese is softened to prevent lumps in the filling.
- For a richer chocolate layer, use high-quality chocolate chips.
- Whipped cream should be gently folded to keep the filling light and airy.
- This cheesecake is best served chilled and can be stored in the refrigerator for up to 3 days.


