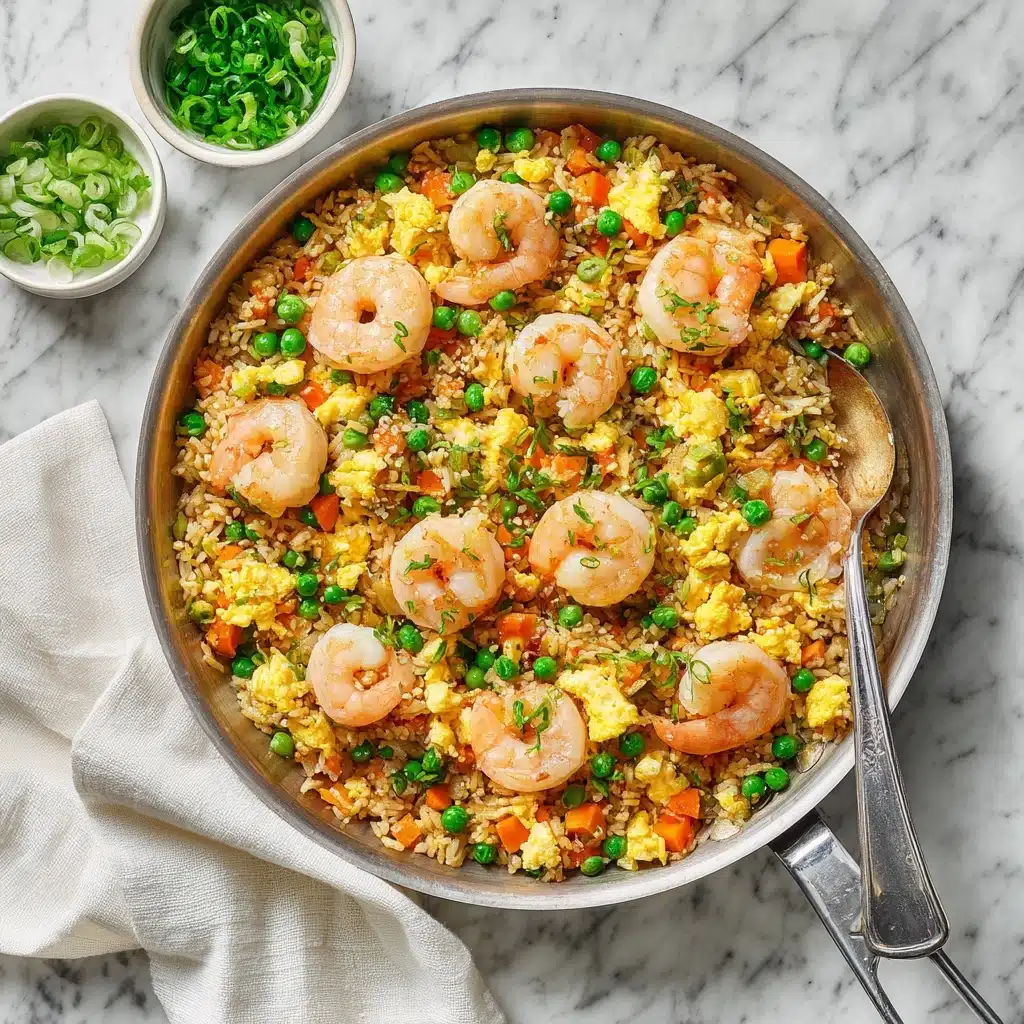
Shrimp Fried Rice Recipe
If you’ve been craving a takeout classic that’s just as good (if not better) when made at home, look no further than this Shrimp Fried Rice Recipe. Brimming with juicy shrimp, fluffy eggs, crisp veggies, and deeply savory flavors, every forkful delivers pure comfort with a hint of nostalgia. Whether you’re whipping up a speedy weeknight dinner or impressing friends with your stir-fry skills, this dish comes together in minutes and always hits the spot. Plus, you control the ingredients, so every bite is fresh, vibrant, and exactly how you like it!

Ingredients You’ll Need
This Shrimp Fried Rice Recipe shines with simple, everyday ingredients—but don’t underestimate their power! Each component brings its own flair, from color and texture to that irresistible umami punch. Here’s what you’ll need and why each piece matters:
- Shrimp: Plump, tender shrimp are the star here—make sure they’re peeled and deveined for easy eating and quick cooking.
- White Rice: Day-old, chilled rice fries up beautifully, giving you those signature separated grains and a slightly chewy bite.
- Vegetable Oil: This neutral oil helps everything cook evenly and develop that classic fried rice flavor.
- Eggs: Lightly beaten eggs add a lovely richness and a pop of yellow throughout the dish.
- Frozen Peas and Carrots: These veggies are a colorful, sweet, and tender addition that round out every bite.
- Green Onions: Freshly sliced, they bring a gentle onion flavor and a burst of green at the end.
- Garlic: Minced garlic infuses the oil and rice with a fragrant, savory backbone.
- Soy Sauce: The must-have seasoning for salty, umami depth—don’t skip it!
- Oyster Sauce (optional): For an extra layer of savory richness, add this if you have it on hand.
- Sesame Oil: Just a dash at the end gives your Shrimp Fried Rice Recipe a nutty, aromatic finish.
- Salt and Pepper: Season to taste for balance and that perfect final touch.
How to Make Shrimp Fried Rice Recipe
Step 1: Sauté the Shrimp
Start by heating one tablespoon of vegetable oil in a large skillet or wok over medium-high heat. Add your shrimp, season with salt and pepper, and cook them for two to three minutes per side until they’re just pink and opaque. Remove the shrimp and set them aside—you’ll add them back later for the grand finale!
Step 2: Scramble the Eggs
In the same pan, add the remaining tablespoon of oil. Pour in the lightly beaten eggs and scramble gently. You want them just cooked but still soft, so don’t overdo it! Push the eggs to one side of the pan to make room for the veggies.
Step 3: Stir-Fry Veggies and Aromatics
Add the thawed peas and carrots, green onions, and minced garlic to the open side of the skillet. Stir-fry everything for two to three minutes, letting the garlic get fragrant and the veggies become tender-crisp. This step is where your kitchen really starts to smell like your favorite takeout spot!
Step 4: Add the Rice
Now it’s time for the magic. Add your chilled, cooked rice to the skillet. Use a spatula to break up any clumps and mix the rice with the eggs, veggies, and aromatics. Stir everything together so every grain gets coated with flavor and color.
Step 5: Combine and Season
Return the cooked shrimp to the pan. Drizzle in the soy sauce, oyster sauce (if you’re using it), and sesame oil. Stir-fry for another two to three minutes, making sure everything is hot and evenly coated. Taste and adjust seasoning if needed—and just like that, your Shrimp Fried Rice Recipe is ready to serve hot!
How to Serve Shrimp Fried Rice Recipe
Garnishes
A sprinkle of extra green onions, a dash of toasted sesame seeds, or even a scattering of chopped cilantro can elevate the presentation and add bursts of fresh flavor. For those who love a little heat, a drizzle of sriracha or a pinch of red pepper flakes brings a subtle kick that plays beautifully with the savory rice.
Side Dishes
This Shrimp Fried Rice Recipe is hearty enough to shine on its own, but it also pairs wonderfully with light sides like a crisp Asian slaw, steamed edamame, or a simple cucumber salad. If you want to go all out, serve it with potstickers or a bowl of miso soup for a complete, restaurant-style meal at home.
Creative Ways to Present
For a fun twist, try serving your fried rice in hollowed-out pineapple halves or small bowls for individual portions. You can even use lettuce cups for a fresh, hand-held appetizer or party bite. No matter how you plate it, the vibrant colors and savory aroma will impress every guest at your table!
Make Ahead and Storage
Storing Leftovers
If you have any leftovers (lucky you!), transfer your Shrimp Fried Rice Recipe to an airtight container and refrigerate it within two hours. It will keep well in the fridge for up to three days, making it perfect for quick lunches or easy dinners throughout the week.
Freezing
You can absolutely freeze this dish for future cravings! Let the fried rice cool completely, then portion it into freezer-safe bags or containers. Freeze for up to two months. Thaw in the refrigerator overnight before reheating for the best texture and flavor.
Reheating
For best results, reheat your Shrimp Fried Rice Recipe in a skillet over medium heat, adding a splash of water or broth to prevent drying out. Stir frequently until warmed through. If you’re in a hurry, the microwave works too—just cover the dish and heat in one-minute bursts, stirring between each round.
FAQs
Can I use fresh vegetables instead of frozen peas and carrots?
Absolutely! Fresh diced carrots and peas (or even corn and bell peppers) work beautifully in this Shrimp Fried Rice Recipe. Just chop them small and give them a quick sauté to ensure they’re tender by the time the rice is finished.
What type Main Course
Day-old jasmine or long-grain white rice is perfect because it’s dry and firm, which helps prevent clumping. If you only have freshly cooked rice, spread it out on a tray and let it cool and dry for at least 30 minutes before using.
Is oyster sauce necessary?
No worries if you don’t have oyster sauce—it’s optional! The Shrimp Fried Rice Recipe is still delicious with just soy sauce, but oyster sauce adds an extra savory depth that’s worth trying if you have it on hand.
How can I make this dish spicy?
If you like a little heat, simply add red pepper flakes, a splash of hot sauce, or a chopped fresh chili during the stir-fry step. Customize the spice level to suit your taste!
Can I substitute the shrimp with another protein?
Definitely! Chicken, tofu, or even leftover pork or beef can stand in for shrimp in this recipe. Just adjust the cooking time as needed and enjoy experimenting with different flavors.
Final Thoughts
There’s nothing quite like making your own Shrimp Fried Rice Recipe at home—fast, fresh, and totally satisfying. I hope you’re inspired to grab your wok, gather your ingredients, and give this easy, flavorful dish a try. Your taste buds (and anyone lucky enough to share your table) will thank you!
Print
Shrimp Fried Rice Recipe
- Total Time: 25 minutes
- Yield: 4 servings 1x
- Diet: Non-Vegetarian
Description
This Shrimp Fried Rice recipe offers a quick, delicious, and flavorful dish that’s perfect for weeknight dinners. Combining succulent shrimp with tender vegetables, fluffy rice, and a savory blend of soy and oyster sauces, this easy-to-make Asian-inspired meal captures the comforting taste of takeout right at home.
Ingredients
Main Ingredients
- 1 pound medium shrimp, peeled and deveined
- 3 cups cooked and chilled white rice
- 2 tablespoons vegetable oil, divided
- 2 eggs, lightly beaten
- 1 cup frozen peas and carrots, thawed
- 3 green onions, sliced
- 3 cloves garlic, minced
- 3 tablespoons soy sauce
- 1 tablespoon oyster sauce (optional)
- 1 teaspoon sesame oil
- Salt and pepper to taste
Instructions
- Cook the shrimp: Heat 1 tablespoon of vegetable oil in a large skillet or wok over medium-high heat. Add the shrimp and season with salt and pepper. Cook for 2 to 3 minutes per side until pink and opaque. Remove shrimp from the skillet and set aside.
- Scramble the eggs: In the same skillet, add the remaining tablespoon of oil. Pour in the beaten eggs and scramble until just cooked, then push to one side of the pan.
- Cook the vegetables: Add the peas and carrots, green onions, and garlic to the skillet. Stir-fry for 2 to 3 minutes until the vegetables are tender and fragrant.
- Add the rice: Add the cooked rice and break it up with a spatula, mixing everything together evenly.
- Combine shrimp and sauces: Return the cooked shrimp to the pan. Drizzle in the soy sauce, oyster sauce (if using), and sesame oil. Stir-fry for another 2 to 3 minutes until everything is heated through and well combined.
- Season and serve: Taste and adjust seasoning with additional salt, pepper, or soy sauce as desired. Serve hot for the best flavor and texture.
Notes
- Day-old rice works best for fried rice because it is drier and less sticky, making it easier to fry and preventing clumping.
- For some added heat, toss in a pinch of red pepper flakes or a splash of sriracha sauce during the stir-frying stage.
- Use chilled rice to help maintain separate, fluffy grains rather than mushy rice.
- Oyster sauce is optional but adds a richer umami flavor typical of restaurant-style fried rice.
- Prep Time: 10 minutes
- Cook Time: 15 minutes
- Category: Main Course
- Method: Stovetop
- Cuisine: Asian-Inspired
Nutrition
- Serving Size: 1 bowl
- Calories: 420
- Sugar: 3g
- Sodium: 780mg
- Fat: 15g
- Saturated Fat: 3g
- Unsaturated Fat: 9g
- Trans Fat: 0g
- Carbohydrates: 45g
- Fiber: 2g
- Protein: 26g
- Cholesterol: 210mg

