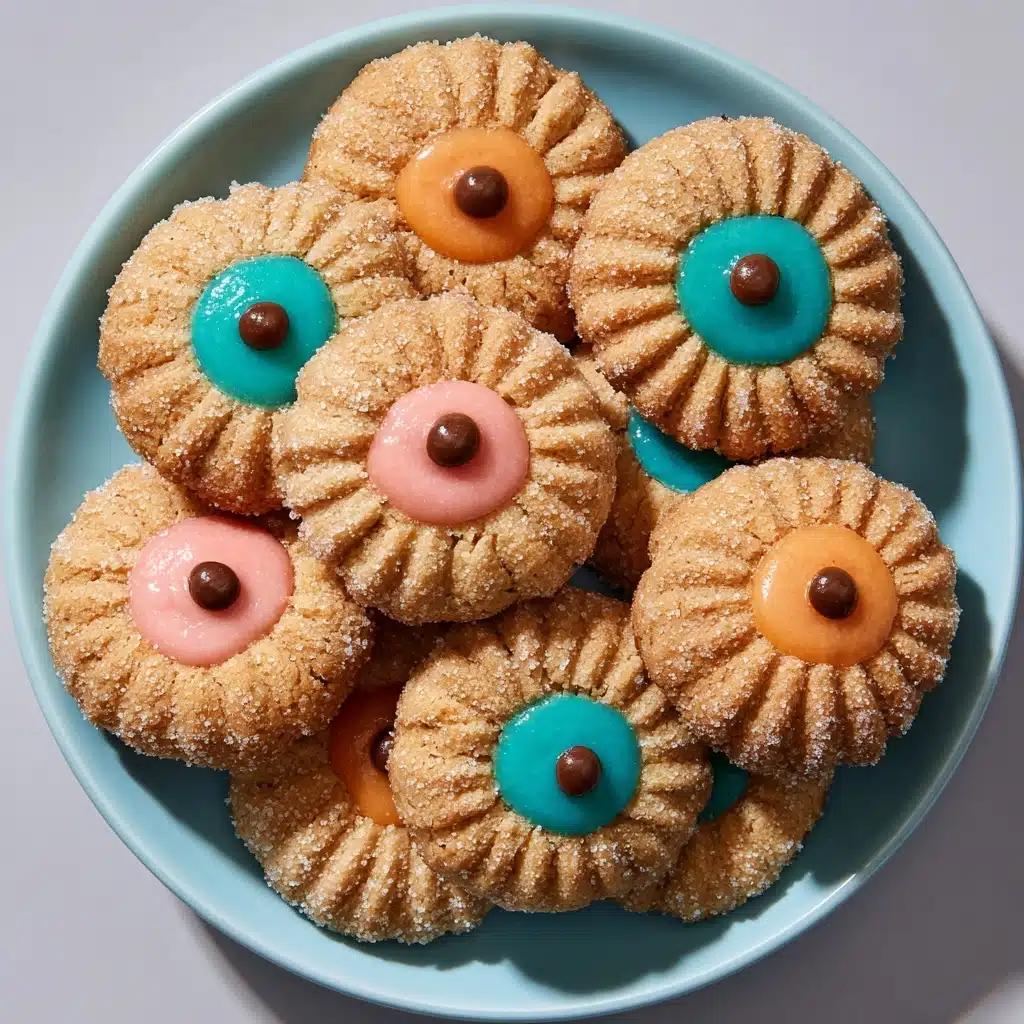
Easter Bunny Button Cookies Recipe
If you’re searching for a whimsical treat to bring sunshine to your spring celebration, Easter Bunny Button Cookies are a delightful answer! These charming cookies marry buttery, melt-in-your-mouth shortbread with festive pastel sprinkles and an adorable “button” center, making them irresistible for both kids and grown-ups. They’re easy to whip up, a joy to decorate, and just as fun to gift as they are to eat. Whether you’re baking for a family gathering or a sweet afternoon project, Easter Bunny Button Cookies promise playful nostalgia and pure comfort in every bite.
Ingredients You’ll Need
These simple baking staples are the heart of Easter Bunny Button Cookies, providing the tender bite, delicate flavor, and signature look. Each ingredient has a special role, ensuring you’ll get perfect cookies every time!
- Unsalted butter (1 cup, softened): Gives the cookies their luxurious, rich flavor and delicate crumb—don’t rush the softening, it’s key for easy creaming!
- Powdered sugar (¾ cup): Creates a melt-in-your-mouth texture and sweet, gentle taste that’s softer than granulated sugar.
- Large egg yolk (1): Adds richness and binds the dough for that irresistible tender bite.
- Vanilla extract (1 teaspoon): Lends subtle warmth and aroma, making the cookies extra comforting—pure vanilla works best here.
- All-purpose flour (2 cups): Provides structure while keeping the cookies delicate and light.
- Salt (¼ teaspoon): Balances the sweetness and deepens the flavors—don’t skip it!
- Pastel-colored sanding sugar or sprinkles: Adds sparkle, color, and the cheerful look that makes these cookies so festive for spring.
- Mini candy-coated chocolates (optional): For a cute “button” and a pop of color and crunch—think of these as little edible surprises in the center!
How to Make Easter Bunny Button Cookies
Step 1: Prep the Oven and Baking Sheets
Start by preheating your oven to 350°F (175°C)—this ensures even baking right from the start. Line two baking sheets with parchment paper so the cookies won’t stick and cleanup is a breeze. Having everything ready makes assembling these cheery little treats super smooth!
Step 2: Cream the Butter and Sugar
In a large bowl, use a hand mixer or stand mixer to cream together the softened unsalted butter and powdered sugar. Beat until the mixture turns fluffy and pale, about 2–3 minutes. This step incorporates air, giving the cookies their delightful, tender texture. Scrape down the bowl to make sure every bit gets incorporated!
Step 3: Add Egg Yolk and Vanilla
Next, blend in the egg yolk and vanilla extract. The yolk adds richness, and the vanilla infuses the dough with a sweet aroma that sets the stage for spring. Mix just until combined—you want everything smooth, but don’t overwork it!
Step 4: Mix in the Dry Ingredients
Gradually add the flour and salt to your creamy base, mixing on low speed to avoid overmixing. In just a minute or two, a soft dough will form that pulls away from the sides of the bowl. If your dough feels a bit too sticky to handle, pop it in the fridge for 20–30 minutes—this makes shaping so much easier.
Step 5: Shape and Decorate the Cookies
Roll the dough into 1-inch balls and space them two inches apart on your prepared baking sheets. Press a thumbprint or the back of a small spoon into the center of each to make a shallow indentation. Sprinkle each cookie generously with pastel sanding sugar or sprinkles—this step transforms every cookie into a festive masterpiece!
Step 6: Bake and Add Button Centers
Bake for 10–12 minutes, keeping a watchful eye for cookies that are just barely golden at the edges. Take them out of the oven and, while still warm, gently press a mini candy-coated chocolate into the center if you’d like a classic “button” look. For even more whimsy, poke four tiny “thread” holes in the center using a clean straw before baking!
Step 7: Cool and Enjoy
Let the cookies rest on the baking sheet for about 5 minutes to firm up before transferring to a wire rack to cool completely. This ensures they’ll hold their perfect shape and finishes the soft, buttery texture that makes Easter Bunny Button Cookies so irresistible. Now, admire your handiwork and get ready to share and savor!
How to Serve Easter Bunny Button Cookies

Garnishes
For added sparkle, you can dust the cooled cookies with a little extra powdered sugar or edible glitter. If you went with mini candy toppings, swap up the colors for added flair! Edible Easter grass or a nest of pastel sprinkles on the serving tray really turns these into a centerpiece worthy of your spring celebration.
Side Dishes
Easter Bunny Button Cookies pair like a dream with a tall glass of cold milk, a cup of fruity spring tea, or even tangy lemonade. For your dessert table, they sit beautifully alongside fresh-cut fruit, chocolate eggs, or lemon squares, balancing out light and rich flavors with ease.
Creative Ways to Present
Lay your cookies in a pastel-lined basket nestled in faux grass for a truly festive look! Wrap a few in cellophane with a colorful ribbon as delightful take-home treats. For a little extra charm, arrange them in circles on a platter “stitched” with licorice laces to mimic real buttons—everyone will love both the creativity and the taste of your Easter Bunny Button Cookies!
Make Ahead and Storage
Storing Leftovers
These cookies keep wonderfully at room temperature. Store Easter Bunny Button Cookies in an airtight container for up to five days—their delicate texture and buttery flavor hold up so well, you’ll almost wish you had made a double batch!
Freezing
If you’d like to get a head start, bake the cookies and freeze them (without candy toppings) for up to three months. Stack with parchment between layers in a freezer-safe container. Thaw at room temperature and add any decorations just before serving for a fresh-from-the-oven look and taste.
Reheating
If you crave that just-baked warmth, reheat the cookies on a baking sheet in a 275°F (135°C) oven for 3–4 minutes. This revives their melt-in-your-mouth texture without melting your sprinkles or candy centers. Let cool slightly and enjoy!
FAQs
Can I use salted butter instead of unsalted?
Absolutely! If you only have salted butter on hand, just omit the added salt in the recipe. Your Easter Bunny Button Cookies will still turn out delicious and flavorful.
How do I make the “button” holes look just right?
The easiest way is to use a clean plastic straw to poke four small, evenly spaced holes in the cookie’s center before baking. Don’t press too hard—you want to make dimples, not cut all the way through. It’s a fun way to get the whole family involved!
Can I customize the flavors?
Yes! While vanilla is classic, you can add a half teaspoon of almond or lemon extract for a twist. Just keep the total liquid flavorings at about a teaspoon so the dough stays perfect for shaping.
Are Easter Bunny Button Cookies safe for those with nut allergies?
This recipe, as written, does not include nuts. However, always double-check your decorations and candy toppings, as some brands process sprinkles or chocolates in facilities that handle nuts. When in doubt, use allergy-friendly decorations.
Can little kids help with this recipe?
Definitely! Rolling the dough, adding sprinkles, and pressing the candy “buttons” are all activities tailor-made for small hands. Easter Bunny Button Cookies make a memorable, mess-friendly kitchen adventure for families.
Final Thoughts
Bake up a batch of Easter Bunny Button Cookies and watch the joy unfold at your kitchen table. These cookies are sweet, simple, and bursting with springtime happiness—perfect for sharing with friends, family, or anyone who could use a sprinkle of cheer. Happy baking, and may your plate always be full of colorful little buttons!
Print
Easter Bunny Button Cookies Recipe
- Total Time: 27 minutes
- Yield: 30 cookies 1x
- Diet: Vegetarian
Description
Delight your family and friends with these adorable Easter Bunny Button Cookies. These soft and buttery thumbprint cookies are perfect for spring celebrations and can be customized with colorful sprinkles and candy-coated chocolates.
Ingredients
Cookies:
- 1 cup unsalted butter (softened)
- ¾ cup powdered sugar
- 1 large egg yolk
- 1 teaspoon vanilla extract
- 2 cups all-purpose flour
- ¼ teaspoon salt
Decoration:
- pastel-colored sanding sugar or sprinkles
- mini candy-coated chocolates (optional for decoration)
Instructions
- Preheat Oven: Preheat oven to 350°F (175°C) and line two baking sheets with parchment paper.
- Cream Butter and Sugar: In a large bowl, cream together the softened butter and powdered sugar until light and fluffy. Add the egg yolk and vanilla extract and beat until well combined.
- Add Dry Ingredients: Add the flour and salt to the wet mixture and mix until a soft dough forms. Chill if needed.
- Shape Cookies: Roll the dough into 1-inch balls and place on baking sheets. Make an indentation in each cookie.
- Decorate: Sprinkle with sanding sugar or sprinkles.
- Bake: Bake for 10–12 minutes until lightly golden. Press a chocolate into each cookie if desired.
- Cool: Cool on baking sheet before transferring to a wire rack to cool completely.
Notes
- To create a “button” look, use a straw to make holes in the center before baking.
- For added flavor variations, consider using lemon or almond extract in the dough.
- Prep Time: 15 minutes
- Cook Time: 12 minutes
- Category: Dessert
- Method: Baking
- Cuisine: American
Nutrition
- Serving Size: 1 cookie
- Calories: 110
- Sugar: 6g
- Sodium: 30mg
- Fat: 7g
- Saturated Fat: 4g
- Unsaturated Fat: 2g
- Trans Fat: 0g
- Carbohydrates: 11g
- Fiber: 0g
- Protein: 1g
- Cholesterol: 20mg


