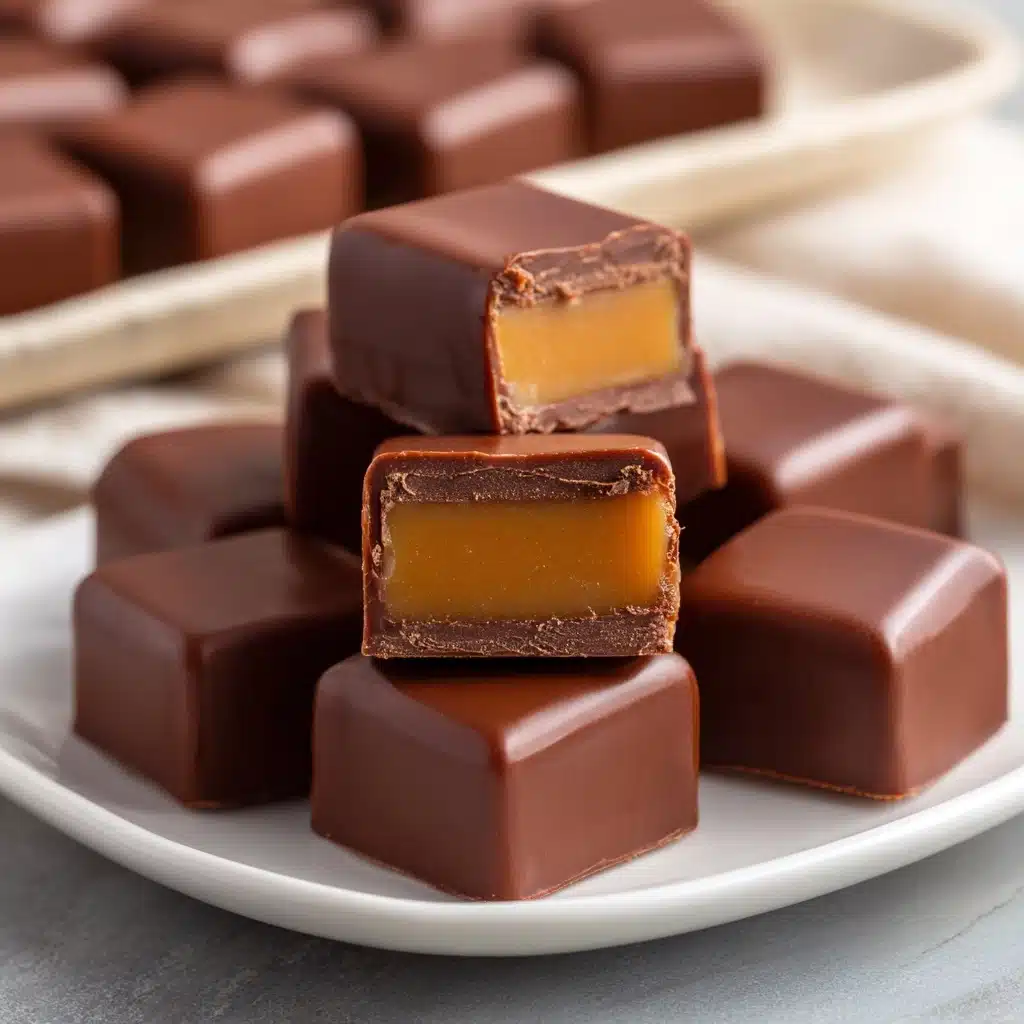
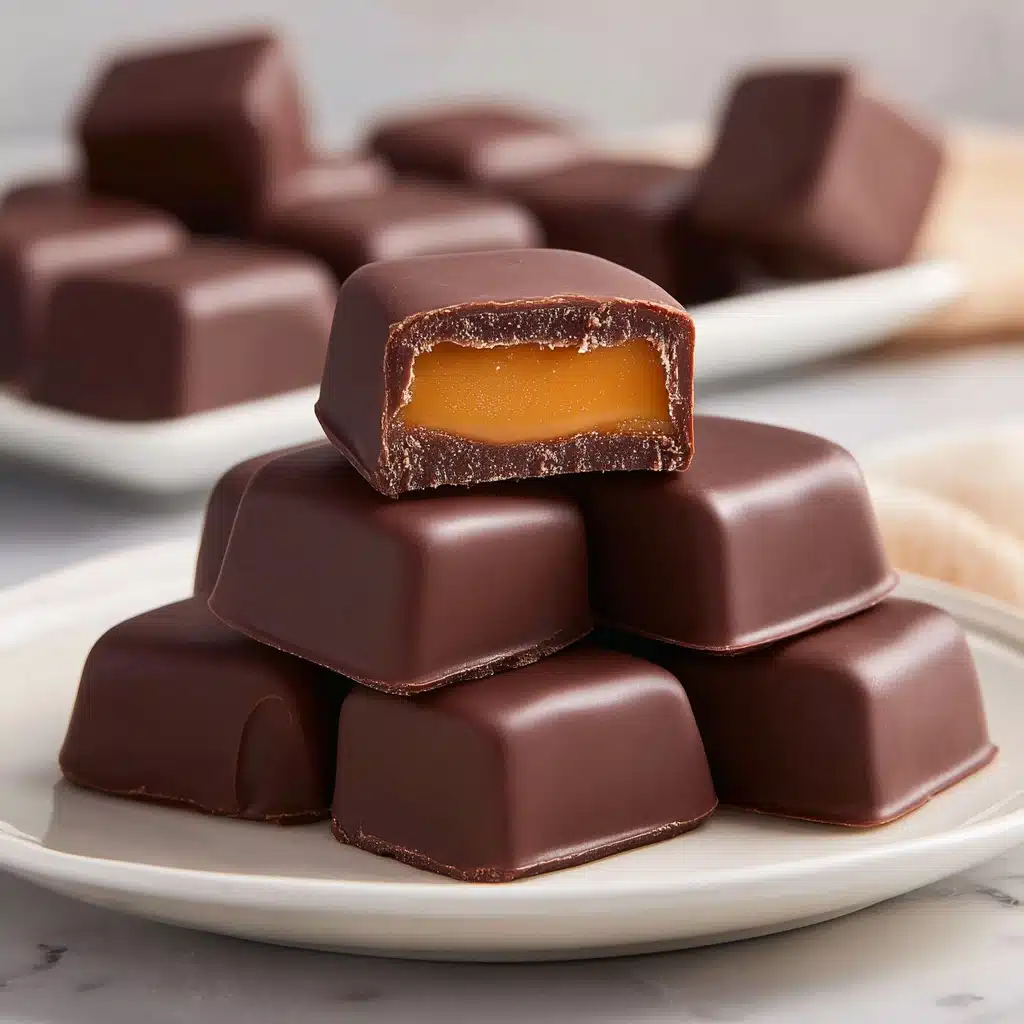
Chocolate Peanut Butter Candies Recipe
If you’re on the hunt for an ultra-satisfying treat that delivers big on nostalgia and even bigger on flavor, Chocolate Peanut Butter Candies are the answer to your sweet tooth’s wishes! Creamy, nutty, coated in luscious chocolate, and irresistibly poppable, these classic candies blend the best of both worlds in each bite-sized morsel. Whether you’re whipping up a party platter or sneaking a few between Zoom calls, this recipe manages to be simple, crowd-pleasing, and just a little bit magical. Trust me: you’ll want to keep a batch of these gems chilling in the fridge at all times.
Ingredients You’ll Need
This treat comes together with just a handful of pantry staples, but each ingredient plays a special part in creating that iconic melt-in-your-mouth experience. From rich peanut butter to smooth chocolate, every bite is the perfect harmony of sweet and salty. Here’s what you’ll need, plus a few tips for candy-making success:
- Creamy Peanut Butter: Opt for a classic, smooth peanut butter to create that dreamy, rich base and ultra-creamy texture.
- Unsalted Butter (softened): Adds richness and helps bind the filling, making it extra decadent and easy to roll.
- Salt: Just a dash sharpens the peanut flavor and balances out the sweetness beautifully.
- Vanilla Extract: Adds a subtle warmth and depth that takes these candies to the next level.
- Powdered Sugar: Thickens the peanut butter mixture while adding that classic sweetness—don’t swap this for granulated, you want that fine, melt-in texture!
- Semi-Sweet or Milk Chocolate Chips: Your choice of chocolate creates the perfect shell. Semi-sweet gives a richer contrast; milk chocolate keeps things sweeter and creamier. Use what you love!
- Coconut Oil or Shortening (optional): A tablespoon added to melted chocolate makes for an extra-silky, shiny coating that sets up beautifully.
How to Make Chocolate Peanut Butter Candies
Step 1: Make the Peanut Butter Filling
Grab a medium mixing bowl and add your peanut butter, softened butter, salt, and vanilla extract. Using a hand mixer or sturdy spoon, blend it all together until the mixture looks glossy and completely smooth. This harmony of butter and peanut butter makes every bite a true delight, and that splash of vanilla pulls all the warm flavors together.
Step 2: Add the Powdered Sugar
Now, gradually add the powdered sugar a little at a time, mixing after each addition. The filling will quickly transform from soft and sticky to a thick, moldable dough. If you notice any stubborn pockets of sugar, press them out with your spoon—this is how you get that classic, fudge-like texture inside each candy.
Step 3: Shape the Candies
Once your peanut butter mixture is stiff enough, scoop out about a tablespoon at a time and roll into 1-inch balls. Place each ball on a parchment-lined baking sheet, giving them some space to chill. Rolling these is a fun, hands-on step where you can even get kids involved! After all your candies are shaped, pop the tray into the fridge for at least 30 minutes. The colder the balls, the easier (and less messy) the next step will be.
Step 4: Melt the Chocolate
While the candies are chilling, pour your chocolate chips and coconut oil (if using) into a microwave-safe bowl. Heat in 30-second bursts, stirring in between, until the chocolate is completely melted and silky smooth. A little patience here pays off—smooth, gently melted chocolate makes dipping a breeze.
Step 5: Dip and Set
Let the chocolate rain begin! Using a fork or candy dipper, carefully lower each chilled peanut butter ball into the melted chocolate. Gently tap off the excess chocolate, then return to your parchment-lined tray. Repeat until all candies are coated in chocolatey goodness. Slide the tray back into the refrigerator for another 15–20 minutes, letting the shells set to a gorgeous, glossy finish.
How to Serve Chocolate Peanut Butter Candies
Garnishes
Make your Chocolate Peanut Butter Candies even more eye-catching (and delicious!) with a sprinkle of flaky sea salt, a drizzle of melted white chocolate, or festive sprinkles right after dipping. Each addition adds a touch of texture and color, making your candies stand out on any dessert table.
Side Dishes
These candies play well with others! Pair them on a platter with fresh strawberries, chocolate-dipped pretzels, or a bowl of spiced nuts for a little crunch and contrast. A chilled glass of milk or a hot cup of coffee also makes a wonderful pairing, especially for a fun afternoon treat.
Creative Ways to Present
For gifting or parties, pile your candies into mini cupcake liners and arrange them in a pretty box or tin. Stack them on a fancy tiered platter or pack a few in cellophane bags tied with ribbon for party favors. Arrange them in the shape of a holiday wreath for a festive touch, or layer them in mason jars for a sweet “just because” gift.
Make Ahead and Storage
Storing Leftovers
Chocolate Peanut Butter Candies keep wonderfully in an airtight container in the fridge. They’ll stay fresh for up to two weeks, and they never lose that creamy filling or shiny chocolate shell. Stack them between parchment or wax paper to prevent sticking and enjoy whenever you need a sweet pick-me-up!
Freezing
If you want to make a big batch ahead of time, you can absolutely freeze these candies. Let them set completely, then transfer to a freezer-safe container with layers of parchment between them. They’ll keep their wonderful texture for up to three months—just thaw them in the fridge overnight before serving.
Reheating
No reheating required for Chocolate Peanut Butter Candies! Enjoy them straight from the fridge or let them sit at room temperature for 5–10 minutes if you prefer a softer bite. If freezing, give them ample time to thaw to enjoy the full, melt-in-your-mouth experience.
FAQs
Can I use crunchy peanut butter instead of creamy?
Yes! Crunchy peanut butter adds a fun, nutty texture to the filling. It’s a fantastic swap if you like some extra crunch, and it still mixes together beautifully with the rest of the ingredients.
What type Dessert
Both semi-sweet and milk chocolate work wonderfully. Semi-sweet chocolate provides a slightly deeper, richer flavor, while milk chocolate keeps everything sweet and mellow. Use your favorite, or even try dark chocolate for a more intense twist!
How do I prevent the chocolate shell from looking dull?
Adding a bit of coconut oil or shortening to the chocolate before melting makes the coating extra shiny and smooth. Also, letting the candies chill fully between each step helps set the chocolate to a glossy finish. Avoid moisture or water, as that can cause the chocolate to seize or bloom.
Can I make these candies nut-free?
Absolutely. Swap the peanut butter for a favorite seed butter, like sunflower or soy nut butter. The texture will be similar, and you still get that satisfying, creamy filling with a chocolatey exterior.
Are Chocolate Peanut Butter Candies gluten-free?
Yes, these candies are naturally gluten-free, as none of the ingredients contain gluten. Just make sure your chocolate chips and vanilla extract are certified gluten-free if you’re serving someone with allergies.
Final Thoughts
I can’t recommend keeping a stash of Chocolate Peanut Butter Candies in your fridge enough! They’re quick, customizable, and deliver that unforgettable combo of smooth peanut butter and luscious chocolate every single time. Whether you’re making them for a special occasion or simply as a treat-yourself moment, you’ll fall in love bite after bite. Give them a whirl and let the sharing (or secret snacking) begin!
Print
Chocolate Peanut Butter Candies Recipe
- Total Time: 1 hour
- Yield: 30 candies 1x
- Diet: Vegetarian
Description
Indulge in these delightful Chocolate Peanut Butter Candies that are perfect for satisfying your sweet tooth. Creamy peanut butter centers coated in rich chocolate make for a decadent treat.
Ingredients
Peanut Butter Filling:
- 1 cup creamy peanut butter
- 1/4 cup unsalted butter, softened
- 1/4 teaspoon salt
- 1/2 teaspoon vanilla extract
- 2 cups powdered sugar
Chocolate Coating:
- 2 cups semi-sweet or milk chocolate chips
- 1 tablespoon coconut oil or shortening (optional, for smoother coating)
Instructions
- Prepare Peanut Butter Filling: In a medium bowl, mix together peanut butter, softened butter, salt, and vanilla extract until smooth. Gradually stir in powdered sugar to form a stiff dough.
- Shape and Chill: Roll the mixture into 1-inch balls and place on a parchment-lined baking sheet. Chill in the refrigerator for at least 30 minutes until firm.
- Coat with Chocolate: Melt chocolate chips and coconut oil in the microwave in 30-second intervals, stirring until smooth. Dip each peanut butter ball into the chocolate, tapping off excess, and place on parchment paper. Repeat with remaining candies.
- Set and Serve: Refrigerate dipped candies for 15–20 minutes until set. Enjoy!
Notes
- Store candies in an airtight container in the fridge for up to 2 weeks or freeze for longer storage.
- For added texture, use crunchy peanut butter.
- Prep Time: 25 minutes
- Cook Time: 5 minutes
- Category: Dessert
- Method: No-Bake
- Cuisine: American
Nutrition
- Serving Size: 1 candy
- Calories: 130
- Sugar: 11g
- Sodium: 60mg
- Fat: 8g
- Saturated Fat: 4g
- Unsaturated Fat: 3g
- Trans Fat: 0g
- Carbohydrates: 14g
- Fiber: 1g
- Protein: 2g
- Cholesterol: 5mg
