
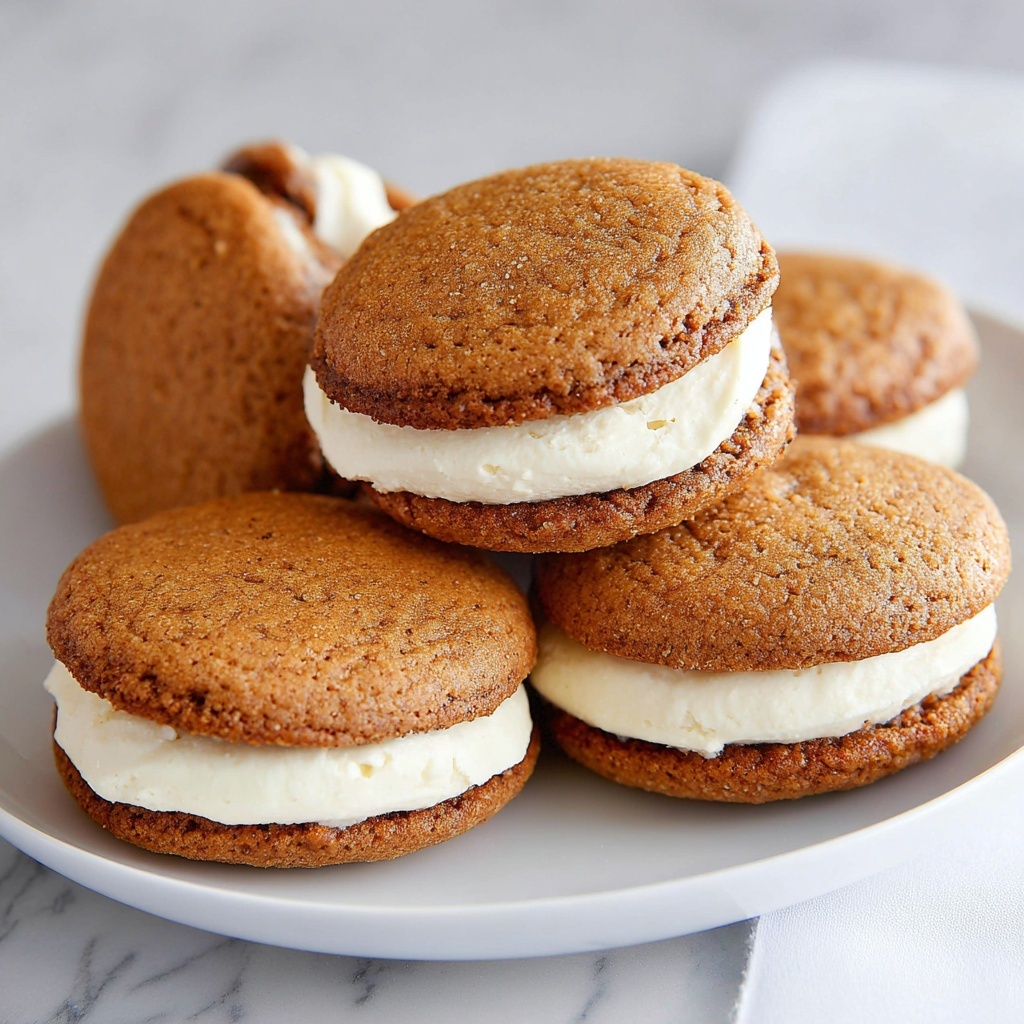
If you have a soft spot for cozy, autumn-inspired treats, you are going to fall head over heels for this Pumpkin Whoopie Pies with Cream Cheese Filling Recipe. These delightful little sandwiches boast a perfectly spiced, moist pumpkin cake exterior paired with a luscious, tangy cream cheese filling that melts in your mouth. Whether you’re baking for a festive gathering or craving a sweet snack to brighten your day, these whoopie pies offer that warm, homemade feeling in every bite. Trust me, once you try this recipe, it’ll quickly become one of your all-time favorites to share and enjoy.
Ingredients You’ll Need
Simple ingredients often create the most magical flavors, and this recipe is no exception. Each component plays a crucial role – from the moist pumpkin puree that brings that lovely orange hue and earthiness, to the fragrant spices that add warmth and depth. The cream cheese filling perfectly balances sweetness with a slight tang, making these treats irresistible.
- Light brown sugar (2 cups, packed): Adds rich sweetness and moisture while enhancing the pumpkin’s natural flavor.
- Vegetable oil (1 cup): Keeps the whoopie pies wonderfully tender and soft.
- Canned pumpkin (1 ½ cups): Provides smooth texture and classic fall flavor—be sure it’s pure pumpkin, not pie filling.
- Large eggs (2): Help bind the ingredients and add structure to the batter.
- Vanilla extract (1 teaspoon plus ½ tablespoon for filling): Gives a gentle, sweet aroma to both the cakes and filling.
- All-purpose flour (3 cups): The base that creates the tender cakey texture of the whoopie pies.
- Ground cinnamon (1 tablespoon): Adds a warm, spicy fragrance that complements the pumpkin.
- Pumpkin pie spice (½ tablespoon): A blend of spices that deepens the autumnal flavor profile.
- Salt (1 teaspoon): Enhances all the flavors and balances sweetness.
- Baking powder (1 teaspoon): Helps the whoopie pies rise for a fluffy texture.
- Baking soda (1 teaspoon): Works alongside baking powder for perfect lift and tenderness.
- Salted butter (½ cup, softened): Essential for a creamy, rich cream cheese filling.
- Cream cheese (8 ounces, softened): Creates that luscious filling with a tangy finish you won’t be able to resist.
- Powdered sugar (3 cups): Sweetens the filling and gives it a smooth, silky consistency.
How to Make Pumpkin Whoopie Pies with Cream Cheese Filling Recipe
Step 1: Prepare the Batter
Start by preheating your oven to 350 degrees Fahrenheit and greasing two large baking sheets. In a large bowl, beat together the light brown sugar and vegetable oil using an electric hand mixer until smooth and well combined. Next, add the canned pumpkin, eggs, and vanilla extract, then beat again until the mixture is well blended. This wet base sets the stage for soft, moist pumpkin cakes that are full of flavor.
Step 2: Combine Dry Ingredients
In a separate large bowl, whisk together all-purpose flour, ground cinnamon, pumpkin pie spice, salt, baking powder, and baking soda. This blend of dry ingredients is what infuses those iconic warm spices into your whoopie pies.
Step 3: Mix Wet and Dry Ingredients
Gently fold the dry mixture into the wet pumpkin mixture until just combined. Avoid overmixing to maintain that tender cakey texture. Then, cover the dough and chill it in the refrigerator for 20 minutes—this step helps the dough to firm up, making it easier to drop onto the baking sheets and bake perfectly.
Step 4: Bake the Pumpkin Whoopie Pies
Using a tablespoon (or cookie scoop), drop heaping balls of chilled dough onto the prepared baking sheets with enough space between each. Bake for 12 to 14 minutes in the preheated oven. The cookies should rise and become cake-like but still remain soft. Allow them to cool completely on a wire rack before filling.
Step 5: Make the Cream Cheese Filling
In a large bowl, beat together softened salted butter and cream cheese with an electric hand mixer until smooth and creamy. Gradually add powdered sugar and vanilla extract, beating continuously until the filling reaches a fluffy and spreadable consistency. This filling is the perfect balance of sweetness and tang that complements the spice of the pies beautifully.
Step 6: Assemble the Whoopie Pies
Flip half of the cooled pumpkin whoopie pies upside down and generously spread cream cheese filling over each. Then place the remaining pies on top, gently pressing together to create a sandwich. Repeat this process until all pies are filled and ready to enjoy.
How to Serve Pumpkin Whoopie Pies with Cream Cheese Filling Recipe

Garnishes
Want to add a little extra flair? Dust your Pumpkin Whoopie Pies with a light sprinkle of powdered sugar or cinnamon for a charming touch. You might also top them with chopped pecans or a drizzle of melted white chocolate for added texture and sweetness. Simple garnishes elevate the presentation and make these pies even more inviting.
Side Dishes
Serve these whoopie pies alongside a hot cup of spiced chai tea, coffee, or pumpkin spice latte to bring out their cozy flavors. Fresh fruit like sliced apples or pears also pairs wonderfully, adding a refreshing contrast. They’re great as dessert after a comforting meal or as a festive snack any time.
Creative Ways to Present
For parties or special occasions, stack your Pumpkin Whoopie Pies on a decorative tiered stand for a pumpkin-themed dessert display. Wrap individual pies in clear cellophane tied with rustic twine or orange ribbon—they make fantastic gifts! You can even sandwich the cream cheese filling between different flavors, like gingerbread or chocolate, for a fun twist.
Make Ahead and Storage
Storing Leftovers
Once assembled, store your Pumpkin Whoopie Pies in an airtight container in the refrigerator to keep the cream cheese filling fresh. They will stay delicious for up to 4 days, making them a perfect make-ahead treat for busy weeks or special gatherings.
Freezing
If you want to prepare in advance or save leftovers, these pies freeze beautifully. Wrap each whoopie pie individually in plastic wrap and place them in a freezer-safe container or bag. They can be frozen for up to 2 months. Just thaw them overnight in the fridge before serving for best texture and flavor.
Reheating
Because the whoopie pies have a delicate filling, it’s best to enjoy them chilled or at room temperature. If you prefer a slightly warmed treat, remove the filling side and microwave the cake halves for about 5 to 10 seconds, then reassemble. This keeps the filling cool while giving a soft, cozy feel to the pumpkin cake.
FAQs
Can I substitute fresh pumpkin for canned pumpkin in the recipe?
Yes! If you use fresh pumpkin, be sure to cook and puree it thoroughly to match the smooth texture of canned pumpkin. The taste will remain wonderfully fresh, but canned pumpkin is often more convenient and consistent in moisture.
What can I use instead of pumpkin pie spice?
If you don’t have pumpkin pie spice on hand, a simple blend of cinnamon, nutmeg, ginger, and cloves will do the trick. Mix about 1 teaspoon cinnamon, ½ teaspoon nutmeg, ¼ teaspoon ginger, and a pinch of cloves to mimic the warming spices.
Can I make these whoopie pies gluten-free?
Absolutely! Use a gluten-free all-purpose flour blend in place of regular flour. Just make sure your blend contains xanthan gum or another binder to help with texture. The result will be just as tasty and moist.
Can I prepare the cream cheese filling ahead of time?
Yes, you can make the cream cheese filling a day in advance. Store it in an airtight container in the refrigerator and give it a quick mix before assembling the pies to refresh the texture.
How do I prevent the whoopie pies from spreading too much during baking?
Chilling the dough before scooping it onto the baking sheets helps control spreading. Also, make sure your baking powder and baking soda are fresh for proper leavening and structure.
Final Thoughts
There’s something truly special about Pumpkin Whoopie Pies with Cream Cheese Filling Recipe that feels like a warm hug with every bite. Their tender cake, fragrant spices, and creamy filling come together perfectly to celebrate the flavors of the season. Whether you’re making them for family, friends, or yourself, these pies are an easy way to bring a little more joy and comfort to your day. So, grab your ingredients, get mixing, and experience the magic of this delicious recipe firsthand—you won’t regret a single bite.
Print
Pumpkin Whoopie Pies with Cream Cheese Filling Recipe
- Prep Time: 20 minutes
- Cook Time: 14 minutes
- Total Time: 54 minutes
- Yield: 18 servings
- Category: Dessert
- Method: Baking
- Cuisine: American
- Diet: Vegetarian
Description
Delight in these soft and spiced Pumpkin Whoopie Pies, a perfect fall treat combining tender pumpkin-flavored cakes sandwiched with a luscious cream cheese filling. Warm cinnamon and pumpkin pie spices blend beautifully with the creamy, sweet filling for a comforting dessert that’s ideal for gatherings or cozy nights in.
Ingredients
Pie Cakes
- 2 cups light brown sugar (packed)
- 1 cup vegetable oil
- 1 ½ cups canned pumpkin (not pumpkin pie filling)
- 2 large eggs
- 1 teaspoon vanilla extract
- 3 cups all-purpose flour
- 1 tablespoon ground cinnamon
- ½ tablespoon pumpkin pie spice
- 1 teaspoon salt
- 1 teaspoon baking powder
- 1 teaspoon baking soda
Cream Cheese Filling
- ½ cup salted butter (softened)
- 1 block (8 ounces) cream cheese (softened)
- 3 cups powdered sugar
- ½ tablespoon vanilla extract
Instructions
- Preheat and Prepare: Preheat your oven to 350°F (175°C). Grease two large baking sheets to prevent the pies from sticking during baking.
- Mix Wet Ingredients: In a large bowl, combine the light brown sugar and vegetable oil. Beat with an electric hand mixer until well combined. Add the canned pumpkin, eggs, and 1 teaspoon vanilla extract, then beat thoroughly to create a uniform wet mixture.
- Combine Dry Ingredients: In a separate large bowl, whisk together the all-purpose flour, ground cinnamon, pumpkin pie spice, salt, baking powder, and baking soda until evenly distributed.
- Mix Batter: Fold the dry ingredients into the wet ingredients, mixing gently and just until combined to avoid overworking the batter. Chill the dough in the refrigerator for 20 minutes to make it easier to handle.
- Shape and Bake: Drop the chilled dough by 2 heaping tablespoons onto the prepared baking sheets, spacing them evenly. Bake in the preheated oven for 12 to 14 minutes until the edges are set and the tops spring back lightly to the touch. Remove from oven and allow to cool completely on the baking sheets.
- Prepare Cream Cheese Filling: In a large bowl, beat together the softened butter and cream cheese with an electric mixer until smooth and combined. Gradually add the powdered sugar and ½ tablespoon vanilla extract, continuing to beat until the filling is creamy and fluffy.
- Assemble Whoopie Pies: Turn half of the cooled pumpkin cakes upside down. Spread a generous amount of cream cheese filling on each. Place the remaining cakes on top to form pies. Press lightly to sandwich the filling evenly.
- Serve and Enjoy: Arrange assembled whoopie pies on a serving platter. These treats are best enjoyed fresh but can be stored in an airtight container in the refrigerator for up to 3 days.
Notes
- Ensure the pumpkin used is pure canned pumpkin, not pumpkin pie filling, to control sweetness and flavor.
- Do not overmix the batter; mix until just combined for tender whoopie pies.
- Chilling the dough helps the cookies hold their shape better when baking.
- Allow the cookies to cool fully before filling to prevent cream cheese from melting.
- Store finished whoopie pies in the fridge; remove a few minutes before serving for best texture.


