
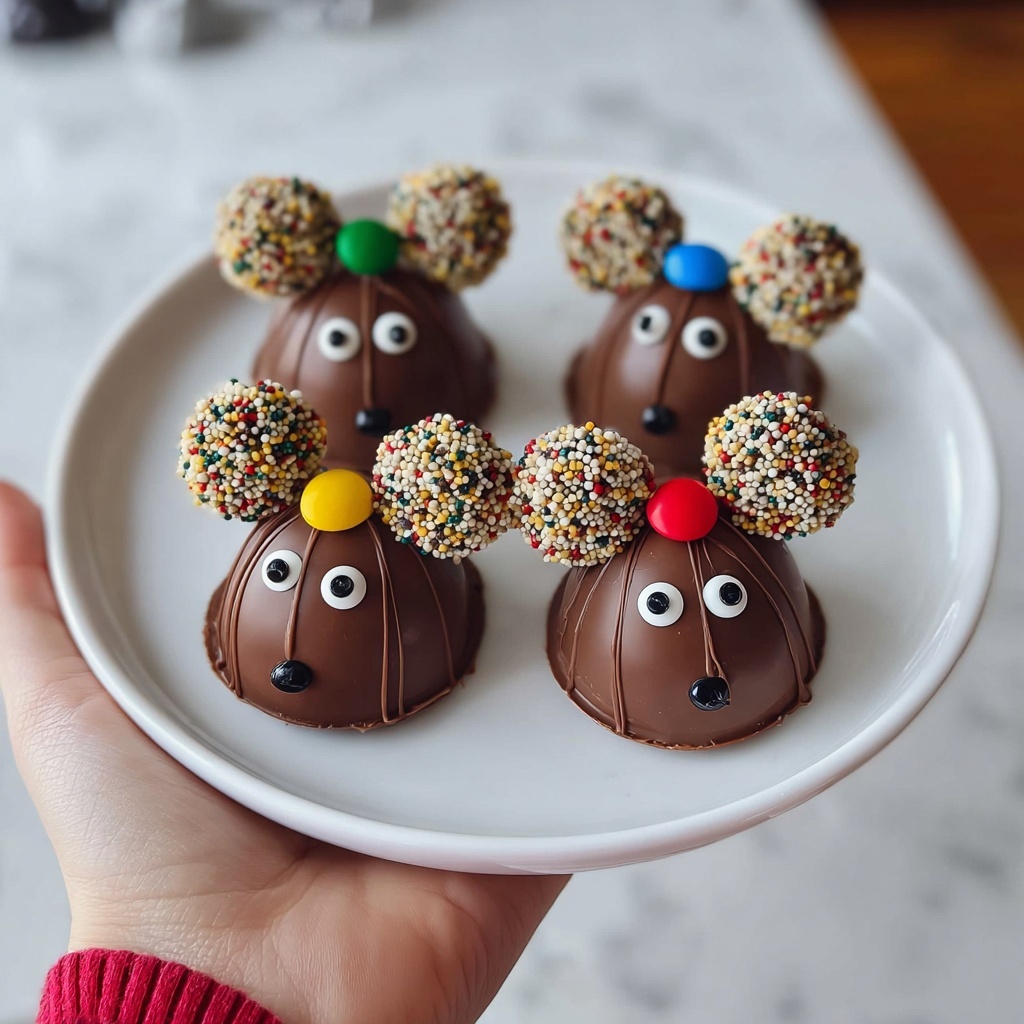
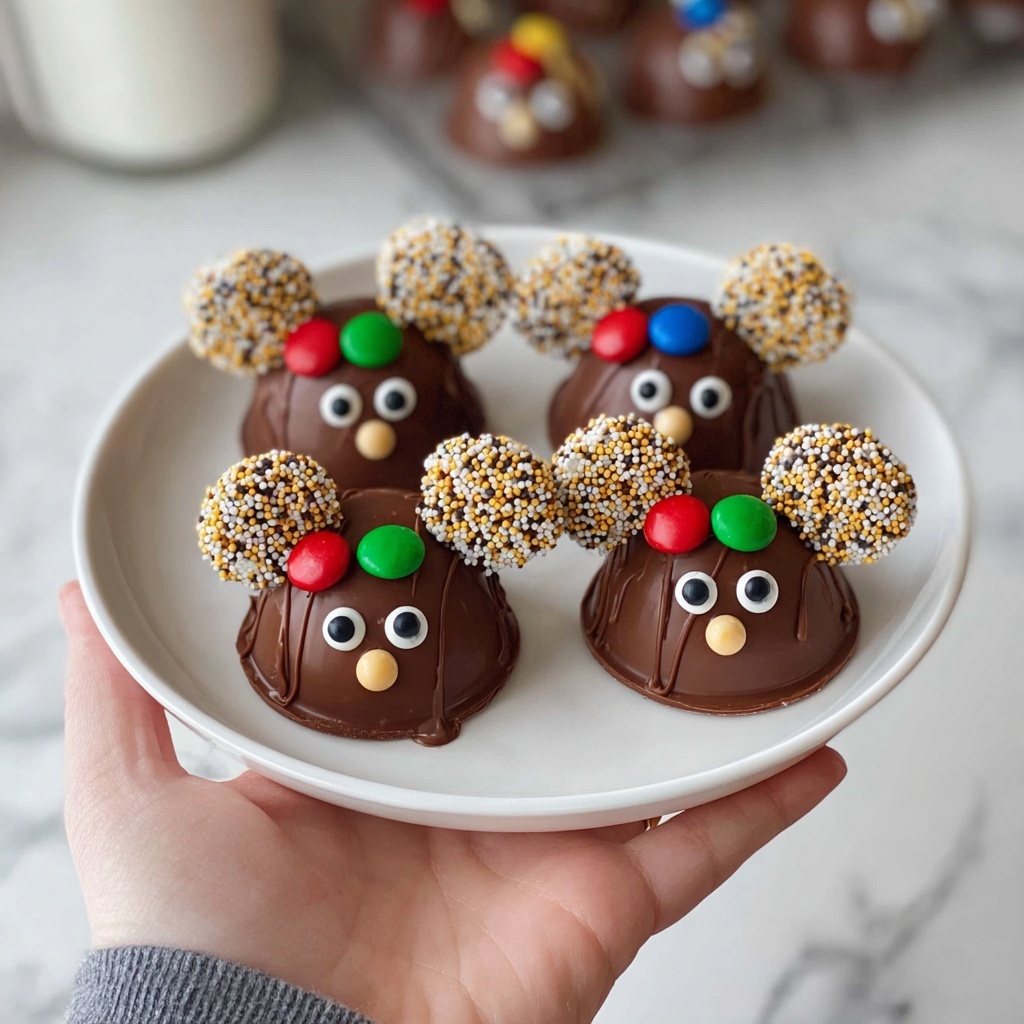
If you’re searching for a delightful holiday treat that brings a wave of sweet nostalgia right to your kitchen, the Hershey’s Christmas Mice Candy: 5 Steps to Sweet Nostalgia Recipe is your new best friend. This charming little candy combines creamy chocolate, crunchy peanut butter goodness, and festive touches that remind you of cozy Christmas mornings. It’s simple to make, irresistibly cute, and perfect for sharing warmth and smiles with family and friends during the holiday season. Trust me, once you try this recipe, these mice will scamper their way into your holiday traditions forever.
Ingredients You’ll Need
The magic of this recipe really shines through the simplicity and harmony of its ingredients. Each element plays a special role—whether it’s the creamy texture, the crunchy surprise, or the festive colors that bring these Christmas mice to life.
- Hershey’s chocolate chips: The smooth, rich base that melts perfectly and creates the candy’s decadent foundation.
- Peanut butter: Adds creamy, nutty flavor and binds the ingredients together wonderfully.
- Powdered sugar: Balances the peanut butter with sweetness while helping to thicken the mixture.
- Rice cereal: Introduces a delightful crunch that mimics little mouse bodies with texture.
- Chopped nuts: Adds extra crunch and a rustic touch to keep things interesting.
- Mini chocolate chips: Perfect for crafting the ears with their small, adorable size.
- Red or green candy melts: These add festive color and a smooth coating to finish off the mice.
- Candy eyes: The signature detail that brings these little treats to life and makes them utterly charming.
How to Make Hershey’s Christmas Mice Candy: 5 Steps to Sweet Nostalgia Recipe
Step 1: Melt the Chocolate
Start by melting the Hershey’s chocolate chips in a microwave-safe bowl. Use short bursts of 20 to 30 seconds and stir in between so you get a silky smooth chocolate base without burning it. This step sets the chocolatey heart of your Christmas mice.
Step 2: Mix in the Peanut Butter
Add the peanut butter to the melted chocolate and stir vigorously until everything is perfectly combined and smooth. This luscious blend will give the candy a creamy richness that’s wonderfully addictive.
Step 3: Add the Powdered Sugar
Next, fold in the powdered sugar. This addition sweetens the mix and firms up the texture so your candy balls will hold shape perfectly. Stir until the sugar is fully incorporated without any lumps.
Step 4: Fold in Rice Cereal and Nuts
Now, gently fold in the rice cereal and the chopped nuts. These bring the all-important crunch factor your mice need to be irresistibly fun. The cereal keeps the candy light, while the nuts provide a satisfying contrast in texture.
Step 5: Shape and Decorate Your Christmas Mice
Form small balls from the mixture and place them carefully on parchment-lined trays. Melt your candy melts and dip the tops of the balls for a colorful festive touch. Then, place candy eyes on each ball so they look lively, and attach mini chocolate chips on top to create cute little ears. Allow the mice to set completely until firm—patience here leads to perfectly shaped candy critters!
How to Serve Hershey’s Christmas Mice Candy: 5 Steps to Sweet Nostalgia Recipe
Garnishes
To make these Christmas mice even more festive, consider adding a sprinkle of edible glitter or powdered sugar snow on top. Tiny sprigs of fresh rosemary or holly leaves can create a woodland effect and complement the holiday spirit beautifully.
Side Dishes
Pair these charming candies with a warm cup of hot cocoa or a glass of chilled milk for the perfect holiday snack combo. They also make delightful favors next to gingerbread men or fruitcake on any dessert platter.
Creative Ways to Present
Show off your candy mice by arranging them in a miniature “mouse house” made from gingerbread or placing them inside clear cellophane bags tied with festive ribbons. You can also use decorative holiday tins or rustic wooden trays to give them that cozy, gift-like feel.
Make Ahead and Storage
Storing Leftovers
Keep your Christmas mice in an airtight container at room temperature for up to a week. This ensures they stay fresh without losing their texture or flavor. Avoid humid places to keep the candy melts from softening prematurely.
Freezing
If you want to prepare them in advance or save some for later, these candies freeze well. Place them on a baking sheet first to freeze individually, then transfer into a freezer-safe bag or container. When you’re ready, thaw them at room temperature to preserve their texture.
Reheating
These candies are best enjoyed as they are, but if your candy melts soften or dull in appearance, a quick 10-15 second blast in the microwave can refresh the shine—just be careful to avoid melting the whole candy ball.
FAQs
Can I use a different type of nut butter?
Absolutely! Almond butter or cashew butter can be great substitutes if you want a slightly different flavor profile. Just make sure it’s creamy to keep the right consistency.
What if I don’t have candy eyes?
No worries. You can substitute them with tiny dots of melted chocolate or simply use small edible pearls to create eyes. Creativity is part of the fun with this recipe!
Can I make these mice vegan or dairy-free?
Yes, by using dairy-free chocolate chips and a plant-based peanut butter, you can adapt this recipe to be vegan. Just check that your candy melts are also vegan-friendly.
How long does it take for the candy melts to harden?
Typically, candy melts firm up within 15 to 30 minutes at room temperature. To speed up the process, you can place the tray in the refrigerator for about 10-15 minutes.
Is it possible to color the candy mice differently?
Definitely! While red and green are festive, you can use any color of candy melts that suit your holiday theme or party colors, making this treat versatile and fun to customize.
Final Thoughts
Making the Hershey’s Christmas Mice Candy: 5 Steps to Sweet Nostalgia Recipe is like wrapping up a holiday hug in edible form. The ease of the recipe combined with the charm of these delightful little mice makes it a must-try for your Christmas celebrations. It’s a wonderful way to create memories in the kitchen while filling your home with joy and sweet smells. So grab your ingredients, gather your loved ones, and let the fun begin—these mice are bound to become a beloved holiday tradition!
Print
Hershey’s Christmas Mice Candy: 5 Steps to Sweet Nostalgia Recipe
- Prep Time: 20 minutes
- Cook Time: 20 minutes
- Total Time: 40 minutes
- Yield: 24 servings
- Category: Dessert
- Method: No-Cook
- Cuisine: American
- Diet: Vegetarian
Description
Celebrate the holidays with Hershey’s Christmas Mice Candy, a nostalgic and delightful treat made from chocolate, peanut butter, and crunchy rice cereal. These adorable little mice are easy to make and perfect for festive gatherings, blending sweet, crunchy, and nutty flavors into bite-sized fun.
Ingredients
Main Ingredients
- 1 cup Hershey’s chocolate chips
- 1 cup peanut butter
- 1/2 cup powdered sugar
- 1 cup rice cereal
- 1/2 cup chopped nuts
Decoration
- 1 cup mini chocolate chips
- 1 cup red or green candy melts
- 1/2 cup candy eyes
Instructions
- Melt Chocolate: Melt Hershey’s chocolate chips in a microwave-safe bowl by heating in 30-second increments, stirring in between until fully smooth and melted.
- Mix Peanut Butter: Add the peanut butter to the melted chocolate and stir well until the mixture is smooth and fully combined.
- Add Powdered Sugar: Gradually incorporate the powdered sugar, mixing thoroughly to form a consistent, thick dough-like batter.
- Fold Cereal and Nuts: Gently fold in the rice cereal and chopped nuts until evenly distributed throughout the mixture.
- Form Balls: Shape the mixture into small bite-sized balls using your hands, then place them on parchment paper laid on a flat surface.
- Melt Candy Coating: In a separate microwave-safe bowl, melt the red or green candy melts using short bursts of 20-30 seconds, stirring until smooth.
- Dip Tops: Dip the top of each peanut butter ball into the melted candy coating to give it a festive colorful touch.
- Decorate: Quickly place candy eyes and mini chocolate chips to the candy-topped part of the balls to create the mouse’s eyes and ears.
- Set: Allow the decorated mice to sit at room temperature or in the refrigerator until the candy coating hardens and the treats are firm to the touch.
Notes
- Use natural or creamy peanut butter for best consistency in mixing.
- Rice cereal adds the perfect crunch, but puffed wheat can be substituted if preferred.
- Store in an airtight container to keep candy fresh and prevent melting.
- These treats are perfect for holiday parties and as gifts.
- Ensure candy melts do not overheat; stir frequently for smooth dipping.


