
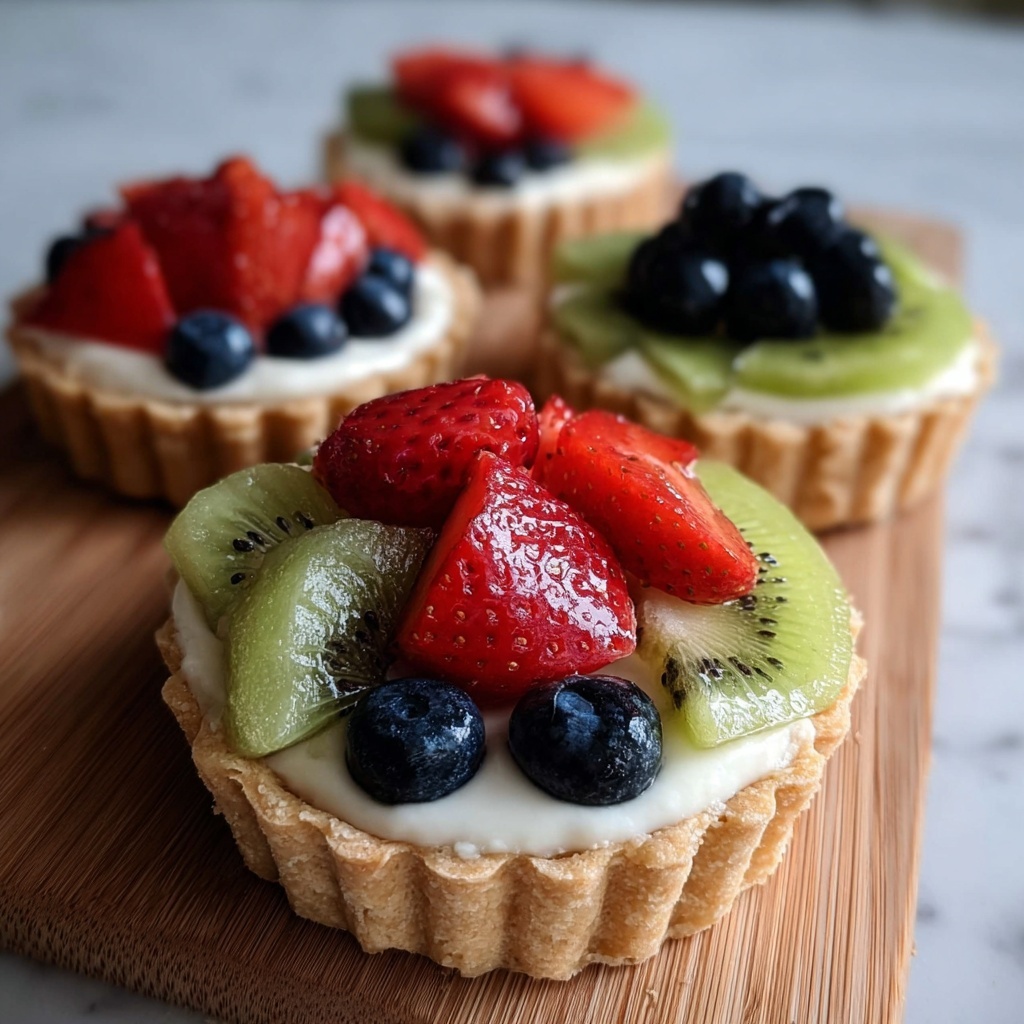
If you have a sweet tooth and love a burst of fresh flavors wrapped in a delicate crust, this Mini Fruit Tarts with Creamy Pastry Filling and Fresh Fruit Topping Recipe is exactly what you need in your life. These charming little desserts are not only a feast for the eyes but also combine the smooth luxury of homemade pastry cream with the refreshing pop of assorted fresh fruit, all nestled inside perfectly crisp tart shells. Whether you’re planning a special celebration or just want to treat yourself to a touch of elegance, these mini fruit tarts are guaranteed to delight and impress every time.

Ingredients You’ll Need
Gathering the right ingredients is key to making these mini fruit tarts truly shine, and luckily, the list is straightforward yet essential. Each component plays a vital role—from the tender pre-made tart shells to the luscious whipped cream folded into the pastry cream, and of course, the vibrant fresh fruits that crown each tart with color and brightness.
- Pre-made tart shells: Convenient and crisp, these provide the perfect base to hold all the creamy goodness while saving you prep time.
- Milk: The foundation of the pastry cream, adding richness and smoothness to the filling.
- Sugar: Adds just the right amount of sweetness to balance the tang from the fruit topping.
- Egg yolks: Essential for thickening the pastry cream and giving it that silky texture.
- Cornstarch: The magic thickener that ensures your pastry cream sets perfectly without any lumps.
- Vanilla extract: A splash of warmth and flavor depth that elevates the cream to something extraordinary.
- Heavy cream: Whipped to soft peaks, this lightens the pastry cream and adds a luscious, airy finish.
- Assorted fresh fruits: Think strawberries, blueberries, and kiwi for a colorful and refreshing topping that’s bursting with natural sweetness and texture.
How to Make Mini Fruit Tarts with Creamy Pastry Filling and Fresh Fruit Topping Recipe
Step 1: Warm the Milk and Sugar
Start by gently heating the milk and sugar together in a saucepan over medium heat. This simple warm mixture will dissolve the sugar perfectly and prepare the base for your exquisite pastry cream. Keep an eye on it so it does not come to a boil but just becomes warm enough to blend smoothly with the eggs.
Step 2: Whisk Egg Yolks and Cornstarch
While the milk is warming, take a bowl and whisk the egg yolks with cornstarch until you get an even, smooth mixture. This step is crucial for avoiding lumps later and gives the pastry cream a perfectly silky consistency.
Step 3: Combine Warm Milk with Egg Mixture
Slowly and carefully pour the warm milk into the egg yolk mixture, whisking constantly. This gradual combining prevents the eggs from scrambling and ensures a smooth custard base to cook.
Step 4: Cook Until Thickened
Pour the combined mixture back into the saucepan and cook over medium heat. Stir continuously until the custard thickens beautifully and coats the back of a spoon. Patience here rewards you with that luxurious, creamy texture that defines great pastry cream.
Step 5: Add Vanilla Extract
Remove the custard from the heat and stir in the vanilla extract for that inviting aroma and lovely flavor depth, turning your pastry cream into something truly irresistible.
Step 6: Cool Pastry Cream to Room Temperature
Allow the pastry cream to cool at room temperature. This step is important before folding in the whipped cream, as mixing while warm will cause it to melt.
Step 7: Whip the Heavy Cream
In a clean bowl, whip the heavy cream until soft peaks form, creating a light, fluffy texture that will be folded into your pastry cream.
Step 8: Fold Whipped Cream into Pastry Cream
Gently fold the whipped cream into the cooled pastry cream. This combination makes the filling incredibly smooth and creamy yet airy enough to delight every bite.
Step 9: Fill Tart Shells
Carefully spoon the creamy filling into each pre-made tart shell. The contrast of the crisp shell and the smooth filling is absolutely divine.
Step 10: Top with Assorted Fresh Fruits
Arrange your chosen fresh fruits—like succulent strawberries, juicy blueberries, and tangy kiwi—on top of each tart. This topping adds vibrant colors and fresh flavors that sing in harmony with the creamy base.
Step 11: Chill Before Serving
Place the filled tarts in the refrigerator for at least one hour to allow the filling to set and the flavors to meld together. This chilling step is essential for the best texture and presentation.
How to Serve Mini Fruit Tarts with Creamy Pastry Filling and Fresh Fruit Topping Recipe
Garnishes
For a final touch that will wow your guests even more, consider adding a light dusting of powdered sugar or a fresh mint leaf on top of each tart. These simple garnishes bring an elegant look and an extra hint of freshness.
Side Dishes
Mini fruit tarts shine as a standalone dessert, but pairing them with a scoop of vanilla bean ice cream or a dollop of lightly sweetened whipped cream complements the flavors beautifully without overpowering their delicate character.
Creative Ways to Present
Try arranging the tarts on a tiered serving tray for a striking display at parties, or serve them alongside a pot of herbal tea for an afternoon treat that feels indulgent yet approachable. The versatility of this Mini Fruit Tarts with Creamy Pastry Filling and Fresh Fruit Topping Recipe makes it perfect for any occasion.
Make Ahead and Storage
Storing Leftovers
If you have any tarts left over, store them in an airtight container in the refrigerator. They will stay fresh for up to two days, though they’re so delicious, you might not have any leftovers!
Freezing
Because of the fresh fruit topping and creamy filling, freezing these tarts is not recommended, as it can affect the texture of both components. It’s best to enjoy this Mini Fruit Tarts with Creamy Pastry Filling and Fresh Fruit Topping Recipe fresh for the best experience.
Reheating
These tarts are best served chilled and are not suited for reheating. Enjoy them cold to savor the lovely contrast of the crisp shell, creamy filling, and fresh fruit topping.
FAQs
Can I make the tart shells from scratch instead of using pre-made ones?
Absolutely! Homemade tart shells add a wonderful personal touch, and the buttery flavor is unbeatable. Just be sure to bake and cool them completely before filling to maintain crispness.
What fruits work best on these mini fruit tarts?
Fruits that are firm and colorful, like strawberries, blueberries, kiwi, raspberries, and mandarin segments, work beautifully. Choose fruits that are fresh and in season for the best flavor and appearance.
Is there a dairy-free alternative for the pastry cream?
While traditional pastry cream relies on dairy, you can experiment with plant-based milks and creams, but keep in mind the texture and flavor may differ. Coconut milk and cashew cream can be good starting points.
How long does it take to make these tarts from start to finish?
This Mini Fruit Tarts with Creamy Pastry Filling and Fresh Fruit Topping Recipe typically takes about 1 hour and 45 minutes, including preparation and chilling time, so plan accordingly for best results.
Can I prepare the pastry cream in advance?
Yes! The pastry cream can be made a day ahead and refrigerated, then folded with whipped cream and assembled just before serving to save time and keep everything fresh.
Final Thoughts
Making these Mini Fruit Tarts with Creamy Pastry Filling and Fresh Fruit Topping Recipe is a joyful experience that results in an irresistible dessert full of flavor, texture, and charm. It’s perfect for impressing friends, indulging your sweet tooth, or simply bringing a bit of elegance to your table. Once you try them, I promise they’ll become a beloved classic in your repertoire. So go ahead, treat yourself to something truly special!
Print
Mini Fruit Tarts with Creamy Pastry Filling and Fresh Fruit Topping Recipe
- Prep Time: 30 minutes
- Cook Time: 15 minutes
- Total Time: 1 hour 45 minutes
- Yield: 12 mini tarts
- Category: Dessert
- Method: Stovetop
- Cuisine: French
Description
These Mini Fruit Tarts with Pastry Cream combine a crisp tart shell filled with rich, creamy vanilla pastry cream and topped with colorful, fresh fruits. Perfect for an elegant dessert or a delightful afternoon treat, these tarts balance creamy texture with vibrant fruity flavors.
Ingredients
Pastry Cream
- 1 cup of milk
- 1/2 cup of sugar
- 3 egg yolks
- 1/4 cup of cornstarch
- 1 teaspoon of vanilla extract
- 1/2 cup of heavy cream
Tart Shells and Toppings
- 1 package of pre-made tart shells (12 shells)
- Assorted fresh fruits (strawberries, blueberries, kiwi)
Instructions
- Heat Milk and Sugar: In a saucepan, heat the milk and sugar over medium heat until warm, ensuring the sugar is dissolved and the mixture is ready to combine with the egg yolks.
- Whisk Egg Yolks and Cornstarch: In a bowl, whisk together the egg yolks and cornstarch until the mixture is smooth and free of lumps, which helps create a creamy pastry cream texture.
- Combine Mixtures: Gradually add the warm milk mixture to the egg yolk mixture, whisking constantly to temper the eggs and prevent curdling.
- Cook Pastry Cream: Return the combined mixture to the saucepan and cook over medium heat, stirring continuously until the cream thickens into a custard-like consistency.
- Add Vanilla: Remove the saucepan from heat and stir in the vanilla extract for flavor.
- Cool Pastry Cream: Let the pastry cream cool to room temperature to prepare for folding in the whipped cream.
- Whip Heavy Cream: In a separate bowl, whip the heavy cream until soft peaks form, adding lightness to the pastry cream.
- Fold Whipped Cream: Gently fold the whipped cream into the cooled pastry cream, creating a smooth and airy filling.
- Assemble Tarts: Fill each pre-made tart shell with the pastry cream mixture, spreading evenly.
- Add Fresh Fruit: Top each filled tart with assorted fresh fruits such as sliced strawberries, blueberries, and kiwi for a colorful garnish.
- Chill Before Serving: Chill the assembled tarts in the refrigerator for at least 1 hour to set before serving.
Notes
- Make sure to whisk constantly when cooking the pastry cream to avoid lumps and burning.
- Tart shells can be substituted with homemade pastry shells if preferred.
- Use fresh, ripe fruits for the best flavor and appearance.
- Chilling the tarts helps the pastry cream set and enhances the overall texture.
- This recipe is best served within 24 hours to maintain freshness of the tart shells.
