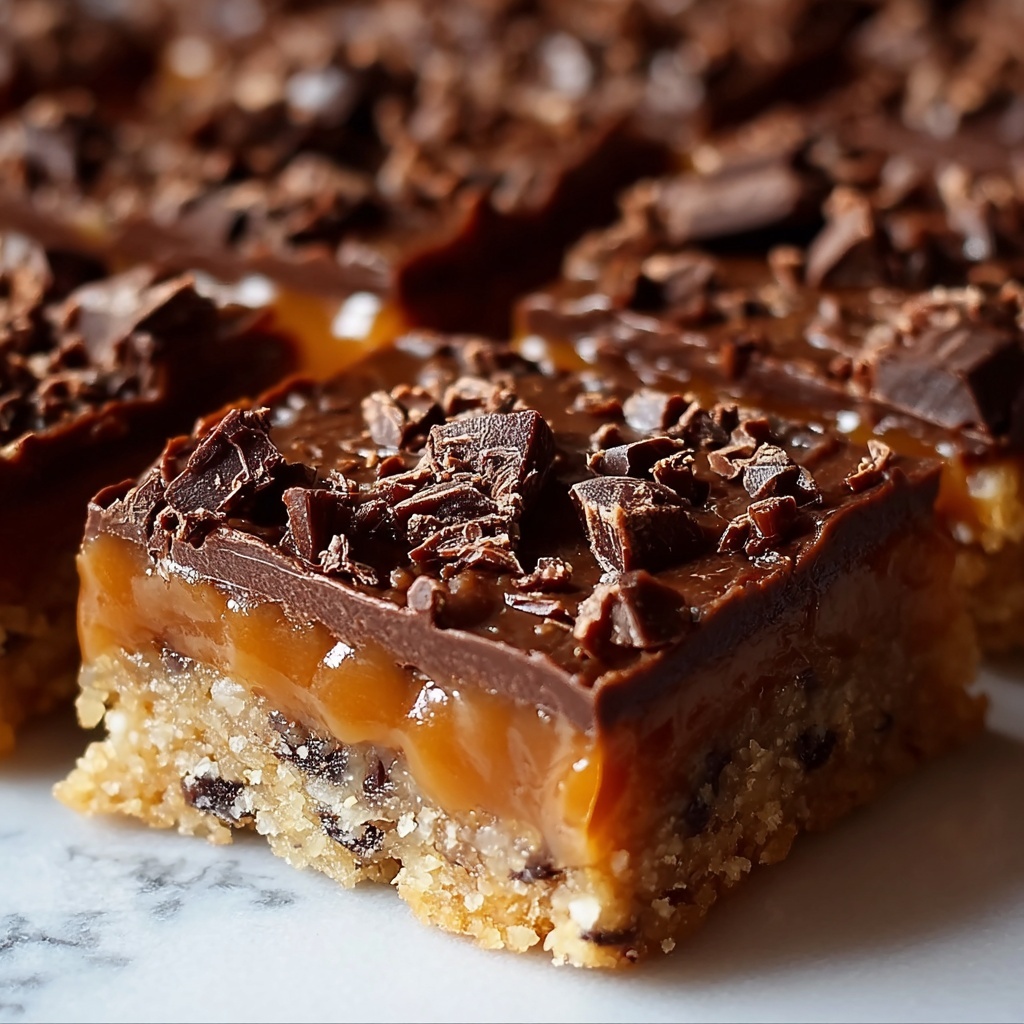
If you have a sweet tooth craving something irresistibly crunchy, gooey, and full of chocolatey goodness, you’re going to love this Butterfinger Caramel Bars with Layers of Sweet Crunch and Chocolate Recipe. This dessert layers a buttery crust with luscious caramel, melty chocolate, and crunchy Butterfinger candy, creating a multi-textured treat that’s as fun to eat as it is to make. Whether for a special occasion or a cozy night in, these bars bring together familiar flavors with a dazzling twist you’ll want to share — or keep all to yourself!
Ingredients You’ll Need
Getting to know your ingredients is the first step toward making these tempting bars. Each one plays a crucial role, whether it’s adding richness, texture, or that signature Butterfinger crunch that makes this recipe unforgettable.
- Unsalted butter (1 cup softened + 1/2 cup cubed): Provides a rich, creamy base and helps create the perfect buttery crust and caramel blend.
- Light brown sugar (1 cup, packed): Adds deep sweetness and moisture to the dough for a tender crumb.
- Vanilla extract (1 teaspoon): Enhances all the flavors with its warm, aromatic touch.
- All-purpose flour (2 cups): The sturdy foundation for our crust and crumbly topping.
- Baking powder (1/2 teaspoon): Gives just enough lift without compromising the bar’s dense texture.
- Salt (1/4 teaspoon): Balances the sweetness and deepens flavor complexity.
- Sweetened condensed milk (1 can, 14 ounces): Brings that luscious caramel creaminess when combined with butter and candies.
- Caramel candies (1 cup, unwrapped): Melt down to create the gooey caramel layer that ties it all together.
- Crushed Butterfinger candy bars (1 cup + 1/2 cup for topping): Adds signature sweet crunch in both the caramel layer and the chocolate topping.
- Semi-sweet chocolate chips (1 cup): Melted on top for rich, velvety chocolate goodness that contrasts beautifully with the crisp layers.
How to Make Butterfinger Caramel Bars with Layers of Sweet Crunch and Chocolate Recipe
Step 1: Prepare the Base
Start by preheating your oven to 350°F (175°C) and lining a 9×13-inch baking pan with parchment paper—this little trick makes lifting the bars out later a breeze. In a large bowl, cream the softened butter and packed brown sugar until fluffy and light, which ensures the base will be tender. Blend in the vanilla and then add your flour, baking powder, and salt, mixing everything until you get a crumbly, combined dough that will press perfectly into your pan.
Step 2: Assemble and Bake the Bottom Layer
Use about two-thirds of your dough to form an even layer at the bottom of your prepared pan. This sturdy base is crucial, giving structure to the bars. Bake this layer for about 10 to 12 minutes, or until it’s lightly golden and just starting to firm. Remove from the oven and set it aside because soon it will get a spectacular top-up.
Step 3: Prepare the Caramel Filling
On the stovetop, melt the cubed butter along with your unwrapped caramel candies over low heat. This step requires patience and constant stirring, turning the mix silky smooth without any lumps. Once the caramel is melted, blend in the sweetened condensed milk and continue stirring until the mixture thickens slightly. This luscious caramel layer transforms these bars into a decadent treat.
Step 4: Layer the Bars
Pour your glossy caramel mixture evenly over the baked base, spreading it with care. Sprinkle half of the crushed Butterfinger candy bars right on top of the caramel, adding bursts of crispy sweetness. Take the reserved third of the dough and crumble it evenly over the caramel and Butterfinger layer, almost like a topping that will turn golden during baking.
Step 5: Bake to Perfection
Pop the layered pan back into the oven and bake for 20 to 25 minutes. You’ll know it’s done when the topping turns golden brown and the edges bubble with caramel goodness. This beautiful contrast of textures begins to come alive.
Step 6: Add the Chocolate Topping
Once the bars come out of the oven, immediately sprinkle the semi-sweet chocolate chips all over the hot surface. Let them sit for a few minutes until they soften, then spread the melted chocolate evenly with a spatula. Finally, sprinkle the remaining crushed Butterfinger candies on top for that irresistible finish—the perfect crunch meets rich chocolate in every bite.
Step 7: Cool and Slice
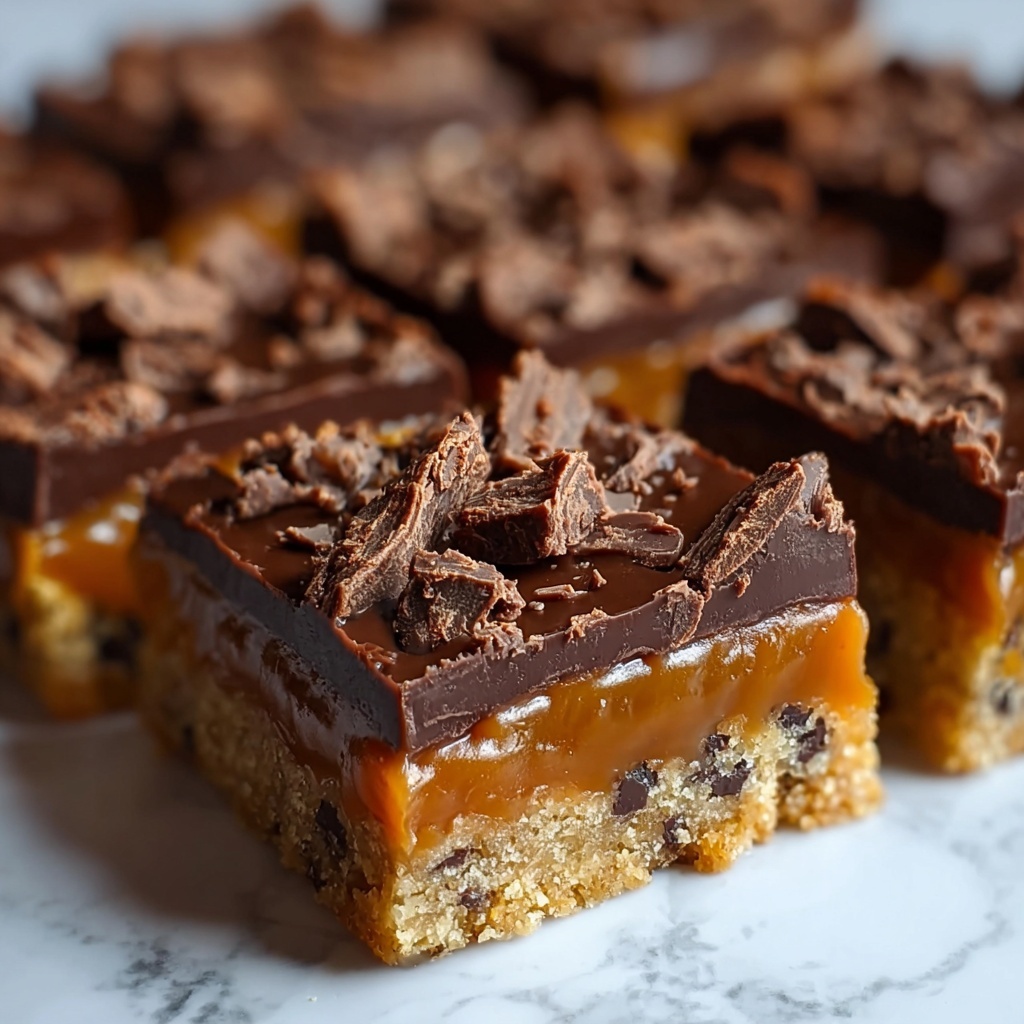
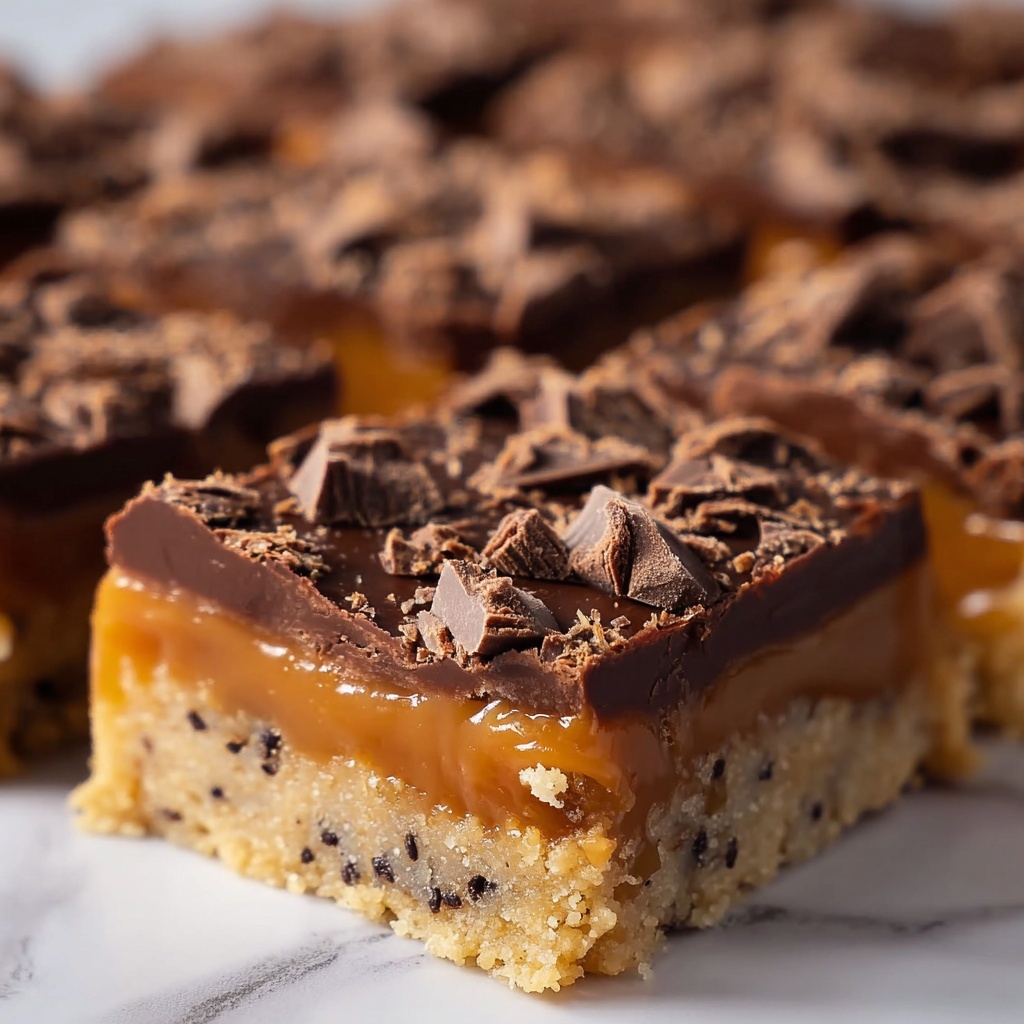
Patience is rewarding here; allow the bars to cool completely at room temperature or chill them in the refrigerator to set faster. Use the parchment overhang to lift the whole slab from the pan gently, then slice into squares and get ready for some serious indulgence.
How to Serve Butterfinger Caramel Bars with Layers of Sweet Crunch and Chocolate Recipe
Garnishes
These bars shine on their own but can be dressed up beautifully for serving. A dusting of powdered sugar or a drizzle of caramel sauce elevates the presentation while intensifying the sweetness. For a fresh contrast, a few fresh raspberries or a sprinkle of sea salt adds a delightful pop beside the bars.
Side Dishes
Pairing these bars with a scoop of creamy vanilla ice cream or a dollop of whipped cream brings a cooling balance to the rich layers. A hot cup of coffee or a bold espresso also complements the bars’ chocolate and buttery flavors perfectly, making it a wonderful combo for dessert or afternoon treats.
Creative Ways to Present
Consider serving these bars as bite-sized squares on a dessert platter with colorful napkins and festive picks for parties. Layering the bars in clear glass trays lets guests admire those beautiful caramel and chocolate layers. You can even break them into rustic chunks and sprinkle over ice cream sundaes for ultimate indulgence.
Make Ahead and Storage
Storing Leftovers
After making your Butterfinger Caramel Bars with Layers of Sweet Crunch and Chocolate Recipe, store leftovers in an airtight container at room temperature for up to three days. Keeping them covered ensures they maintain that perfect balance of softness, caramel goo, and crunchy topping without drying out.
Freezing
If you want to make these bars ahead and save them for later, they freeze beautifully. Wrap individual bars tightly in plastic wrap and place them in a sealable freezer-safe bag. They can be frozen for up to three months without losing any of their deliciousness. Thaw at room temperature before serving.
Reheating
To bring back that just-baked warmth, gently reheat an individual bar in the microwave for about 15 to 20 seconds. This softens the chocolate and caramel layers, making every bite melt in your mouth anew. Avoid overheating to keep the textures distinct and delicious.
FAQs
Can I use different candy bars instead of Butterfinger?
Absolutely! While Butterfinger bars give a unique crispy peanut butter flavor, you can experiment with similar candy bars like Heath or Skor for a toffee twist. Just note the texture and sweetness will vary slightly.
Is it possible to use salted butter instead of unsalted?
Yes, but adjust the additional salt in the recipe accordingly or omit it entirely to avoid an overly salty flavor. Unsalted butter offers better control over the final taste.
How thick should I press the dough for the base?
Press the dough evenly to about a half-inch thickness to ensure a sturdy crust that holds the caramel and chocolate layers without becoming too dense or crumbly.
Can I make these bars gluten-free?
To make a gluten-free version, substitute the all-purpose flour for a gluten-free blend that measures cup-for-cup. The texture may be slightly different but still delicious.
What’s the best way to crush Butterfinger candy bars?
Place candy bars in a zip-top bag, seal it, and gently crush with a rolling pin or the back of a spoon until you achieve small, uneven pieces. Avoid powdering them to maintain that satisfying crunch.
Final Thoughts
Making these Butterfinger Caramel Bars with Layers of Sweet Crunch and Chocolate Recipe is like giving yourself permission to enjoy the best of all dessert worlds combined into one irresistible treat. The layers of flavors and textures bring smiles with every bite, and once you try them, they are sure to become a favorite in your baking repertoire. So grab those Butterfinger bars and get baking—you’re in for something truly spectacular!
Print
Butterfinger Caramel Bars with Layers of Sweet Crunch and Chocolate Recipe
- Prep Time: 15 minutes
- Cook Time: 40 minutes
- Total Time: 55 minutes
- Yield: 12 servings
- Category: Dessert
- Method: Baking
- Cuisine: American
Description
Butterfinger Caramel Bars combine a buttery crumbly base with rich caramel layers and crunchy Butterfinger candy pieces, topped with smooth melted chocolate for a decadent treat perfect for sharing.
Ingredients
Dough Base
- 1 cup (2 sticks) unsalted butter, softened
- 1 cup light brown sugar, packed
- 1 teaspoon vanilla extract
- 2 cups all-purpose flour
- 1/2 teaspoon baking powder
- 1/4 teaspoon salt
Caramel Filling
- 1/2 cup unsalted butter, cubed
- 1 cup caramel candies, unwrapped
- 1 (14-ounce) can sweetened condensed milk
Toppings
- 1/2 cup crushed Butterfinger candy bars (for caramel layer)
- 1 cup semi-sweet chocolate chips
- 1/2 cup crushed Butterfinger candy bars (for chocolate topping)
- Remaining reserved dough (one-third of the dough base)
Instructions
- Prepare the base: Preheat your oven to 350°F (175°C) and line a 9×13-inch baking pan with parchment paper, allowing an overhang for easy removal. In a large bowl, cream together the softened butter and light brown sugar until the mixture is light and fluffy. Stir in the vanilla extract. Add the all-purpose flour, baking powder, and salt, mixing until the dough becomes crumbly yet combined.
- Assemble the bottom layer: Press about two-thirds of the prepared dough evenly into the bottom of the lined pan to form the base layer. Reserve the remaining one-third of the dough for later use as the topping. Bake this base for 10-12 minutes until it turns lightly golden. Remove from the oven and set aside.
- Prepare the caramel filling: In a medium saucepan over low heat, melt the cubed butter together with the caramel candies, stirring constantly until the mixture is smooth. Gradually add the sweetened condensed milk, continuing to stir until the caramel mixture is fully combined and has thickened slightly.
- Layer the bars: Pour the warm caramel mixture evenly over the baked crust in the pan. Sprinkle 1/2 cup of crushed Butterfinger candy bars evenly over the caramel layer. Then crumble the reserved one-third of dough evenly on top, covering most of the caramel surface.
- Bake the bars: Return the pan to the oven and bake for 20-25 minutes, or until the topping is golden brown and edges become bubbly.
- Add the chocolate topping: After baking, immediately sprinkle the semi-sweet chocolate chips over the hot bars. Let them sit for 2-3 minutes until the chocolate softens, then spread it evenly using a spatula. Finally, sprinkle the remaining 1/2 cup of crushed Butterfinger candy bars on top of the melted chocolate.
- Cool and serve: Allow the bars to cool completely in the pan at room temperature, or refrigerate to speed up setting. Once firm, use the parchment paper overhang to lift the bars from the pan and slice into squares for serving.
Notes
- Use parchment paper for easy removal and cleaner cutting.
- Be patient when melting the caramel to avoid burning; keep heat low and stir constantly.
- You can refrigerate the bars for at least an hour for firmer slices.
- Store bars in an airtight container at room temperature for up to 3 days or refrigerate for up to a week.
- Crushing Butterfinger candy bars adds texture and signature flavor; crush by placing bars in a sealed bag and lightly pounding with a rolling pin.


